Recent Movies

Chilean Sea Bass

I am a proud member of the Foodie Blogroll and through them I was able to sample some product from Certified Steak & Seafood Company.

 A little bit about them in their words...


Our commitment to our customers is simple: Offer the highest quality products at the best price and back it with a 100% guarantee. We source directly with no 'middle man' making our supply chain the shortest in the industry. This allows us to maintain the highest quality standards all the way to your plate. On top of this, we sample all products at the moment of final packaging and have a world-renowned laboratory test for various types of adulteration or contamination. This ensures that the food you purchase from us is pure and safe.

Certified Steak and Seafood Company was formed by the three Frisch boys, Mark, Adam, and Steven; all of whom thought that everyone should be able to buy the highest quality steaks and seafood direct. The brothers experience comes from a three generation family owned wholesale company that is one of the largest seafood importers in America.

They have vast experience in sourcing and selling high quality seafood and meat products to the commercial trade — and bring you the same grade of products fine restaurants, resorts, hotels, and high-end retail stores demand – and at a direct price that gives you tremendous value for every purchase.
I was sent some of their Chilean Sea Bass to sample.  We found it to be quite delicious.  We prepared it simply by seasoning with salt and pepper and sauteing in a mix of olive oil and butter melted and heated to medium high.  We sauteed the fish on all sides and served on a bed of greens tossed with some balsamic vinegar and olive oil.

A bit about Chilean Sea Bass...

Chilean Sea Bass

A popular favorite in restaurants across America, the best Chilean Sea Bass now comes to your table courtesy Certified Steak and Seafood. Harvested and processed under close inspection of the National Marine Fishery Service, this soft, tender and smooth fish is a smart and healthy purchase. Impress your family or give as a memorable gift. Facts: Easy to Cook, Wild Caught, 3rd Party Certified, Product of Chile

Visit the Certified Steak & Seafood website! Use coupon FBR125D to get $25 off your order.


This sponsorship is brought to you by Certified Steak & Seafood Company who we have partnered with for this promotion..

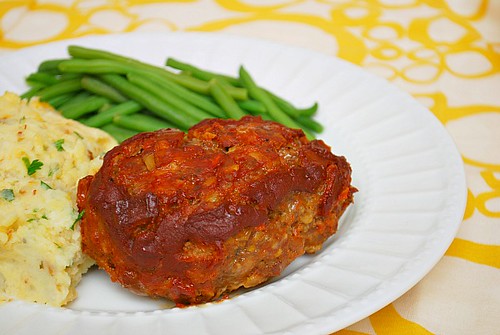
Smokey Mesquite BBQ Meatloaves

I'm all for making things easier for myself when it comes to getting dinner on the table. Sometimes that means getting meals prepped in advance so it only requires heating up in the oven/stovetop, other times it means utilizing my crockpot to have dishes slow cooking throughout the day while I'm out, and another way is to take advantage of ingredients that combine key items to use in a recipe. Take for example these Smokey Mesquite BBQ Meatloaves where cheddar cheese, breadcrumbs, and a blend of ground beef and pork were formed into savory loaves and topped with a smokey BBQ sauce. It's comfort food in a small package, made easy with Kraft Fresh Take...


I've recently teamed up with Kraft to participate in their Kraft Fresh Take Program. KRAFT Fresh Take understands that it can be difficult to create a quick and delicious meal for our families, so we've partnered together to help folks make something amazing and keep meal planning interesting. So what exactly is Kraft Fresh Take? 

Well, Kraft Fresh Take combines fresh natural cheeses and expertly seasoned breadcrumbs to use with your favorite proteins and ingredients creating fast and delicious entrée, appetizer, and side dish combinations. With three new flavors including Smokey Mesquite BBQ, Spicy Chipotle Cheddar and Classic Four Cheese, you’ll never run out of flavorful options. Find these flavors and the original Fresh Take varieties including Italian Parmesan, Cheddar Jack and Bacon, Savory Four Cheese, Southwest Three Cheese, Rosemary and Roasted Garlic, and Chili Lime and Panko in the dairy aisle and make something amazing tonight.


I was provided with the new Smokey Mesquite BBQ variety and as my recipe challenge, I needed to come up with something that uses a protein other than chicken.... and could be a dish that's perfect for an appetizer or lunch sandwich. Lastly, I needed to utilize my broiler to add a little crispness to the dish. With all that in mind, I created these Smokey Mesquite BBQ Meatloaves.

These were wonderful as an entree and leftovers make for a great sandwich filling! If you wanted to serve these up as an appetizer, form these into little meatballs and serve with BBQ sauce. Joel and The Baron were fans and we barely had any leftovers... so you know these were good! Stay tuned... I'll have another Kraft Fresh Take recipe I'm developing which I'll share next week and there will be an exciting giveaway coming up as well! 


Smokey Mesquite BBQ Meatloaves
1 pound ground beef
1/2 pound ground pork
1 package Smokey Mesquite BBQ Kraft Fresh Take

1 onion, diced
1 egg, lightly beaten
1 1/2 teaspoons salt
1/2 teaspoon pepper

2 (8-ounce) cans tomato sauce
3 tablespoons vinegar
3 tablespoons brown sugar
2 tablespoons Dijon mustard
2 tablespoons Worcestershire sauce
1/2 cup water, to thin sauce if necessary

Preheat oven to 350 degrees F.
Combine together the beef, pork, Fresh Take, onion, egg, salt, pepper, and 1/2 cup of the tomato sauce.

Form this mixture into mini individual loaves (or meatballs) and place it in a shallow pan.

Combine the remaining tomato sauce, vinegar, sugar, mustard, Worcestershire and the water (if too thick) to create the BBQ. Pour this sauce over the meatloaves. Bake for 1 hour, basting every 15 minutes with the pan juices.

Just before serving, place the loaves under the broiler for the BBQ sauce to caramelize just a bit.

*Kraft provided me with compensation to participate in creating a recipe. #KraftFreshTake

Lenovo S890 - 5inch Screen with 1.2 GHz Dual Core

Looking for a 5-inch smartphone with a budget price! the Lenovo S890 might be the right smartphone for you, with a price tag of Php 12,999 and a successor of Lenovo S880. The S890 have an 8MP Rear Camera with AF and LED Flash + 0.3MP FF Front Camera and 1.2 GHz Dual Core Processor compared to 5-Megapixel Camera and VGA front-facing camera and 1GHz of S880.

The main advantage of S890 is with its new 8MP Rear Camera with AF and LED Flash and 1.2 GHz Dual Core Processor and runs on Android OS Jellybean 4.1,  the rest of the specs. are the same with Lenovo S880.
Read more »

Ruota di salsiccia con le mele

Ancora Jamie Olivier, ancora una ricetta saporita e velocissima!

Per realizzarla vi occorreranno alcune salsicce, rosmarino fresco, aglio, vino bianco, 2 piccole mele rosse, zucchero di canna chiaro non raffinato.

Togliete lo spago che lega fra loro le salsicce e manipolandole delicatamente rendetele un unico lungo salsicciotto. Attorcigliatelo su se stesso e fermatelo con i rametti di rosmarino, precedentemente appuntiti oppure con degli spiedini in legno.
Spruzzateci sopra un po' d'olio extravergine, conditelo con una presa di sale e pepe e strofinatelo con cura in modo che s'insaporisca per bene.

Mettete la carne nella padella calda e continuate a girarla più o meno ogni minuto per circa cinque minuti, aggiungendo ancora qualche rametto di rosmarino ed un paio di spicchi d'aglio sbucciati e schiacciati. Spruzzate con vino bianco e lasciate evaporare.

Intanto accendete il forno e portatelo alla temperatura di 220°C. Trasferite la ruota di salsicce in forno per circa 15-18'.

Versate un goccio d'olio nella padella vuota e appoggiateci le mele, precedentemente tagliate a metà, in modo che si insaporiscano con il sughetto. Prendete le mele, cospargetele con pizzico di zucchero e mettetele in forno, portandole a cottura.

Servite la ruota di salsiccia calda, accompagnandola con le mezze mele.

Nella mia cucina
Coltello lama in ceramica bianca Classe
Tagliere Ferraboli
Padella Fusion Risolì

Chipotle Chicken Enchiladas

Make ahead meals - how often do you prepare them for yourself or family? I've found myself making them more often these days since The Baron has been so helpful in the kitchen lately. He's the master of preheating ovens and if I have a make ahead dish ready, he'll pop them in the oven to finish cooking or warm up while I'm commuting home. It's wonderful... to come home after a long day at the office, have dinner already in the oven, the table set and be able to decompress for a bit while The Baron plays with Joel. He's a keeper folks! :)  A recent make ahead meal I made was this dish for Chipotle Chicken Enchiladas. Tender shreds of chicken is combined with a zesty chipotle sauce and cheese as a filling for corn tortillas that are rolled up and baked with more sauce and cheese. Gloriously delicious and easy to make...

So for this dish, you can roast a whole chicken and debone to use the chicken in the recipe.... or you can take the easy route and use a store bought rotisserie chicken instead. I got about 3 cups of chicken, which was perfect for this recipe. However if you want more chicken in each enchilada, use 2 rotisserie chickens which may yield about 6 cups after deboning. The chipotle sauce was nice and zesty with a bit of kick. You can hold back on the chipotle if you want it more on the mild side - adapt it to your tastes! I included the make ahead directions below within the recipe too if you want to make this to freeze and enjoy later.

Chipotle Chicken Enchiladas
recipe adapted from Baking Bites

3 tbsp vegetable oil
1 tablespoon flour or gluten free flour blend*
3 tablespoons chili powder
1 teaspoon ground cumin
1/2 
teaspoon ground paprika
1/2 
teaspoon dried oregano
tablespoon minced chipotle peppers in adobo sauce (or more to taste)
12-oz tomato paste
3 cups chicken stock
1/2 teaspoon salt
3 cups cooked, shredded chicken (from rotisserie chicken)
1 1/2 cups shredded Monterrey jack cheese
12 medium-sized corn tortillas
Preheat the oven to 350F.
In a large bowl, combine the shredded rotisserie chicken, 1 1/2 cups enchilada sauce and 1/2 cup shredded cheese; set aside.

I
n a medium saucepan over medium heat,  add oil. When oil is hot, add flour and stir with a wooden spoon until mixture is smooth to create a roux.

Stir in the dry spices to the roux and add in chipotle peppers, tomato paste, chicken stock and salt. Stir to incorporate all the ingredients in the saucepan and bring to a simmer, lower heat and cook for 10-15 minutes, until slightly thickened.

Spread about 3/4 cup sauce over the bottom of a 9x13 baking pan , or if freezing as a make ahead meal, use a disposable aluminum pan or a microwave/dishwasher/oven safe baking pan. Place about 1/4 cup of the chicken mixture (or a little less) in each tortilla and roll it up like a cigar. Place in the baking dish and repeat with all remaining chicken and tortillas to create an even layer of rolled tortillas on the bottom of the pan. Top with remaining enchilada sauce and sprinkle cheese over the top.

At this point, you can cover and freeze the dish as a make ahead meal. Otherwise, cover the baking dish with aluminum foil and bake for 20 minutes. Remove foil and bake for an additional 10 minutes.
Allow to cool for at least 5 minutes before serving with guacamole and sour cream.

To bake the freezer meal, defrost completely and bake as directed above.
*Gluten free flour blend:
This is the best combination for my personal uses and has never failed me. I purchased a majority of the ingredients at an Asian market (at less than $.99/lb) and the other ingredients marked were Bob Red Mill brand. Cornstarch was Argo brand.

300 grams superfine brown rice flour (Bob's Red Mill)
250 grams sweet rice flour (Asian market)
150 grams tapioca flour (Asian market)
100 grams sorghum flour (Bob's Red Mill)
100 grams potato starch (Asian market)
100 grams cornstarch (Argo brand)


Whisk together the above flours and store in an air tight container. To use, measure out 140 grams for every cup called for in your favorite baking recipe (NOT yeast bread recipes.) Add 1/2 teaspoon xanthan gum for every cup used in the recipe as well to help with texture and binding. Voila! You can bake gluten free with confidence!

Chocolate Orange Sponge Cake

Darkness and Light

A lonely person in the middle of a forest. 
Henning Mankell in The return of the Dancing Master 


 I stare into my own eyes, at my own face, skin sallow under the glare of lights much too harsh. Age runs her silver fingers through my hair, mocking my every attempt at feigning less years than I actually own. My eyes slide across the stage behind me; men and women scurry about like rats forever chasing after some elusive deed in the simple act of looking busy, following the same old unwritten script they must follow every morning of the year. Poor souls. Those lights with their neon violence bounce off of every surface making the outside pewter gray even drearier yet somehow luminous in its natural softness; the stillness outside more infused with life and light than the living brightness inside.

Early morning haircut, settled into the deep faux-leather chair waiting for someone to come and yank, pull, tug; neck bent back in an unnatural position until the ache is too much to bear, water hot, cold, tepid awakening me from my trance. I leave feeling lighter, a sparkle of elation even as the skies above are drained of their own brilliant light. Where is the darkness that follows me about like a faithful dog at my heels or a secret admirer, always two steps behind?


Light thinks it travels faster than anything but it is wrong. 
No matter how fast light travels, it finds the darkness 
has always got there first, and is waiting for it. 
Terry Pratchett 


I fell asleep in darkness and woke in darkness. The skies pale, a brooding mist hangs from the discolored clouds, and blends with my mood; anger, self-doubt, haunting sadness. This darkness comes and goes without heed to the time of day, with no care as to the cast of the sky. The color black or shades of gray in brushstrokes across my soul. Days monotonous, skies the same monochrome as my spirit. I drag my body from my bed, stumble bleary-eyed, weary into the kitchen to begin my day. Coffee, rolls, jelly cold and sharp. The radio shouting wars and political battles broken only by the aggressive onslaught of music or fervently grinning announcers. I focus on the pages of a paperback and concentrate on the words, the story. Husband pokes me in the ribs, dog bounces around my feet, urging me to pay attention, making me smile. Yes, I can do this. Again. One more day.

A tale of darkness dwelling deep inside, a story of ghosts illuminated, transparent, intangible, as persistent as the devil. Unromantic darkness wrapped around me like clothing, or like a shard of glass buried under my skin. Light when it materializes comes from somewhere else. A sudden thought, a kind word, the face of a friend. My spirit, that eternal eddy of darkness, has a talent to suck the light, drain the skies of even the most minor hint of vibrancy. If I allow it. Sometimes it is easier, less energy, less effort to simply fall backwards into the abyss. We each of us allow ourselves to be lured by the simple luxury of waves of sadness or worry lapping softly, rhythmically against our ankles and miring us in the muck of our lives. Until a sliver of light pierces the surface.

When it is dark enough, you can see the stars. 
Charles Austin Beard 


And I bake. The darkness of chocolate, a shower of cocoa like earth sliding through a sieve. Egg whites whipped and beaten, thick, thicker, opaque phantoms unwilling to blend easily, putting up a fight, continually bobbing to the surface, imposing themselves. And the light. Bright like a Florida winter sky, radiating a clear, chilly warmth. Oranges. In this season of darkness, we crave the dense, the heavy, the rich. Yet break the spell with something light, moist, ethereal. A sponge cake. The heavenly darkness of chocolate to soothe the soul brightened with the essence of orange to lift the spirit.


Chocolate Orange Sponge Cake

1 ¼ cups flour
¼ cup cocoa powder
1 tsp baking powder
Scant ½ tsp salt and a small pinch for the egg whites
6 large eggs, separated
1 ¼ cups sugar
¼ cup cold water *
¼ cup freshly squeezed orange juice *
1 tsp vanilla extract
1 tsp orange extract (I use Nielsen-Massey) or 1 tsp finely grated orange zest
Couple of drops lemon juice for the whites, optional

* For a slightly stronger orange flavor, use ½ cup freshly squeezed orange juice in all, and no water.

Preheat the oven to 325°F (160°C). Have ready an ungreased 10-inch tube pan with removable tube.

Sift the flour, cocoa powder, baking powder and salt into a small bowl; stir or whisk to blend. Set aside.

Measure out the orange juice and the water. Replace the water with more orange juice for a more pronounced orange flavor.

Separate the eggs. Place the whites in a mixing bowl (plastic is preferable to glass); add a few grains of salt and a drop or two lemon juice to help stabilize the whites. Place the egg yolks in a large mixing bowl.

Beat the yolks with an electric beater on high speed until thick and pale. Add the sugar and continue beating until very thick and creamy. Beat in the vanilla and orange extracts.

Add the dry ingredients to the yolk/sugar mixture in three additions, alternating with the cold water in two additions, beating after each addition until blended, scraping down the sides as necessary.

Beat the whites on high speed (start on low speed for 30 seconds, then work up to medium then high speed) until very dense and stiff peaks hold.

Delicately fold the whites into the cake batter: begin by folding in about a third of the whites in order to lighten the heavy batter so as not to “break” the whites (knock out the air). Then fold in another third, then the final third. Make sure there are no pockets or lumps of whites left yet try not to overmix the batter.

Pour into an ungreased 10-inch tube pan and bake in the preheated oven for 55 - 60 minutes until set. Press very lightly on the surface of the cake; if the indentations remain and if the cake “hisses” when pressed – as if the batter is still a mousse and not yet set - then allow the cake to bake for an extra few minutes.

Cool inverted. Once the cake is cool, run a long-bladed knife or cake spatula around the sides and around the center tube to loosen. Lift the tube and cake out from the outer pan. Run a knife carefully underneath the cake to loosen from the bottom of the cake pan all around. Very carefully turn over, lift out the center tube, then upright onto a serving platter.


Serve dusted simply with powdered sugar or drizzle with a chocolate ganache. To intensify the orange flavor, use an orange scented chocolate (such as Lindt Excellence Orange Intense) to make the ganache.

HTC Butterfly Officialy Launch in Philippines for Php 32,190

HTC Philippines Officially launch the HTC Butterfly and Android Smartphone with 5-inch Screen in Philippine market last last Feb. 26, 2013 with a price tag of Php 32,190 you might say that its a bit pricey for a phone. But with its with a full HD 1080p display and Qualcomm Snapdragon S4 Pro processor (quad-core 1.5 GHz CPU plus full 2GB of RAM). I say this is one Bad Ass smartphone.
"HTC Butterfly is quite simply the most stunning smartphone HTC has created to date, with a display that people will fall in love with instantly,” said Lennard Hoornik, president, South Asia, HTC Corporation. "It offers the best experience in terms of performance, design and innovation, and is our most eagerly anticipated smartphone with rave reviews from media and consumers alike."
Read more »

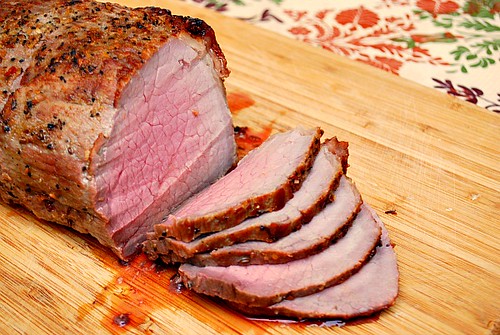
Perfect Sunday Roast Beef

Do you plan your meals for the week? For me, it's imperative I do so that we're not eating out of convenience from drive through windows or scrambling to find within my pantry, fridge or freezer to whip up. In fact, what helps me plan out my meals is incorporating the use of my crockpot and make ahead meals that I can warm up in the oven as I settle in after a long day. But my favorite day is Sunday. This is usually the day I can take my leisurely time to prepare a family meal with all the fixings and detail that I normally wouldn't have time for on a weeknight. I recently prepared ths Perfect Sunday Roast Beef which was not only comforting to enjoy with family and friends, but so easy. A beef roast is seasoned and roasted for a couple hours, making for a wonderful aroma to fill your home with deliciousness...
Sundays is one day I look forward to. Aside from starting that day with church, I usually have that day to take my time, relax and really enjoy my time either for myself or with friends and family. Dinners on Sunday will include a well rounded menu to feast on and recently, this roast beef was the star of the table. The spice and seasoning for the roast really brings out the flavor of the beef - not overpower it, which I really like. Then any bits and pieces help season the pan gravy which you can serve along side of the roast.
Perfect Sunday Roast Beef
recipe from Country Living

Roast:

1 (4-to-5-pound) boneless beef bottom round roast or rump roast
2 tablespoons Worcestershire sauce
1 teaspoon garlic powder
1 teaspoon onion powder
1 teaspoon paprika
1 tablespoon + 1/4 teaspoon coarsely ground black pepper
2 1/2 teaspoons coarse salt

Pan Gravy:
3 tablespoons all-purpose flour or gluten free flour blend
2 cups beef broth


Prepare the Roast: Adjust the rack to the bottom of the oven and heat to 425 degrees F. Blot any excess moisture from the roast, rub the Worcestershire sauce over the entire roast, and allow to marinate for 30 minutes, turning it twice.

Combine the powdered garlic, onion powder, paprika, and 1 tablespoon coarse-ground pepper in a small bowl; sprinkle the seasoning mixture evenly over the roast, pressing it, and let the roast stand for 20 to 30 minutes. Rub the meat with 2 teaspoons salt, place fat side up in a shallow roasting pan, and roast for 15 minutes.

Reduce oven temperature to 325 degrees F and continue to roast until the meat's internal temperature reaches 130 degrees F -- about 2 hours. Let the roast stand for 20 minutes before slicing.

Prepare the Gravy: Skim any fat from the liquid that remains in the roasting pan. Whisk the flour and 1/2 cup water together to a paste; set aside.

Scrape the drippings from the bottom of the roasting pan, add the beef broth, and stir over medium heat until the mixture begins to simmer. While continuously whisking, add the flour paste and bring to a boil.

Reduce heat to medium-low and let simmer for 4 to 5 minutes. If needed, add a little water to thin the gravy. Add remaining salt and pepper; serve warm.

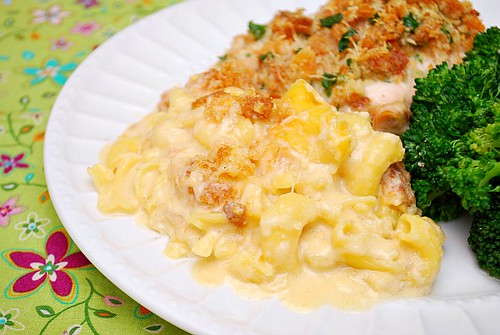
Mac & Cheese Casserole

Comfort food at it's finest, my friends! I don't know what it is, but kids just love macaroni and cheese. It seems adults do too. With my two boys, they share that common love and when I came across this recipe for Mac & Cheese Casserole, I knew I had to make it for them. It came out delicious with all it's cheesy glory and it was so comforting, it hit the spot. A creamy cheddar cheese sauce is baked with macaroni pasta in such a perfect ratio and the buttery breadcrumb topping gives the dish the perfect crunch for texture...

This is a little different from the traditional macaroni and cheese recipe in that there is a bit more cheese sauce to the pasta... making it a perfect dish if you love the cheese. I thought the ratio was perfect since I like a little more cheese than pasta. You can make this well in advance and even freeze it to enjoy later.

Mac & Cheese Casserole
recipe adapted from Brown Eyed Baker

1 lb. elbow pasta or gluten free macaroni
½ cup (4 ounces) unsalted butter
½ cup all-purpose flour or 70 grams gluten free flour blend*
1 teaspoon onion powder
1 teaspoon garlic powder
Salt & pepper, to taste
5 cups milk (whole or 2%)
4 cups (16 ounces) shredded sharp cheddar cheese
For the Topping:
1/2 cup breadcrumbs or 2 slices gluten free bread, processed into crumbs
1 tablespoon butter, melted
1 tablespoon minced fresh Italian parsley


1. Preheat the oven to 350 degrees F.
2. Cook the pasta according to the package directions for al dente. Drain and set aside.
3. In a large saucepan over medium heat, melt the butter. Whisk in the flour, then add the onion powder, garlic powder, salt and pepper. Gradually whisk in the milk. Cook, stirring constantly, until the sauce thickens and the mixture begins to boil. Add the cheese and stir until the cheese is melted. Add the cooked pasta and stir to coat the pasta.
4. Pour the mixture into a 9x13-inch baking dish. Mix together the bread crumbs, melted butter and parsley until all of the crumbs are moistened, and then sprinkle over the top of the pasta mixture.
5. Bake for 30 minutes, until golden and bubbly. Let stand 10 minutes and serve.

*Gluten free flour blend:
This is the best combination for my personal uses and has never failed me. I purchased a majority of the ingredients at an Asian market (at less than $.99/lb) and the other ingredients marked were Bob Red Mill brand. Cornstarch was Argo brand.

300 grams superfine brown rice flour (Bob's Red Mill)
250 grams sweet rice flour (Asian market)
150 grams tapioca flour (Asian market)
100 grams sorghum flour (Bob's Red Mill)
100 grams potato starch (Asian market)
100 grams cornstarch (Argo brand)


Whisk together the above flours and store in an air tight container. To use, measure out 140 grams for every cup called for in your favorite baking recipe (NOT yeast bread recipes.) Add 1/2 teaspoon xanthan gum for every cup used in the recipe as well to help with texture and binding. Voila! You can bake gluten free with confidence!

Bavarese alle noci con salsa al gorgonzola

Un altro splendido antipasto proposto dalla chef Laila Adamolli!

Per la bavarese vi occorreranno 200g di latte intero, 100g di panna fresca, 40g di gherigli di noci, 6g di colla di pesce e 3 tuorli.
Per la salsa invece servono 100g di gorgonzola dolce, 50g di gorgonzola piccante, 50g di mascarpone, 50g di latte intero.
Per completare: pan brioche o pancarrè in fette, gherigli di noce.

Tritate finemente le noci e, per realizzare la bavarese, unitele al latte e portate ad ebollizione. Separatamente battete i tuorli con il sale, aggiungete quindi il latte caldo con le noci e riscaldate il composto a bagnomaria, facendo attenzione a non superare gli 85°C; togliete dal fuoco, unite la colla di pesce precedentemente raffreddata, regolate di sale e pepe e lasciate raffreddare. Unite quindi la panna fresca montata, colate negli stampi per tortine Pavonidea e passateli in frigo per almeno due ore.

Al momento di servire preparate la salsa: mettete in una casseruola il latte, il mascarpone ed i due tipi di gorgonzola, lasciar sciogliere e insaporire con sale e pepe.

Servire le bavaresi sopra a pan brioche o pancarrè tostato e accompagnarle con la salsina al gorgonzola, decorando con gherigli di noce.


Nella mia cucina

Globe TATTOO BLACK - Experience the Tattoo Black magic in more areas nationwide

TATTOO BLACK, the only luxury broadband in the market with its breakneck speed and premium services, now gets even better as its Long Term Evolution (LTE) coverage expands to more areas nationwide allowing more subscribers to experience the ultimate broadband experience.


Tattoo Black has also partnered with leading luxury online portal shop AVA providing new subscribers with shopping credits to satisfy their premium lifestyle.
Read more »

Gadget ON: Libratone Live - Wi-Fi Speaker Review

If you love music and love to share it without the hassle of wires, then you will love Libratone Live and it's the perfect Wi-Fi speaker for you. Not only the designed is elegant, the speaker really sound great


Libratone Live is a Wi-Fi Speakers that is designed to work with Apple Air Play,  DLNA - Android and Windows and on their Libratone PlayDirect echnology is wireless sound on-the-go and works in conjunction with both AirPlay and DLNA.

Want to know how.... Read on.
Read more »

Off To The Autism Resources Miramichi AGM!


I am thrilled to be heading off shortly for Miramichi to attend the Annual General Meeting  of Autism Resources Miramichi Inc. at 139 Duke St. Starting at 12:00 noon.   ARM has been kind enough to offer me an opportunity to speak and provide an overview of the history of autism advocacy in New Brunswick over the past decade and to address our most pressing need .... adult autism care.  

Lila Barry of ARM is a former Autism Society New Brunswick president and was one of our most active and effective advocates for autism specific early intervention and school services and accommodation.  It will be great to see Lila and her family and other friends from the Miramichi.   I will head up early so that I can drive slowly and hopefully see some opportunities to take a few pictures along the way. 

If anyone from the area reads this blog I hope to see you at noon today!

Promo ON: Lenovo S880 for just Php11,500! on Limited Time

From Php 14,999 when the Lenovo S880 was launch last year, this smartphone with huge 5 inch capacitive multi-touch screen is now available now for only Php 11,500 on a limited time, that is until Feb. 28, 2013
The Lenovo S880 is one the first Android Phones to features 1GHz CPU and Wireless FM transmitter, the promo prize could be a hint that Lenovo will be releasing another 5-inch device with an updated features and specs. Like the one that they have a teaser picture of it here

Read more »

Easy Layered Carrot Cake

I'm on a cake roll! Last week I shared a Bananas Foster Cake recipe using an easy technique of baking the cake as one thin layer on a baking sheet as opposed to baking in traditional cake pans. Using the same technique, this Easy Layered Carrot Cake is what really sparked the whole idea of making easy layer cakes. A tender spice cake is swirled with shredded sweet carrots and studded with golden raisins with alternating layers of tangy cream cheese frosting. How could anyone say no to a slice of this?!...

If you ask The Baron, he says the only reason why one should have cake at all is because it serves as a vehicle for frosting. He's definitely a frosting type of guy and he especially enjoyed taste testing  the frosting before using it on the cake! I will have to say that when it comes to this cake, I'm torn between what I like better - cake or frosting.

The cake is perfectly spiced and the shredded carrots and raisins add just the right amount of sweetness. With the tender crumb and how easy it was to layer, I really liked how this cake turned out - even as gluten free. As for the frosting, it had this wonderful tang, thanks to the use of powdered buttermilk. That made all the difference and it was especially creamy, smooth and so easy to use on the cake.

What's your favorite part of cake - the cake itself or the frosting?!


Easy Layered Carrot Cake

recipe adapted from Baking Illustrated


1 3/4 cups all-purpose flour or 245 grams gluten free flour blend + 1 teaspoon xanthan gum*

2 teaspoons baking powder
1 teaspoon baking soda
1 1/2 teaspoons ground cinnamon
3/4 teaspoon ground nutmeg
1/2 teaspoon salt
1/4 teaspoon ground cloves
1 1/4 cups light brown sugar (8-3/4 ounces)
3/4 cup vegetable oil
3 large eggs
1 teaspoon vanilla extract
2 cups shredded carrots
1/2 cup golden raisins


Set a rack to the middle of your oven and preheat to 350-degrees. Grease an 18”x 13” rimmed baking sheet, line it with parchment paper, and then grease the parchment paper too.  
In a medium bowl, add together flour, baking powder, baking soda, cinnamon, nutmeg, salt, and cloves. Whisk together until combined.

In another large bowl add sugar, oil, eggs, and vanilla. Use a whisk to combine until smooth. Gently stir in carrots and raisins with a rubber spatula until evenly distributed. Finally, add in flour mixture and fold in with your rubber spatula, but only until it is just combined.


Transfer batter onto baking sheet. Use an offset spatula to smooth surface and ensure the batter is an even depth. Bake for about 15 minutes, rotating half-way through baking, until the center is firm when touched.


Allow cake to cool for 5 minutes in pan set on a wire rack. Flip the cake onto a wire rack then immediately re-flip back onto a second wire rack. The cake should be resting with the parchment side down. Allow the cake to cool for another 30 minutes.

Frosting ingredients:

16 tablespoons unsalted butter, room temperature (2 sticks)

3 cups confectioners’ sugar (12 ounces)

1/3 cup buttermilk powder
2 teaspoons vanilla extract
1/4 teaspoon salt
12 ounces cream cheese (1-1/2 packages), cold & cut into 1 tablespoon portions
2 cups chopped walnuts, lightly toasted (8 ounces)

While the cake is cooking, toast your pecans and chop them coarsely. Cut your cream cheese into 12 equal-size pieces, but keep it refrigerated until you are ready to use in step 3.

Add the butter, sugar, buttermilk powder, vanilla extract and salt to the bowl of a standing mixer. 


Mix using the paddle attachment on low-speed for 2 minutes; scrape down the bowl as necessary.
Increase mixer speed to medium-low, then add cream cheese one piece at a time. Mix for 2 minutes until the frosting is smooth.


To Finish:
Put cooled cake on a cutting board and cut into equal halves cross-wise. Cut length-wise so that you have 4 equal pieces, measuring about 6″x8″ each.
Cut out a 6″x8″ rectangle out of stiff cardboard. Put the first of the cake piece on the cardboard. Use a spatula to spread 2/3-cup of frosting over layer. Repeat with two more layers.


Place the final cake layer on top. Remove any crumbs from your spatula and frost the top with a 1-cup of frosting.

Frost the sides of the cake with your remaining frosting. You just need enough frosting to hold the chopped pecans, not completely hide all the crumbs.

Holding the cake with one hand, use your other hand to gently press the chopped walnuts onto the side of your cake. Refrigerate for at least 1 hour before serving.


*Gluten free flour blend:
This is the best combination for my personal uses and has never failed me. I purchased a majority of the ingredients at an Asian market (at less than $.99/lb) and the other ingredients marked were Bob Red Mill brand. Cornstarch was Argo brand.

300 grams superfine brown rice flour (Bob's Red Mill)
250 grams sweet rice flour (Asian market)
150 grams tapioca flour (Asian market)
100 grams sorghum flour (Bob's Red Mill)
100 grams potato starch (Asian market)
100 grams cornstarch (Argo brand)


Whisk together the above flours and store in an air tight container. To use, measure out 140 grams for every cup called for in your favorite baking recipe (NOT yeast bread recipes.) Add 1/2 teaspoon xanthan gum for every cup used in the recipe as well to help with texture and binding. Voila! You can bake gluten free with confidence!

Chairs

An Object of Desire

Nature is by and large to be found out of doors, a location where, 
it cannot be argued, there are never enough comfortable chairs. 
Fran Lebowitz 


Winter never does settle in in Nantes. Not really. A midnight flurry, maybe, quite possibly, hidden from prying eyes. Wake to white in the morning and by noon it is gone. The days have been quite temperate, an early spring, and as cabin fever sets in we leave the safety and four walls of home and take to the streets.


Settle in, chair faced out, legs stretched, jutting awkwardly forward, and let the street theater begin. That old French tradition of long lazy moments at a sidewalk café beckons as the sun splatters across the pavement, warming our upturned faces. People scurry through town, in front of us, oblivious. People stroll hand in hand, nonchalantly, swallowed up in their own thoughts.


Each day I discover something new of my town. Look up and see art; scribbles on the walls, crazy mosaics glued to the sides of buildings, a game of hide-and-seek. Or the buildings themselves, architecture gone wild, architects let loose. Vibrant colors and odd shapes crisscross in our paths, sculptures in our line of vision, yelling for attention.


It isn't so much what's on the table that matters, as what's on the chairs. 
William S. Gilbert 


And then there are all of these chairs. Who thinks of a chair? Inanimate objects, purely functional. Where to place our seat when desiring….a seat? Colors, shapes, living sculptures. Who notices the benches, the stools, the seats and chairs in rattan, wicker, plastic, metal? Slats, woven, wooden, sturdy, rickety? There they sit, pretty as a picture, blocking my path, inviting me, anyone to stop, sit, relax. And do we really need a reason – a coffee clutched, a book opened, a croque-monsieur lying placidly on a plate – to pull up a chair?


A place for quiet reflection, a good book, a crisp newspaper, a shared meal or a lively discussion. Sit facing each other, eyes locked, leaning in across the table, the world shut out, forgotten. Sit side by side, shoulder to shoulder, watching anyone but your companion, watching the world go by, an unobserved observer.


Common sense says that chairs and tables exist independently of 
whether anyone happens to perceive them or not. 
Charles D. Broad 


I am enthralled. I begin to snap all that I see and there are still more waiting patiently to be discovered.


Sitting quietly, doing nothing, spring comes, and the grass grows by itself 
 – Zen proverb


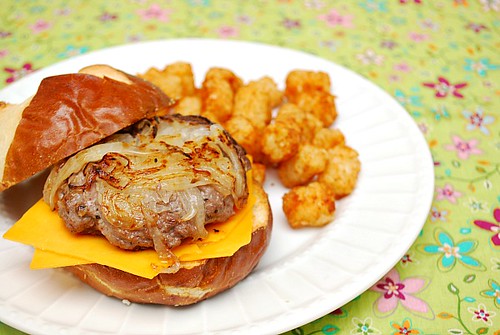
Oklahoma Fried Onion Burgers

Burgers... do you have a favorite way to top or dress them up? I personally prefer my burgers with cheese. It adds to the richness and well, cheese makes everything better in my book. Apparently in Oklahoma, burgers with onions is very popular. I've never been to Oklahoma but to get a taste of their burgers, I found this recipe for Oklahoma Fried Onion Burgers. These burgers have caramelized onions formed right into the patty, making it especially delicious, flavorful and juicy. Of course, with a slice of cheese, it's fully complete and a great way to enjoy a burger...

If you're a caramelized onion fan, these are the burgers for you. There is a technique to these burgers. For the onions, it's key to thinly slice them, salt them and let the excess water from the onions draw out. The result is dry onions that will adhere to the patty well and they'll caramelize perfectly too. It's definitely worth the time to take that step so don't skip it! Also, these are burgers made on the stovetop - grilling these may not do so well.

Oklahoma Fried Onion Burgers
recipe adapted from Cook's Country
               
1 large onion, halved and sliced 1/8 inch thick
all purpose steak seasoning (or salt & pepper to taste)
1 pound 80 percent lean ground beef  
1 tablespoon unsalted butter
1 tsp vegetable oil
4 slices of cheddar cheese
4 hamburger or pretzel buns, buttered and toasted

Combine onion and 1 teaspoon salt in a bowl and toss to combine; transfer to a colander and let sit for 30 minutes, tossing occasionally.  Using tongs, transfer onions to clean dish towel, gather edges and squeeze onion dry.  Season with 1/2 tsp pepper.

Divide onion mixture into 4 separate mounds on a rimmed baking sheet.  Portion beef into 4 lightly packed balls and season with steak seasoning (or salt and pepper). Place beef balls on top of onion mounds and flatten beef firmly so that the onion adheres and patties measure 4 inches in diameter.

Melt butter with oil in a  12-inch skillet over medium heat. Using spatula, transfer patties to skillet, onion side down, and cook until onion is deep golden brown and beginning to crisp around the edges,  6-8 minutes. Flip burgers, increase their heat to high and cook until well browned on the 2nd side, about 2 minutes.  Place 1 slice of cheese on each bottom bun.  Place burgers on buns, add desired toppings and serve.

Labels

أحدث المواضيع

 
Support : Creating Website | Johny Template | Mas Template
Copyright © 2013. Entries General - All Rights Reserved
Template Created by Creating Website Published by Mas Template
Proudly powered by Blogger