Recent Movies
‏إظهار الرسائل ذات التسميات weight watchers. إظهار كافة الرسائل

Badly needed Energy Bars

I guess most of you, or at least anyone who follows me on Facebook and Twitter, know that I have taken up running.  It’s only been a couple of months but I am really loving it.  Now I am only running between 2-4 miles 3 or 4 days a week, but add that to the walking and weights I have been doing and I need some energy help during some workouts. 

You also know that we eat very few processed foods with granola bars and energy bars being the exception.  At least now you can buy them with no artificial sugars or dyes…anyway, I need something that I can grab at 5:00AM when I head out the door for my run and these are just about perfect.

DSC_0259

Energy Bars Adapted from The Food You Crave by Ellie Krieger

Ingredients

  • Cooking spray
  • 1 cup quick cooking rolled oats
  • 1/2 cup roasted sunflower seeds
  • 1/2 cup toasted wheat germ
  • 1/4 cup whole-wheat flour
  • 1/2 cup dried apples
  • 1/2 cup pecans
  • 1/2 cup pitted dried dates (I used ones with sugar but would like them without next time)
  • 1/2 cup powdered nonfat dry milk
  • 1/2 teaspoon ground cinnamon
  • 1/3 cup pure maple syrup
  • 2 large eggs

Directions

Preheat the oven to 350 degrees F. Coat a 9 by 13-inch baking pan with cooking spray.

Place all ingredients except the syrup and eggs in a food processor and pulse until the mixture is finely chopped. Add the syrup and eggs and pulse until the mixture is well combined. It will resemble a coarse paste.

Transfer to the baking pan and spread evenly pressing in with your fingers. Bake until lightly browned and just done, about 20 minutes. Allow to cool for about 15 minutes and then cut into 24 squares.

These can be stored in an airtight container at room temp for about 3 days or wrap individually and freeze for up to  3 months.

***I really loved these and so did the family.  I think that this is a really versatile recipe and am looking forward to playing with the dried fruits and nuts used in it.  The recipe calls for almonds and apricots so I may try that with some cranberries thrown in…endless possibilities!

***WW points has it as a 3 point recipe but I think with all of the good fats and whole grains in it it is worth the splurge!

signature

Haystacks in honor of National White Chocolate Day…

This is not a sponsored post, just something I tried and really, really liked. 

Also with it being National White Chocolate Day how could I not?

DSC_0251

Now I know these don’t look like much (white cookies on white plate…Doh!) and I am almost embarrassed to post a “recipe” for them but these are really, really good and something we all loved even though none of us really, really love white chocolate!

Fiber One Haystacks

Ingredients:

1 sleeve of Fiber One Cereal (it comes two sleeves to a box)
1-11 oz bag of Nestle white chocolate chips

Directions:

Melt morsels in the microwave until melted and smooth
Stir in one sleeve fiber one until well coated.
Working quickly, using a teaspoon, spoon  out onto a waxed paper-lined cookie sheet into 48 small mounds.
Refrigerate until set. Store in an airtight container in refrigerator or freezer (I use a zip-loc bag).

Number of Servings: 48  WW Points 1 per serving!!!

***You can use any type of chip that you like for this, chocolate chip, butterscotch chips etc. but we have found that the best are the white chocolate!!!

signature

Pasta All'Amatriciana

Sunday dinner for us has usually included a big meal that generally takes a ton of prep and a long time to cook as it is the one day of the week that we don’t have anything going on.  This week was going to be different and I wanted to try a recipe that would help me to feel really good the next morning when I went for my run!  This recipe fit the bill perfectly and one I will be adding to our regular rotation. The balance of salty, smoky and sweet is amazing and I loved the whole wheat pasta that we used with it!

This is a traditional Roman dish and the next time I make it I want to use some good pancetta in it.  I used bacon and loved it so can only imagine how great it would be with pancetta!!!  I think I will also add some red pepper flakes to give it a spicy edge to it…

DSC_0228 

Pasta All'Amatriciana (How to Cook Everything by Mark Bittman)

Ingredients:

2 tablespoons olive oil
1/4 to 1/3 cup minced good bacon or pancetta
1 small onion, minced
1 (28-ounce) can whole plum tomatoes, drained
1 pound linguine, spaghetti, fettuccine, or other long pasta
Salt and freshly ground black pepper to taste
Freshly grated Parmesan or Pecorino Romano cheese
Minced fresh parsley leaves

Directions:

1. Bring a large pot of water to a boil.
2. Place the oil and bacon or pancetta in a medium skillet over medium heat. Cook, stirring, until the meat becomes crisp, about 10 minutes.
3. When the meat is done, remove it with a slotted spoon, leaving the fat in the pan. Add the onion and cook, stirring, until it browns. Turn off the heat for a minute (this will reduce the spattering when you add the tomatoes).
4. Crush the tomatoes with a fork or your hands and add them to the pan. Turn the heat to medium-high. Cook, stirring occasionally, until the tomatoes break down and the mixture becomes saucy, about 10 to 15 minutes.
5. Meanwhile, salt the boiling water and cook the pasta until it is tender but firm. Drain it, toss it with the sauce, and top with the reserved bacon, the Parmesan, and the parsley. Serve, passing additional Parmesan at the table.

***This is really such a perfectly balanced dish!  Salty, sweet and acidic all in one forkful.  I did use whole wheat linguine instead of white and 2 can of diced and drained tomatoes.

***I calculated this without the Parmesan and Romano cheese as you can sprinkle this on yourself and it came out to 7 WW points based on 4 servings.

signature

Malaysian Shrimp Salad

It’s hot here.  Very, very hot here.  Yes, I know that I live in SW Florida and that the summers are really hot but this is hot even by Floridian standards.  Every single day the heat index is up over 105F and that just makes it really challenging when trying to do anything other than lounge in a pool all day!  Gotta give my oldest credit though!  She is still riding and racing BMX even in all this heat…

When I saw this salad on the Weight Watcher site I knew I had to make it.  Minimal heat being used and if you use precooked shrimp no heat being used at all.  Perfect summer food for me!!!  I would have used the fresh mangoes from my Mango tree but unfortunately my dog and possums got all of them faster than I could…

salad

Malaysian Shrimp Salad

Ingredients:

1 pound(s) cooked and chilled shrimp, peeled, coarsely chopped (about 2 cups)  
1 cup(s) mango(es), diced
1 cup(s) cucumber(s), diced 
2 Tbsp mint leaves, fresh, minced 
1 tsp green hot chili pepper(s), serrano-variety, minced (or to taste) I used a jalapeno
1 Tbsp olive oil, extra-virgin
1 Tbsp fresh lime juice 
2 tsp lime zest 
1/2 tsp kosher salt 
1/2 tsp sugar   

Directions:

  • In a medium bowl, combine shrimp, mango, cucumber, mint and pepper.
  • In another bowl, whisk together oil, lime juice and zest, salt and sugar; toss with shrimp mixture. Yields about 1 cup shrimp salad per serving.
  • **I thought this was delicious but maybe a little flat tasting…maybe more salt? 

    ***WW points is 4 based on a 1 cup serving

    signature

    Ricotta Pancakes with Strawberries and Syrup

    So I woke up bright and early this morning as seems to be my M.O. lately and pulled some bacon out of the freezer.  My thought was that I would make breakfast sandwiches when everyone woke up.  This was one of those lazy Sunday mornings that I NEVER seem to get and I was just planning on enjoying it.  The girl’s woke up and crawled into bed with us (I was reading and Tony was still sleeping).  Dogs climbed in and it got way too crowded for me so I got up to tackle breakfast…

    That’s when the plans all changed.  I wanted something fresh and light.  After the requisite 5 minutes of standing in front of my fridge wondering what to do (I know you do it too…), my plan came to me!

    DSC_0157-1

    Light and Fluffy Ricotta Pancakes with Strawberries and Strawberry Syrup (adapted recipe from the kitchn)

    Fluffy Ricotta Pancakes
    makes 8

    1 cup ricotta cheese
    3/4 cup flour
    1/2 teaspoon baking powder
    1 1/2 tablespoons sugar
    pinch salt
    3/4 cup milk
    3 eggs, divided
    1/2 teaspoon vanilla

    Set ricotta in a fine mesh strainer about 30 minutes before you start cooking, to drain off excess liquid. We used fresh ricotta from Whole Foods that was pretty dry. If you are using a commercial brand that's runny, you may want to drain it longer (or make your own).

    Whisk together flour, baking powder, sugar, and salt in a bowl. Combine ricotta, milk, egg yolks, and vanilla in a separate bowl.
    Beat the egg whites in an electric mixer until stiff. Add the dry ingredients to the ricotta and milk mixture, stirring gently until just combined. Whisk in a small amount of the egg whites to lighten the batter, then fold in the remaining whites.

    Heat a griddle over medium-high heat, and brush the surface with butter. Use a ladle or measuring scoop (we used a 1/3 cup measure) to pour batter onto the griddle. Cook pancakes for about 3 or 4 minutes, then flip, cooking until both sides are golden brown.

    Changes I made: 

    Less sugar. I was making syrup and strawberries for these so I reduced the sugar to 1 1/2 tsp.

    Did not brush the griddle with butter.  I cooked them without any oil or fat and they turned out beautifully.

    For the topping all I did was slice up some strawberries and add some sugar to them and let them sit.  How much sugar?  Not sure so just do it to taste (if you want them sweeter add more…).

    The syrup I “made” was just a jar of Smucker’s Simply Fruit Seedless Strawberry micro waved for about 40 seconds until it was a syrup like consistency!

    ***The pancakes on their own are 6 Weight Watchers points add your topping to it and total it out for a total point value.

    You may have noticed that it’s been a long while since I last posted.  I am really working hard to change this!  I spent an incredibly busy month doing things for BMX.  We travelled one weekend out of the past month but had another weekend of clinics and then the State Championship in which Kyra is now ranked 8th for 9 year old rookies in the state of FL.  I was just totally uninspired in my cooking through all of this and really didn’t think you would want to see the sandwiches that we were sometimes forced to eat for dinner!  Hopefully I am now back and feeling the inspiration!

    signature

    Black Bean Hummus…

    I was hunting around the other day waiting to pick the girls up and I stumbled across a recipe for Black Bean Hummus.  Turns out a friend of mine has also been requesting a recipe from me for hummus.  I gave her my original one that is here, but this black bean one sounded really good to me and i couldn’t get it out of my head.  I love black beans and who doesn’t love a nice garlicky hummus???

    This came together in a matter of minutes in my food processor.  I think stirring up the tahini took more time the the recipe!

    DSC_0082-1

    Black Bean Hummus (from All Recipes)

    Ingredients:

    1 clove garlic
    1 (15 ounce) can black beans; drain and reserve liquid
    2 tablespoons lemon juice
    1 1/2 tablespoons tahini
    3/4 teaspoon ground cumin
    1/2 teaspoon salt
    1/4 teaspoon cayenne pepper
    1/4 teaspoon paprika
    10 Greek olives

    Instructions:

    • Mince garlic in the bowl of a food processor.
    • Add black beans, 2 tablespoons reserved liquid, 2 tablespoons lemon juice, tahini, 1/2 teaspoon cumin, 1/2 teaspoon salt, and 1/8 teaspoon cayenne pepper; process until smooth, scraping down the sides as needed.
    • Add additional seasoning and liquid to taste.
    • Garnish with paprika and Greek olives.

    ***I calculated this for WW as 2 points for a 1/4 cup serving…that’s not including the yummy pita that you HAVE to have with it!

    signature

    Strawberry Scones

    DSC_0057-3redo

    This isn't the first time I have made these scones and it will certainly not be my last. I love this recipe and cannot thank Jasmine of Confessions of a Cardamom Addict enough!!! She came to my rescue one day when I tweeted looking for a good scone recipe for a school project that my daughter was working on.

    Turns out to be the easiest and most forgiving recipe I have come across in a long, long time!

    DSC_0066-1

    Scones – from "Tamasin's Kitchen Bible" by Tamasin Day-Lewis (converted to imperial measures)

    Yield 12-24 (depending on how you shape them)

    Ingredients:

    3 1/4 cup (450g) All Purpose Flour
    1/2 tsp salt
    1/4 cup (50g) sugar (+ more for sprinkling)

    6 Tbsp (85g) butter (cold)

    and either

    2 tsp baking soda + 2 tsp cream of tartar + 1-1/4 cup (300ml) buttermilk, sour milk, yoghurt or sour cream (mixed together)

    or

    2 tsp baking soda + 4.5 tsp cream of tartar + 1-1/4 cup (300ml) homo milk (full fat) (mixed together)

    1/2 – 3/4 cup strawberries(100g) or other fruit or dried fruit

    Directions:

    • Preheat oven to 425F/220C and line a baking tray with parchment
    • Sift together flour, salt and sugar. Grate/rub in butter and quickly mix in liquid until spongy.
    • Lightly knead until smooth and roll to about 1/2" – 3/4" (1-2 cm) thickness.
    • Cut out scones with a 2" cutter...or whatever size you want, set on prepared tray for 10 minutes. Lightly brush with egg/milk wash and sprinkle with sugar.
    • Bake for 15 minutes or until a nice golden brown. Cool for about 5 minutes on sheet pan then move to rack to cool.

    ***I have made these with blueberries and also dried cranberries with some lemon zest added in. Truly a wonderfully versatile recipe!

    ****For anyone following Weight Watchers this is a 4 Point item based on the 15 that I made using non-fat plain yogurt.

    signature

    Homemade Caesar Salad

    I am a huge fan of Caesar Salads.  When hubby had a restaurant I think that I lived on the Caesar salad that was topped with blackened shrimp.  Since the restaurant has gone I have desperately been in search of a Caesar Salad fix.  This has been going on for about 8 years…:(

    Then the other night we were watching TV and there seemed to be nothing on.  Turned on the Food Network and started watching “The Best Thing I Ever Ate” and Alex was talking about her favorite Caesar Salad from a Steakhouse somewhere.  Can’t really remember all the details because I was totally and one hundred percent lost once I saw the tableside Caesar being made.  At that moment I just knew it had been way too long since I had had a perfect Caesar.

    DSC_0065-1 

    Homemade Caesar Salad

    Ingredients:

    1/2 head of chopped romaine lettuce
    1 egg yolk (the egg is raw, I like to use cage free, hormone free and antibiotic free eggs when I am eating them raw)
    ground pepper to taste
    1/2 tsp dry mustard powder
    2 tsp chopped anchovy
    2 tsp garlic, minced
    1/2 tsp Extra Virgin Olive Oil
    2 tsp Worcestershire Sauce
    1/4 cup Parmesan Cheese, grated
    1-1/2 tsp fresh squeezed lemon juice

    Directions:

    1. Clean lettuce thoroughly and dry in a salad spinner or in towels. Refrigerate until crisp, at least 1 hour or more.
    2. In a jar combine egg yolk, pepper, mustard, anchovy, garlic, olive oil, Worcestershire sauce, lemon juice, and 2 Tbsp of the Parmesan cheese. Whisk until well blended.
    3. To assemble, place torn lettuce leaves in a large bowl. Pour dressing over the top and toss until well coated. Add the remaining Parmesan cheese.  Serve immediately!

    This Caesar Salad was perfect.  Lots of garlic and lemon.  Just the way I like it!  Hubby loves his with some bacon added in.  Tailor this to your taste but definitely try it!

    And here is the real kicker…this is only 5 WW Points!!!!

    signature

    Homemade (quick) Refried Beans

    The other day I was making tacos for dinner when I realized that I had used up the last can of refried beans.  See, I really, really like beans and on my tacos they are one of my favorite things!  I was crushed…

    I didn't have time to go to the grocery store so I jumped online to see how easy they would be to make them myself.  Guess what?  If you plan ahead you can make them real easy…only problem was I had not planned ahead and had about 10 minutes to figure this out!  I had no time to soak beans (even a quick soak would take too long).  So !reached for a can of pinto beans and went to work.  DSC_0051
    This is one of my favorite ways to eat refried beans: Whole Wheat tortilla, refried beans, jalapenos, tomatoes and fresh cilantro!

    Refried Beans

    Ingredients:

    1 can of pinto beans, rinsed and drained (I try to find the canned beans that have the fewest ingredients in them.  A lot of beans have added sugar???)
    1/4 cup water
    1/2 tsp granulated garlic
    1 tsp cumin
    1 tsp chili powder
    1 small can of chopped green chilies

    Directions:

    • Drain and rinse pinto beans.
    • Place in small saucepan over medium heat and add water.
    • As the beans heat mash them with a potato masher or fork. 
    • Add all spices and stir well
    • Add green chilies and cook on low heat stirring frequently until they reach your desired consistency.

    I really need to try this with pinto beans that have been soaked overnight but I just never seem to be able to plan that far ahead…hehehe!

    ****Did you know that a 1/4 cup serving of fat free refried beans only have 1/2 a WW Point????  That whole lunch above is only 1-1/2 WW Points!

    signature

    Orange-Cilantro Black Bean Salad

    My Mom sent me an email today reminding me that I had not posted since last week some time…funny Mom! One of my problems is we are so busy that by the time I get to sit and eat I am so hungry and it is pitch black out. I have lights but am not satisfied with the pictures when I use them. Also my meals have been somewhat less than inspiring. Mostly based on what I have on hand and that hasn't really been anything fancy. But today I was flipping through sites and came across this recipe from Weight Watchers. It sounded wonderful and…I had everything on hand!!!

    P1020435

    Orange-Cilantro Black Bean Salad (Weight Watchers Online)

    Ingredients:

    1/2 tsp olive oil
    1/2 medium red onion(s), cut into thin wedges
    2 medium garlic clove(s), finely chopped
    1/4 tsp ground cumin
    1 cup(s) canned black beans, rinsed and drained
    2 Tbsp cilantro, fresh, chopped
    2 tsp red wine vinegar
    2 medium orange(s), peeled, segmented
    1/8 tsp table salt, or to taste
    1/8 tsp black pepper, or to taste

    Directions:

    In a large skillet, warm oil over medium-high heat. Add onion; sauté 2 minutes. Add garlic and cumin; cook 1 minute more.

    Stir in black beans and cook just until heated through. Transfer bean mixture to a medium-size bowl and stir in cilantro, vinegar and oranges. Season to taste and serve. Yields about 3/4 cup per serving.

    ***If you are counting points this is described as being 4 servings at 3/4 cup each. They give it 1 weight watchers point. Not bad for a filling lunch!

    Vegetable Frittata

    I prepared this vegetable frittata for lunch tomorrow so that I wouldn't have to hit up the usual fast food suspects while at work. I'm really glad I made this to bring in because its not only nutritious, but colorful too! With this being a week of our vegetarian & pescatarian friendly meals, I like the ability to exercise some creativity. This recipe is actually adapted from a frittata recipe from Cook's Illustrated. I've added more vegetables, decreased the amount of cheese and oil and made it Weight Watchers friendly! To complete my lunch, I plan on eating this with a light salad.
    Vegetable Frittata
    serves 2

    3 large eggs
    1 tablespoon fat free half & half
    salt & pepper to taste
    1 teaspoon olive oil
    1 cup chopped fresh broccoli florets
    1/4 cup diced yellow pepper
    1/4 cup chopped carrrots
    1 clove garlic, minced
    1 cup oven roasted grape tomatoes (* see note)
    2 teaspoons grated parmesan cheese

    Preheat oven to 350 degrees.

    Whisk eggs, half-and-half, salt, and pepper in medium bowl until well combined. Set eggs aside.

    Heat oil in 10-inch nonstick ovensafe skillet over medium heat; add garlic broccoli florets, carrots, bell peppers and salt and cook until beginning to soften, 6 to 8 minutes.

    Stir in the roasted grape tomatoes into the egg mixture; add egg mixture to skillet and cook, using spatula to stir and scrape bottom of skillet, until it starts to set, about 2 minutes. Shake skillet to distribute eggs evenly; cook without stirring for 30 seconds to let bottom set.

    Slide skillet in the preheated oven and bake until the top of the frittata is cooked and the eggs are no longer wet, about 5-7 minutes. Remove skillet from oven and let stand 5 minutes to finish cooking; using spatula, loosen frittata from skillet and slide onto platter or cutting board. Cut in half and serve. (Each half is one serving.) Sprinkle a teaspoon of grated parmesan cheese over each serving before eating.

    * The original Cook's Illustrated recipe called for sun dried tomatoes packed in oil. In an effort to cut out fat and calories where I can, I took some grape tomatoes, tossed with a light spritz of cooking spray, a sprinkle of truffle salt and roasted them on a baking sheet in a 450 degree oven for about 30 minutes.

    Weight Watchers Point Value = 5 points per serving


    I'm also submitting this recipe to The Heart of the Matter blogging event highlighting slimmer recipes! Check out the round up coming soon!

    Eggplant Parmesan

    Over the weekend at a baby shower, I had some eggplant parmesan that was delicious! It was so good that I wanted to make some more but there was one little challenge - my husband *hates* eggplant. With that in mind, I decided tonight is when I would reintroduce eggplant to him. He hated it until tonight and this is a huge culinary milestone! There have been so many recipes I've wanted to make using eggplant but I had to pass them up since making those dishes are difficult for only one person who'll eat it. But no more... we have embraced the eggplant!

    What dish did it? This eggplant parmesan was what warmed my husband up to eggplant. It's a recipe that's flavorful and if an eggplant hater has grown to enjoy it, I'm sure that's telling of how good this is! I halved the recipe below since it's only for the two of us and it was perfect with leftover to enjoy later.

    Eggplant Parmesan
    recipe adapted from MyRecipes.com
    serves 8

    1/2 cup dry white wine
    1 tablespoon dried basil
    1 tablespoon dried oregano
    4 (8-ounce) cans no-salt-added tomato sauce
    1 (28-ounce) can no-salt-added whole tomatoes, undrained and chopped
    1 (6-ounce) can tomato paste
    2 garlic cloves, minced
    1 (1-pound) eggplants, cut crosswise into 1/4-inch slices
    1/4 cup water
    3 egg whites, lightly beaten
    1 1/4 cups Italian-seasoned breadcrumbs
    1/4 cup grated Parmesan cheese
    Vegetable cooking spray
    1 1/2 cups (12 ounces) shredded part-skim mozzarella cheese
    Fresh oregano sprigs or fresh basil, chiffonade (optional)


    Combine the wine, dried herbs, tomato ingredients and garlic in a large saucepan; bring to a boil. Reduce heat, and simmer, uncovered, 20 minutes.
    Place eggplant in a large bowl; add water to cover, and let stand 30 minutes. Drain well; blot dry with paper towels. Combine 1/4 cup water and egg whites in a shallow bowl for the eggwash. Combine breadcrumbs and Parmesan cheese for the breading; stir well. Dip eggplant in egg white mixture, and dredge in breadcrumb mixture.
    Place eggplant on a baking sheet coated lined with parchment paper, and broil 5 minutes on each side or until browned. Set eggplant aside.
    Spread half of tomato mixture in bottom of a 8 x 8-inch baking dish coated with cooking spray. Arrange half of eggplant over sauce; top with half of mozzarella cheese. Repeat layers with remaining sauce, eggplant, and cheese.
    Bake at 350° for 30 minutes or until bubbly. Let stand 5 minutes before serving. Garnish with fresh oregano sprigs or basil, if desired.

    Weight Watchers Point Value = 6 points per serving

    Salmon & Fruit Spring Mix Salad

    This week we're starting the Chinese New Year by changing our eating habits slightly. We decided to incorporate more meatless meals and seafood in our diet as my husband doesn't eat beef. Although it's not quite vegetarian, we're opting for pescetarian meals every other week. So you'll find some pescatarian & vegetarian friendly meals in my blog in the posts to come. You'll also notice that I'll be including Weight Watcher points in my recipe posts for those who may be following the Weight Watchers Program.

    For lunch today, I made a filling salad with salmon. Salmon is one of my favorite types of fish since it works well with various marinades, especially those of Asian flavors. For my salad, I prepared a salmon fillet to place on a bed of spring mix lettuce greens. For color and sweetness, I added some fresh fruits which made it an even more filling and satisfying meal.

    Salmon & Fruit Spring Mix Salad
    serves 1

    1/8 salmon fillet
    cooking spray
    salt & pepper to taste
    pinch of dill seasoning
    1 tablespoon fresh lemon juice
    1 1/2 cup spring mix lettuce greens
    1/2 cup drained mandarian oranges
    1/2 cup sliced fresh strawberries
    1/2 oz fresco Mexican crumbling cheese
    2 tablespoons Asian sesame dressing


    - Heat a small skillet over medium high heat.
    - Season your fillet with salt, pepper and dill seasoning.
    - Spray your skillet with cooking spray.
    - Place seasoned fillet in the hot skillet and cook 2-3 minutes on each side.
    - Squeeze the lemon juice over the fillet in the skillet.
    - Top your lettuce with the cooked salmon.
    - Sprinkle the oranges, strawberries and cheese around the fillet.
    - Drizzle the dressing over the salad.

    Weight Watcher Points Value = 6 points


    I've also submitted this recipe/post to Chefspiration's Healthy Choices Giveaway who's featuring healthy recipes. I chose to submit this recipe because it's not only colorful but combines a nice balance of fruit, vegetables and lean protein. Be sure to check out the upcoming round up on Chefspiration's blog!

    Whole Wheat Pancakes made lighter...

    Whole Wheat Pancakes made even better!

    I am pretty excited today! Not only is one of my most favorite people in the whole world coming to visit me (yep that's you sis!) but I just found a way to make my Whole Wheat Pancakes even better!!!

    First off my sister flies in this morning to spend a week just hanging out with T, me and the kids. How lucky am I? This means shopping, lunches, long walks on the beach and just hanging out with the one person in the world that knows me best (and still likes me!).

    Now onto the incredible pancakes!


    Whole Wheat Pancakes (Weight Watchers point value...2 pancakes=3 points)

    Ingredients:

    2 cup whole wheat flour
    2Tbsp sugar
    2 Tbsp baking powder
    1 tsp salt
    2 eggs
    1-3/4 cup milk
    4 Tbs unsweetened apple sauce
    1 mashed banana

    Directions:

    Mix all the dry ingredients together in a large bowl.

    In a smaller bowl mix the banana, applesauce, milk and eggs.

    Add wet ingredients to the dry and stir until just moist.

    Cook on an electric griddle or fry pan.

    This makes about 16 pancakes but the girls like the heated up the next day or even cold from the fridge as a snack! Recipe halves well for less pancakes!

    As Always...

    Happy Entertaining!!!

    Judy
    www.nofearentertaining.com

    Stuffed Cabbage Rolls or Golumki's

    Stuffed Cabbage Rolls with Meatballs!

    Oh this has been a ling time coming. I have truly wanted to make these things since my friend Jenn The Leftover Queen Posted about them last February. At that time I even bought a cabbage but it went bad and I threw it out :(!!!

    This time when my CSA box had cabbage I knew I was gonna do it...but how? Guess what I did? I Twittered it! I love my Twitter friends. They respond to my every food whim in the form of recipes galore!!!

    With all of the great recipes I got I was able to pick and choose and I also emailed T's Mom and got the original...

    Coconut & Lime
    The Leftover Queen
    Sunday Nite Dinner
    Kalofagas
    To Market, To Market with San Diego Foodstuff

    They all had great things about them. T. wanted his memories though and that didn't involve dill, Asian or dried fruit (bookmarked and will happen!!!)

    One thing I did find out and can't wait to try is that you can eliminate the boiling process by freezing the head of cabbage for 24 hrs or longer. My idea is to buy one and freeze it until you need it. When it thaws the leaves will be limp like that lettuce that gets accidentally frozen! Easy to roll without all the boiling...I am truly all about simplicity!!!

    Here is the recipe that I ended up with and it seemed to fulfill T.'s memories of all of the Polish and Italian women's cabbage rolls or golumki's that he grew up with!!!

    Stuffed Cabbage Rolls (Golumki's)

    Ingredients:

    2 lbs lean ground beef (90% lean)
    1-1/2 cups rice, cooked and cooled
    1/2 cup onion, chopped
    1/4 cup celery, chopped
    5 garlic cloves, minced
    1 tsp salt
    1/2 tsp pepper
    1 tsp garlic powder
    1/2 tsp onion powder
    29 oz can of tomato puree
    2 Tbsp brown sugar
    15 oz can of sauerkraut, drained and rinsed

    Directions:
    • Boil a pot of water large enough to hold your head of cabbage. Once boiled immerse cabbage in water for about 2 minutes. Remove from water and let drain. When cool enough to handle gently remove leaves. When you reach the point where they aren't soft enough dunk back into your still boiling pot of water. Repeat process until you have all the leaves you need. Alternate method that I want to try is freezing the head of cabbage for about 24 hrs. Allow to thaw. Leaves should be soft like lettuce leaves that you have accidentally frozen. Would save this tedious step.
    • Mix the beef, rice, onion, celery, garlic, salt, pepper, garlic powder, onion powder and 3 Tbsp of the tomato puree.
    • In a large roasting pan or casserole dish (I used a 10X15 glass pan) covered with aluminum foil, evenly spread the sauerkraut as the bottom layer.
    • Lay your cabbage leaf on a clean work surface and fill with an amount that will be easily rolled. Not too full or it may split during cooking. Roll for the stem side in folding in edges as you go.
    • Lay seam side down on the sauerkraut. Continue with this until you are out of leaves.
    • I had some extra filling left over so I made little meatballs and stuffed them in spaces in the pan. Doesn't have to be perfect!
    • Mix 2 Tbsp of brown sugar into the tomato puree and pour over rolls and meatballs. Add about 1/2 can of water to the edges.
    • Bake at 350 degrees for about 2 hrs or until everything looks nice and tender and the meat is cooked through!
    I made these in the afternoon and refrigerated them. When T. got home he popped them into the oven and reheated them.

    He said they were perfect. My girl's loved them. Even my tomato hater. She just ate the inside but that's good enough for me!

    These worked out to be 6 weight watchers points per serving calculated at 8 servings. Not a bad meal!

    As Always...

    Happy Entertaining!!!

    Judy
    www.nofearentertaining.com

    Look at my breakfast!


    I am trying to eat healthier in the New Year. Christmas and New Year's did me in this year and my energy was not where it needed to be. By eating healthier and lighter meals I am rapidly correcting this! Having my wonderful CSA box right now helps a whole bunch but you can do this with food from your grocery store too!

    Today it was an egg scrambled with Asian spinach and tomato. Yesterday it was the same egg scrambled with leftover pizza sauce and cremini mushrooms.

    All I do is reach in the fridge and find something fresh and cook it up. When it's just about cooked I add the beaten egg and there you have it. Breakfast in less than 5 minutes!!!

    Weight Watchers - 1 egg is 2 points. Most veggies are 0

    As Always...

    Happy Entertaining!!!

    Judy
    www.nofearentertaining.com

    Stuffing It... In a Healthy Way!

    Today was a dreary, cold, wet and cloudy day... a typical fall night in Chicago. It definitely called for a warm and comforting dinner, but I wanted it to also be healthy. (Often times, warm and comforting means starch heavy and sauce laden meals in our house!)

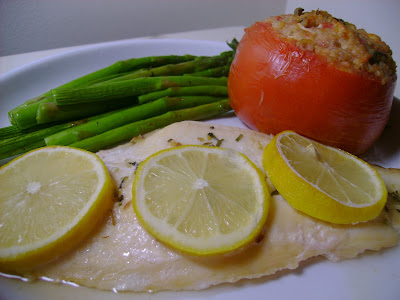
    It's been a few nights since we had some seafood so I baked some flounder fillets, seasoned with rosemary, garlic and lemon slices. To go along with our flounder, I roasted some asparagus spears and served up these stuffed tomatoes:

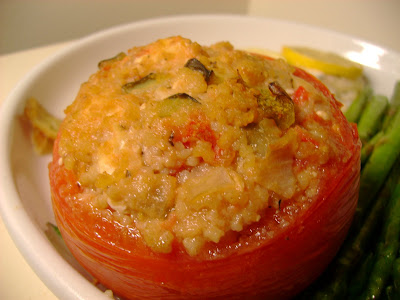
    Couscous Stuffed Tomatoes
    courtesy of Weight Watchers Best Eats Cookbook
    1/2 cup water
    3/4 teaspoon salt
    1/4 teaspoon black pepper
    1/3 cup whole wheat couscous
    6 (7 oz) beefsteak tomatoes
    1 tablespoon extra virgin olive oil
    1 small zucchini, diced
    1 small onion, chopped
    1/2 small red bell pepper, diced (I omitted)
    1 teaspoon dried basil (I used fresh)
    1 (15.5 oz) can great northern beans, rinsed & drained
    1 (8 oz) can tomato sauce
    1/3 cup crumbled fat free feta (I used regular feta)

    Bring the water, 1/4 teaspoon of salt, and 1/8 teaspoon of the pepper to a boil in a small saucepan. Add the couscous, cover, and remove from the heat. Let stand 5 minutes, then fluff with a fork.

    Meanwhile, cut a thin slice from the top of each tomato and reserve (I accidentally threw it out when I prepared it!). With a spoon, carefully scoop out the seeds and pulp, leaving a tomato shell. Reserve the pulp for a soup or sauce.

    Heat the oil in a large nonstick skillet over high heat. Add the succhini, onion, bell pepper, and basil; cook, stirring frequently, until crisp-tender, about 5 minutes. Add the beans and tomato sauce; cook until slightly thickened, about 2 minutes. Remove from the heat and stir in the couscous, cheese, and remaining salt & pepper. Spooon about 3/4 cup of the filling into each tomato shell and cover with the reserved tomato tops.

    * I baked these stuffed tomatoes in a 350 degree oven for 20-25 minutes to roast them as well. This can be made in advance and frozen too!

    Serves 6
    Serving size: 1 stuffed tomato
    WW Points value: 3 Points

    Weight Watchers Blueberry Muffins

    The following recipe was featured in my Muffin Swap event. You can read about it and view other muffin recipes HERE.


    Ann's Weight Watchers Blueberry Muffins
    Recipe adapted from HERE

    2 cups whole wheat flour
    3/4 tsp salt
    1/2 tsp baking powder
    1/2 cup Splenda
    1/4 cup sugar free table syrup
    1 tsp vanilla extract
    1 small carton egg beaters
    1 cup fresh blueberries
    1/2 cup fat free milk
    1/2 cup unsweetened applesauce
    Butter Flavored Pam

    Preheat oven 350. Sift all dry indredients together. Set aside. In separate bowl, beat Splenda, syrup and vanilla. Add egg beaters slowly. Beat until fluffy. Alternately, add flour mixture and milk, beginning and ending with flour mixture. Fold in blueberries. Spray muffin pan with Pam and fill pan for 10 muffins. Bake for 25-30 mins or until toothpick comes out clean. Enjoy!

    WW: Eggplant Rollatini with Tomato Basil Sauce

    For dinner tonight, I had a special guest over... my 6 year old nephew. To keep things healthy yet kid friendly, I made something similar to a lasagna (a favorite of my nephew's) - Eggplant Rollatini. Little did he know that it was completely vegetarian! I served this with a baked bone-in chicken breast, seasoned with italian seasoning. Thankfully it was a hit and he enjoyed it... so did the rest of the family.

    *Tip: You could make this in advance and is freezeable too, just like a traditional lasagna!

    Eggplant Rollatini with Tomato Basil Sauce
    courtesy of Weight Watchers Best Eats cookbook

    1 medium eggplant, unpeeled, cut lengthwise into 8 (1/4 inch slices)
    1 teaspoon olive oil
    3 garlic cloves, chopped
    2 cup canned crushed tomatoes
    4 tablespoons chopped fresh basil
    1 small zucchini, diced
    1/4 cup minced onion
    1/2 cup part skim ricotta cheese
    1/2 cup chopped fresh parsley
    1 large egg
    3 tablespoons grated Parmesan cheese
    1/4 teaspoon salt
    1/4 teaspoon black pepper

    Preheat the oven to 450F degrees. Spray a large rimmed baking sheet with nonstick spray. Arrange the eggplant on the baking sheet in one layer and spray lightly with nonstick spray. Bake until browned, about 10 minutes on each side. Reduce the oven temperature to 400F degrees.

    To make the sauce, heat the oil in a medium saucepan over medium hat. Add 2 cloves of the garlic and cook, stirring occassionall, until fragrant. about 30 seconds. Add the tomatoes and 2 tablespoons of the basil; bring to a simmer. Cook until thickened, 10 minutes.

    To make the filling, spray a large nonstick skillet with nonstick spray and place over medium-high heat. Add the zucchini, onion, and remaining 1 garlic clove; cook until the vegetables are softened, 5 minutes. Transfer to a medium bowl; allow to cool slightly. Stire in the ricotta, parsley, egg, remaining tablespoons basil, 2 tablespoons of the Parmesan, the salt and pepper.

    To assemble the rollatini, spray a 1 1/2 quart baking dish with nonstick spray. Spread 3 tablespoons of sauce in the dish. Place 2 tablespoons of the filling at one end of each eggplant slice. Beginning at the filled end, roll up the eggplant slices and place, seam side down, ina single layer in the baking dish. Spoon the remaining sauce over the rollatinil sprinkle with the remaining 1 tablespoon Parmesan. Bake until heated through completely, about 25 minutes.

    Serves 4
    Serving size: 2 rollatini
    WW Points value: 3 Points

    Labels

    أحدث المواضيع

     
    Support : Creating Website | Johny Template | Mas Template
    Copyright © 2013. Entries General - All Rights Reserved
    Template Created by Creating Website Published by Mas Template
    Proudly powered by Blogger