Recent Movies
‏إظهار الرسائل ذات التسميات Yeastspotting. إظهار كافة الرسائل

Chocolate Prune Bread for Bread Baking Babes

ARTISAN BREAD IN FIVE FOR THE BABES

The smell of good bread baking, like the sound of lightly flowing water, 
is indescribable in its evocation of innocence and delight...
- M.F.K. Fisher, The Art of Eating


It has never been a secret that I am a huge fan of Jeff Hertzberg and Zoë François’ Artisan Bread in Five Minutes a Day books. I now own three of them. I adore my cookbooks and have hundreds, but there are very few that I actually cook and bake from regularly, over and over again. And the Artisan Bread in 5 books are definitely among that cherished minority.


My first attempt at yeast bread was a Thanksgiving long ago when I lived one floor up from my brother in that ratty apartment building in Brooklyn. What I thought would be an exciting, glamorous job in the world of art brought me to New York City just after college and happy I was when the apartment above Michael opened up just as I began my own search for living quarters. I moved my meager belongings and my wide-eyed, rather naïve young woman’s dreams into that one bedroom flat. As we both loved to cook and bake, we spent quite a bit of time together preparing meals, cakes and holidays. Our first November as neighbors, that first November of my new life, we decided to prepare a full-fledged traditional Thanksgiving dinner, yet another first for me.

I had absolutely no understanding of yeast and yeast baking. I had no concept of allowing yeast to activate, being patient while dough rose. Needless to say, my breads, no matter how beautiful the braid, no matter how glossy the crust of that Challah, the bread itself was hard and dry. My brother and I laughed heartily together as we sliced and ate the Challah, which we did, of course. Memories are hazy, but I imagine that the following morning, Michael turned that stale Challah into tender, luscious French toast. Or whizzed it in his mixer where it became breadcrumbs or stuffing. Embarrassed and disappointed by my endeavor at making yeast bread, it was years before I attempted it again. Yet my lesson had not been learned, for I once again found myself with rock-hard rolls. Oy. Not a proud moment in my culinary history. Only years later when my sons and I decided to prepare a wonderful, formal Friday night Shabbat meal every week and I began making a Challah each Friday morning, did I slow down and figure it all out.

My very first Challahs and very first yeast breads.

If only I had had a copy of Artisan Bread in Five Minutes a Day. Seriously. Jeff and Zoë offer a slew of incredible recipes for no-knead bread. Yes, that’s right, no knead. Simply put all of the ingredients in a bowl, mix and allow to rest and rise. Or place the bowl of dough for a slow rise in the refrigerator and pull off balls of dough as needed, shape, allow to rest and rise and pop in the oven. No-knead….no-fail. I have had perfect bread every time. And as you can see, their perfect recipe is now my go-to recipe for Challah and Focaccia.


When Jeff and Zoë sent me a review copy of The New Artisan Bread in Five Minutes a Day, I immediately volunteered to be Kitchen of the Month for the Bread Baking Babes. I wanted to share and talk about their new book. And I wanted to select a recipe that was different from what I usually bake in my own kitchen, a new challenge. There are so many new recipes that I want to try – the Pletzel, the Blueberry-Lemon Curd Ring, the Pumpernickel Date and Walnut Bread – but I ended up choosing this wonderful Chocolate Prune Bread.

I loved the bread. The dough itself was stickier, almost cake like, than most bread doughs and, once baked, it is difficult to decide (as I pull off and eat chunk after chunk) whether it is a bread or a dessert, but it is so delicious. Light and fluffy like a bread, the addition of chocolate chips (I made one loaf with and one without and I highly recommend that you do add them) and prunes making this loaf the ideal snack.


January’s Bread Baking Babes recipe is Chocolate Prune Bread from The New Artisan Bread in Five Minutes a Day (revised & updated edition) by Jeff Hertzberg, M.D. and Zoë François. You too can bake along with us and be a Bread Baking Buddy. Simply bake this Chocolate Prune Bread, blog it – don’t forget to mention being a Bread Baking Buddy and link back to this blog post! Then send me the link (please include your name and your blog’s name) by January 29th to jamieannschler AT gmail DOT com with January Bread Baking Buddy in the subject line and I will add you to the roundup at the end of the month.

For now…. definitely check out if and how the other Babes managed their own Chocolate Prune Bread:

Bake My Day – Karen
Bread Baking Babe Bibliothécaire – Katie
blog from OUR kitchen – Elizabeth
Feeding my enthusiasms – Elle
girlichef – Heather
Lucullian Delights - Ilva
Living in the Kitchen with Puppies – Natashya
My Kitchen In Half Cups – Tanna
Notitie Van Lien – Lien


I want to share this wonderful Chocolate Prune Bread with Susan of Wild Yeast for her weekly Yeastspotting!

To get to know Jeff and Zoë and for more great recipes, visit the Artisan Bread in 5 website.

According to Zoë and Jeff, this bread goes really well with either a glass of milk or… a glass of Armagnac (of course… prunes and Armagnac!). And just think of all the possibilities for this wonderful dough with its tender, fluffy, just chewy crumb and delicate chocolate flavor… use your imagination!


CHOCOLATE BREAD RECIPE (Chocolate Chocolate Chip Bread)
Makes two 2-pound loaves. This recipe is easily doubled or halved.

2 ½ cups (565 ml) lukewarm water (100°F or below)
¾ cup (170 ml) vegetable oil
1 Tbs (0.35 oz / 10 g) granulated yeast
1 to 1 ½ Tbs (17 to 25 g) kosher salt – * use less if using fine table salt, more if using coarse salt
1 cup (7 ounces / 200 g) sugar
5 ½ cups (1 pound, 11 ½ ounces / 780 g) all-purpose flour
¾ cup (3 ounces / 85 g) dark, unsweetened cocoa powder
1 ½ cups (6 ounces / 170 g) bittersweet or semisweet chocolate chips - * can omit for the chocolate prune bread

Mixing and storing the dough:

Mix the oil, yeast, salt and sugar with the water in a 6-quart bowl or a lidded (not airtight) food container.

Mix in the flour, cocoa powder and the chocolate chips without kneading, using a spoon or heavy-duty stand mixer (with paddle). If you are not using the machine, you may need to use wet hands to incorporate the last bit of flour.

Cover (not airtight) and allow to rest at room temperature until the dough rises and collapses (or flattens on top), approximately 2 hours.

The dough can be used immediately after the initial rise, though it is easier to handle with cold. Refrigerate the container of dough and use over the next 5 days. Beyond the 5 days, freeze the dough in 1-pound (about 450 g) portions in airtight containers for up to 4 weeks. When using frozen dough, thaw in the refrigerator for 24 hours before using, then allow the usual rest and rise time.

Chocolate Prune Bread:
Makes one 1 ½ pound loaf

1 ½ pounds (about 680 g – the size of a small cantaloupe) of the Chocolate Chocolate Chip Bread dough
Softened unsalted butter for greasing the pan
2 ounces (55 g) high-quality bittersweet chocolate - * use 6 ounces (170 g) if you did not add chocolate chips to the original Chocolate Bread Dough
¾ cup chopped pitted prunes
Egg wash (1 egg beaten with 1 Tbs water)
¼ cup (50 g) sugar for sprinkling over the top of the bread and preparing the pan

On baking day, generously grease an 8 ½ x 4 ½ - inch (22 x 11 ½ cm approx) nonstick loaf pan with butter, sprinkle some sugar evenly over the butter and shake the pan to distribute.

Dust the surface of the refrigerated dough with flour and cut off a 1 ½ pound piece. Dust the piece with more flour and quickly shape it into a ball by stretching the surface of the dough around to the bottom on all sides, rotating the ball a quarter turn as you go. Using a rolling pin, roll out the dough into a ½ - inch-thick (scant 1 ½ cm) rectangle. As you roll out the dough, use enough flour to prevent it from sticking to the work surface but not so much as to make the dough dry.

Sprinkle the chocolate and chopped prunes over the dough and roll up the dough jelly-roll style to enclose them. Fold the dough over itself several times, turning and pressing it down with the heel of your hand after each turn. This will work the chocolate and prunes into the dough; some may poke through.


With very wet hands (I floured my hands instead), form the dough into a loaf shape and place it into the prepared pan. Allow to rest and rise for 90 minutes, loosely covered with plastic wrap.


Preheat the oven to 350°F (180°C). A baking stone is not required and omitting it shortens the preheat.

Using a pastry brush, paint the top of the loaf with egg wash and sprinkle with sugar. Bake the loaf in the center of the oven for 50 to 60 minutes until firm. Smaller or larger loaves with require adjustments to baking time.


Remove the bread from the pan and allow to cool on a rack before slicing and eating.

Modern Lardy Cake

HOLIDAY BAKING

Here he produced a decanter of curiously light wine, and a block of curiously heavy cake, 
and administered instalments of those dainties to the young people. 
– Charles Dickens, A Christmas Carol 


Once again, we arrive in that limbo between Hanukkah and Christmas. I wait for hints, curious to know what his decision will be. Sons wiggle around us looking for clues that something is afoot, bringing up (once again) the topic of gifts. Hanukkah has come and gone in its own very quiet way amid subtle displays of joy, bringing us together as a family, and now we watch as the city dresses itself in its Christmas finest bringing a bit of cheer to the drab seasonal weather. But whether or not we will be celebrating Christmas this year has yet to be decided.


Although Hanukkah is our holiday and we do not celebrate Christmas, there is definitely something about this season conducive to baking. It could be the misty skies the color of tarnished pewter, the occasional spatter of rain against the windows, keeping us inside, cozy and comfortable with little to do except write and bake. It could be the glittering of the Christmas lights in the streets below, brilliant and gay against the dark night sky that makes us feel all romantic and warm inside, desiring nothing more than being able to offer something freshly baked, redolent of cinnamon, heady with chocolate and rum, or spiced and studded with fruit and nuts, to those we love.


Winter rolls in on a wave of misty white, the fog hanging heavy and cruel over the city. No joy, no snow. Sunshine playing hide and seek with the rain. The icy chill penetrates every pore of one’s body and no matter what one does, no matter how many blankets or pairs of socks the cold simply seeps in. But the gloom and gray of a midwinter day doesn’t dampen my excitement for the onset of this, my favorite season and all of the festivities. The holiday spirit seems to have arrived and settled in, as the bustling marketplace is alive with shoppers pushing their way towards stalls overflowing with seasonal treats. Garlands of gold and silver sneak their way in, Santas pop up on velvet hills of snow and visions of sugarplums, smoked salmon and oysters dance in my head. The first strains of Winter Wonderland and Rudolph signal the beginning of the Christmas season.


But chez nous, one never knows if it will be Scrooge, the Grinch or one of Santa’s merry elves that will arrive at our house, be blown in over the threshold on a blast of cold air. When the boys were little, Hanukkah flowed into Christmas easily when and if their grandparents would be visiting. Once or twice, a tree had indeed been lugged home, set up and decorated by three sets of hands. Once, when the boys were in high school, the Christmas spirit whipped Clem into a merry frenzy and he dragged a lumbering evergreen (or so we thought) back to our apartment, forcing our hand, demanding we not be the only ones of his acquaintance not to participate in the seasonal festivities. We decorated that tree, shared special Christmas Eve and New Year’s Eve meals around it, merry and bright, and then waited post-holidays for Clem to drag it away. Until we were sliding around in puddles of sharp pine needles weeks later. And arguing over whose responsibility it was to remove the thing.

And once in a while, husband dons his proverbial Santa hat and his jolly disposition and announces that this year he would like Christmas. For someone with Scrooge-like tendencies when it comes to most holidays, it must mean that he is feeling somewhat wistful and nostalgic. It must mean that he needs the warmth of gathering us, wife and sons, closely around him, shutting out all worries and cares for the time of a long, slow, peaceful meal. It means that he desires nothing more than spending a long afternoon and evening in joy and conversation, laughter and indulgence, hilarity and delight.

Yet, no matter his choice, the season encourages baking. Something about the cold and inclement weather has me craving cinnamon-rich treats, neither too rich nor too sweet, that go perfectly, merrily, with a cup of coffee either for breakfast or snack. Homey, warming, comforting. Yet with a touch of the festive.


And so this month’s Bread Baking Babe’s challenge was perfect! Our hostess for December is the lovely Lien of Notitie Van Lien and she chose a Modern Lardy Cake, which I found to be utterly perfect for the season. Traditionally, the Lardy Cake is (obviously) made with lard, but this version is made with butter. Layers of dough reveal swirls of dried fruit-studded cinnamon-nutmeg sugar, creating a laminated bread traditionally English and eaten for special occasions, holidays and harvest festivals. So as simple as it may seem for those of us who are used to really rich holiday treats, it is a bread… or teacake reserved for a celebration. I loved this Lardy Cake just eaten as is, or dipped in café au lait while husband spread his with lots of jam.


Take the folding and rolling slowly and carefully, trying to keep the dough from tearing and too much filling oozing out. Several Babes found as I did that a total of 3 rather than 4 folds and rolls was enough. I decided to bake mine in a small rectangular pan instead of a round one. This was quite a fun bread to make and so delicious to eat that I know I will be making it over and over again. A winner!

If you would like to bake the Modern Lardy Cake with the Babes, you can earn your Bread Baking Buddy badge and be included in the round up at the end of the month. Just head over to Lien’s blog for details.

Meanwhile, check out all of the Babes’ Modern Lardy Cakes! And be inspired! This is the perfect treat to serve the family while decorating the tree and house, wrapping or unwrapping gifts and to serve friends and family when they drop by. Perfect with coffee, tea, milk or hot cocoa. And a few good old holiday movies.

Bake My Day – Karen
blog from OUR kitchen – Elizabeth
Feeding my enthusiasms – Elle
girlichef – Heather
Lucullian Delights - Ilva
Living in the Kitchen with Puppies – Natashya
My Kitchen In Half Cups – Tanna
Notitie Van Lien – Lien
Paulchens Foodblog – Astrid
Bread Baking Babe Bibliothécaire – Katie


I want to share this Modern Lardy Cake with Susan of Wild Yeast for her weekly Yeastspotting roundup!

MODERN LARDY CAKE
From “Warm Bread and Honey Cake” by Gaitri Pagrach-Chandra

Lardy cake is not a cake, but a bread that is laminated with lard with some raisins or currants. We have replaced the lard with butter, giving a fresher, more modern twist on the Lardy Cake. This is not a rich bread like a coffee cake, but a lightly flavored, gently sweetened bread almost, but not quite, like a challah or brioche type bread. We loved it precisely because it wasn’t overly sweet and rich, just the perfect bread for breakfast smeared with jelly. Or eaten as a snack. It stays fresh for a couple of days. Definitely make this during the holidays to have on hand when family or friends visit.

Dough:
375 g strong white flour
1 ½ tsp active dry yeast
1 Tbs sugar
¼ tsp salt
35 g butter, melted and cooled to warm/tepid
± 200 ml milk, warmed

Filling:
100 g butter, softened
75 g soft dark brown sugar (make sure it is soft and lump free; if not use granulated brown sugar as I did)
½ tsp ground cinnamon
¼ tsp freshly grated or ground nutmeg
50-75 g currants, raisins or other dried fruit (I used dried blueberries)

Beaten egg, to glaze

1 – 2 Tbs granulated brown sugar (my own addition for dusting on the bread)

24 cm (9 in) round cake tin (pref. a springform) – or a rectangular pan of similar volume

Make the dough:

Put all of the dough ingredients in a large mixing bowl. If using a heavy-duty stand mixer with a dough hook, knead until smooth and supple. If working by hand (as I did), stir the flour and salt together in a mixing bowl; make a well in the center and add the sugar and the yeast to the well and then add the warm milk and allow the yeast to activate for about 10 minutes. Add the warm melted butter and stir everything together until all the dry ingredients are moistened and it pulls together into a scraggly ball. Bring the dough together in a ball, scrape onto a lightly floured work surface and knead briefly until smooth and supple. Return the dough to the bowl (or place in a lightly oiled clean bowl). Cover with clingfilm/plastic wrap and leave to rise in a warm place until doubled in size.

Make the filling:

Blend the butter, sugar and spices together until creamy. I used a hand mixer for this to keep my hands clean and it comes together creamy and smooth easily.

Knock the risen dough back and re-knead it briefly. Roll it out to a rectangle about 50 x 25 cm (20 x 10 in), the long side perpendicular to your body, the shorter side right to left. Spread the filling evenly over the top two-thirds of the dough sheet, leaving one outer third empty and about 4 cm (1 ½ inch) on all sides. If using, sprinkle the dried fruit over this and press down to embed. Fold the empty third over the middle third and the remaining third back down over this – you will have three layers of dough in a small rectangle “package”. Pinch all the edges well to seal the filling in. Cover with a sheet of clingfilm and leave to rest for about 5 minutes to relax.

Give the parcel a quarter turn – the new rectangle will once again have the long side straight up away from you, perpendicular to your body. Gently press the rolling pin down to seal and flatten slightly, then gently roll it into a rectangle about 30 x 15 cm (12 x 6 in) or a bit bigger. Fold into thirds again and leave to rest for 5 minutes. Repeat this procedure three more times for a total of four folds, turning the dough by a quarter turn and rolling and folding. If you find you are losing too much filling, omit the final turn. (I folded the dough in thirds for a total of 3 times)

This is a delicate, difficult and sometimes messy work as the filling oozes out in weak spots, so press and roll out lightly and gently, taking your time. Patch them up as well as you can and continue to work. All the oozing bits will caramelize nicely as the cake bakes. But you don’t want to loose too much filling as the laminating effect.

Grease the tin and put the dough packet in it, then flatten it with your hand to fit it in as well as possible. Cover with clingfilm/plastic wrap and leave it to rise until almost doubled.

Preheat the oven to 180ºC (350ºF).

Brush the dough with beaten egg, and dust generously with the granulated brown sugar. Bake until brown; the bread may spread a bit and will not rise during the baking. The total baking time will vary: the author instructs to bake for 25 – 30 minutes but I baked mine for 1 hour as did several of the Babes.

Remove from the oven, but leave in the tin for about 5 minutes. Carefully release the clip and turn the cake upside down on a wire rack. Remove the bottom of the tin, which will probably still be attached to it, and leave to cool further. (I lifted my Lardy cake out of the pan with a spatula)

Eat warm or room temperature, cut into wedges or slices.

Crunchy Seed Crackers for Bread Baking Babes

LA RENTRÉE – BACK TO NORMAL

Autumn, the year's last, loveliest smile. 
- William Cullen Bryant


This has certainly been one of those odd, between-season weeks. One day we are enjoying cool late afternoon cocktails on a café terrace, sweaters off and hung over the backs of our chairs, faces turned up to drink in the glowing warmth of summer’s heat, and the next we are bundled up in fleece and socks, warming our hands around mugs of steamy coffee, huddled in our apartment watching bad tv. The rain and the sun take turns walking the streets; I imagine them doing the old Paper-Rock-Scissors thing in the dead of night, deciding by random which one will spend the day with us. We wake up every morning, this long stretch of September, not knowing what kind of a day it will be. And we are rather exhausted by the flip-flopping, this emotional tug of war. Both husband and dog droop around the house when the weather is gray and rainy, pots of coffee are brewed and drunk, soup is poured from tins. But if this is what it takes to turn summer into autumn, then I will gladly suffer the whims of Mother Nature.

I adore autumn. I bask in the glow of autumn. I am energized by the golden vitality of autumn.

I finally received my very own copies of The Art of Eating, the issue with my article in it about good old-fashioned Blanquette de Veau. I couldn’t be happier! The magazine is stunning!


I have also been planning next year’s teaching/workshop and speaking/conference schedule and it looks like it will be a busy year! Keep your pens poised and your date books at the ready! And stay tuned for a second post in the series on Writing as well as more travel images of my beautiful city, Nantes.


I’ve been rather lethargic all summer long. The heat brings out the sloth that lives deep within and as others tire me out with their talk of vacations, as the Nantais scuttle off to the seaside, the mountains or some far-away exotic hot spot, we have been… working. And hanging around, watching films, reading books and discussing the American Civil War. Passionately. When the cooking bug hit JP time after time, I sat back and watched him slave away in the kitchen with great pleasure. He kept me fed and happy. But I rarely could gather up the energy to cook or bake. Yet with the advent of autumn, glorious autumn, I have found myself in the kitchen more often, running my fingers through flour, breathing in the heady scents of cocoa and vanilla, rolling chilly eggs around in my fingers and capping and uncapping bottles of olive oil.

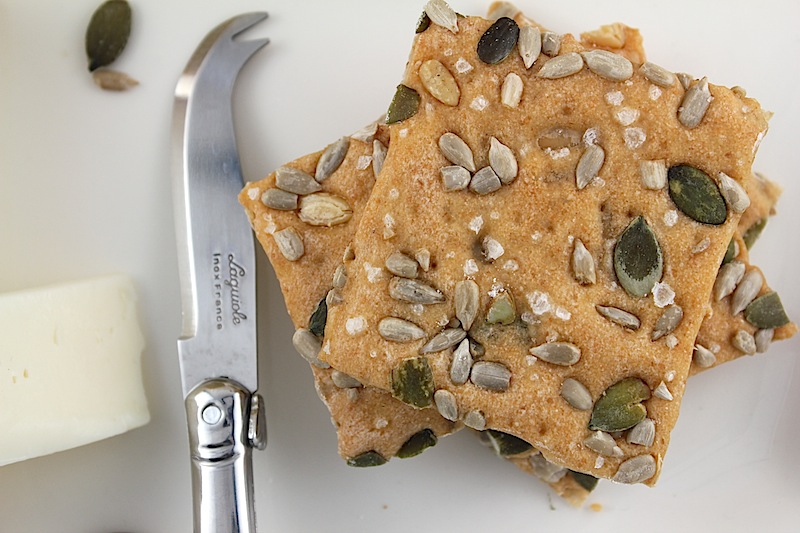
This month’s Bread Baking Babes’ challenge was no challenge at all. Well, almost. The lovely Tanna of My Kitchen in Half Cups asked the Babes to bake crackers! Seedy, crunchy crackers! It was one of those recipes that I find perfect for a lazy day, when one wants to bake but… really doesn’t. Or doesn’t want something so time consuming, so complicated and exhausted that, halfway through, one wants to drops everything, mess and all, and go to bed. Easy peasy, these crackers were and so delicious, so good, so addictively good that I cannot stop eating them.


I must say that mine did not come out as thin and crispy as they should have (check out Elle’s or Ilva’s or Elizabeth’s or Heather’s or Tanna’s own to see thin and crispy!) but slightly too dense and chewy. But I still cannot stop eating them. And they are good enough and easy enough that I am more than willing to make them again until I get them right.


If you want to make this bread with us and be a Bread Baking Buddy, click over to Tanna at My Kitchen In Half Cups to get all the details. But before you do that, check out if and how the other Babes baked their Crunch Crackers:

Bake My Day – Karen
Bread Baking Babe Bibliothécaire – Katie
blog from OUR kitchen – Elizabeth
Feeding my enthusiasms – Elle
girlichef – Heather
Lucullian Delights - Ilva
Living in the Kitchen with Puppies – Natashya
My Kitchen In Half Cups – Tanna
Notitie Van Lien – Lien
Paulchens Foodblog – Astrid
Provecho Peru – Gretchen


I want to share these crackers with Susan of Wild Yeast for her weekly Yeastspotting!

CRUNCHY SEED CRACKERS
(For the original recipe visit Tanna’s blog My Kitchen in Half Cups)

For the cracker dough:
190 g white or white whole wheat flour
100 g spelt flour (or replace with more white whole wheat)
30 g ground flax seeds (Ilva replaced with ground almonds)
2 Tbs light brown granulated sugar
1 tsp active dry yeast
1 tsp salt
200 – 225 ml warm water
2 Tbs unsalted mixed seeds (I used a combination of pumpkin, sunflower seeds and pine nuts; you can use a combination of flax, sesame and sunflower seeds)

For the topping:
Water
Unsalted seeds, - either 70 g sunflower + 30 g sesame seeds or 100 g mixed seeds (I used the same combination as for the dough)
Fleur de sel or flaked sea salt

In a medium to large mixing bowl, combine the two flours and the salt. Make a slight well in the center and add the brown sugar and the yeast without mixing. Pour on 200 ml of the water; allow to activate for about 10 minutes.

Once the yeast is slightly foamy, add the two tablespoons seeds and mix everything together until well blended and all of the dry ingredients are moistened. Add the last 25 ml water as needed.

Turn out onto a floured surface and knead until you have a smooth dough, adding flour if the dough sticks. This should be a fairly dry dough.

Place the dough in a lightly greased (I used olive oil) medium-sized bowl, turning to make sure the dough is lightly coated with oil, cover the bowl with plastic wrap and a clean kitchen towel. Allow the dough to rise for 60 to 90 minutes until slightly expanded.

After the rise, scrap the dough out onto a floured surface and divide in half. Working one half at a time, roll the dough into a 14 x 9-inc rectangle, as thin as possible but no thicker than 1/8-inch thick. If need be, let the dough rest and roll a second time. Lift the dough rectangle onto a piece of parchment paper the size of your baking sheet and run the rolling pin over it again to resize if needed. Spritz the surface of the dough with water or brush all over with a light coating of water. Sprinkle half of the seeds evenly over the surface of the rectangle and then dust with the fleur de sel or salt flakes. Place a large piece of plastic wrap over the seeded dough and, using the rolling pin, roll and press the seeds into the dough. Slide the parchment onto a baking sheet and allow the dough to rest for about 30 minutes while you preheat the oven.

Repeat with the second half of the dough.

Preheat the oven to 350°F (180°C). Carefully peel the plastic wrap off of the dough. Using a sharp knife (dip the blade into flour between cuts) cut the dough carefully into squares or rectangles. Bake for 20 – 25 minutes (depending on your oven). Turn off the oven but leave the crackers in the closed oven for an additional 15 minutes. Then open the oven door slightly and allow the crackers to cool completely.


Cinnamon Nut Roll Coffee Cake

THIRD TIME’S THE CHARM

A Babe in the house is a well-spring of pleasure, 
A messenger of peace and love, 
A resting place for innocence on earth, 
A link between angels and men. 
- Martin Farquhar Tupper 


The life of a Babe is not an easy one. Oh, it may look glamorous on the outside, all conviviality and dazzling bonhomie in a sisterly way. It may look all elegant ease to others, but that is all smoke and mirrors. Behind the scenes, I tell a different story. It is a tragic tale of cursed recipes, frustration, kicking, screaming and cursing like a sailor. While my fellow Bread Baking Babes, those who bake yeasty things practically for a living, seemingly with their eyes closed and one hand strapped behind their back, no doubt like my own ancestors, those great, strong women of my past; while my fellow Babes scuddle around me tossing dough with ease, adapting recipes and serving up homebaked things in kitchens redolent of the cinnamony, spicy scent of heaven, I, well, I often live quite another experience. And I live to tell about one.


 Once a Babe, always a Babe

This month, the month of August, I am the Bread Baking Babe hostess. The recipe is of my own choosing. So really, there is no excuse. But by the third try, I was beginning to feel like my recipe was simply cursed. Or the stars were not aligned or something ominous. It isn’t often that a food blogger reveals the kitchen mishaps, the baking disasters, the flops and the fiascos. But this was so huge, the blunders so enormous and so many, that I wanted to let my readers into my home, my life and share with them a little slice of what sometimes goes on in my kitchen.

Call it a series of flukes, label it simply wild misfortune or just (go ahead!) blame it on me, my impulsiveness and my impatience. But whatever you rack it up to, I decided to share the story. It is just all too incredible to be true. I am still pinching myself.

Try #1: I made the dough. A breeze! I have made no-knead sweet brioche-type dough in the past several times and this one seemed as it should. But. The following day, I should have known better than to simply dump it out onto a floured cutting board, as sticky as it was, slice it in two and begin rolling it out. I knew that it was too wet, too sticky, too difficult to handle much less to roll. I already saw where this was heading but I forged ahead. I whipped the meringue using 3 large egg whites and, again, I should have trusted my instincts based on pretty decent experience and knowledge. Although the meringue looked beautiful, I could see that it was fairly wet and loose for a jellyroll-type filling (it did not dawn on me until later that I had replaced the ground nuts which are intended to give the meringue body with chopped nuts which did nothing at all). And that there was too much of it. I was already starting to piss myself off, lose patience – I felt the steam beginning to ooze from my ears, I felt the crazy pills kicking in – but I went ahead and slathered that meringue onto the dough rectangles anyway! And tried to roll them up. They slithered and slid across the wooden cutting boards, the gooey meringue was spreading everywhere, in my hair, up and down my arms and across the counter and no matter how I fought that thing, it only got worse. No way in hell was this thing going to roll up and then behave long enough to be lifted from cutting board to pan.

So I scraped it off, all of it, straight into the trash.

Grocery store run – after much fuming and cursing and sending pathetic emails wallowing in self-pity to Ilva.

Try #2: Back to the drawing board. I upped the flour from 2 ½ cups to 3 cups in the initial mix of dough and stuck it in the fridge overnight. Still good. Following day, I kneaded the dough briefly adding more flour until it was malleable and controllable. I still have not corrected the filling and still used chopped instead of ground nuts, but I succeeded in rolling the dough around the filling and lifting it into the pan. It rose, it baked, it looked good. I took photos of it for the blog. At least I thought I did. Three, maybe four days later, the cake mostly eaten – completely by myself, I would like to add (both husband and Clem out of town and Simon is no longer eating anything sweet, thank you very much!) The last bit…. Well, I am sorry but I just could not look at it another day, another hour and sent the rest into the trash. * sigh *

I then made my Cherry Crumble Coffee Cake and was getting ready to post it on my blog when it struck me… I hadn’t seen the photos of my Bread Baking Babes Coffee Cake! What the what?! I checked my photos, I checked the camera and pffffftttttt gone into thin air. Disappeared. No photos. Not a one. Man, oh, man where are they and how am I ever going to post a recipe without photos? Especially when I am hosting the event?

Try #3: Back to the drawing board…again. And only for the sake of getting photos for the blog. But husband and son are back in town, so found comfort in the fact that there would be more people to eat it. It also crossed my mind that by the third try I have understood the ins and outs of this coffee cake. 3 cups flour to the dough, all the rest of the ingredients. As I am stirring the flour into the initial dough before its overnight rest, I am looking at it and thinking: “Hmmmm. Why is it so dough-like and not all sticky and gooey like it is supposed to be? Didn’t I add all of the ingredients?” I have a beautiful, firm yet supple dough sitting in my mixing bowl and I’m scratching my head. I skim through the list of ingredients and look around the kitchen and then it hits me. NO NO NO NO NO I have a pot with 225 grams of melted butter sitting on my stovetop, staring me in the face! “MAUDIT! MAUDIT! MAUDIT!” Is all that I can think… Cursed! This recipe is cursed! I begin wailing, cursing, throwing things around, slamming things onto the countertop as I attempt to stir, knead, whisk all that butter into the ball of dough.

This is when husband walks into the kitchen. “Look!” I scream hysterically. “Do you know how impossible it is to get all that butter into dough? I left the butter out of the recipe!” I have melted butter up to my wrists as I push my knuckles into butter-slick dough (which is sitting in an inch of melted butter), push and fold, push and fold then whack at it a bit with a wooden spoon. “Yes, I know. I heard.” He answers, actually chuckling at me! “You should change the name of your blog to Baking with the Drama Queen!” before he walks off, no help at all! Well, I keep at it for heaven knows how long until finally, finally I knead in all of that melted butter and have a unified, pretty nice, smooth dough. It actually feels…. Nice! I gave up and covered the bowl and put it in the fridge.

I briefly considered praying for the dough to turn out correctly and offer me a beautifully risen and fluffy dough, but by now I just was so fed up that I actually just wanted this entire experience to be done and finished with.

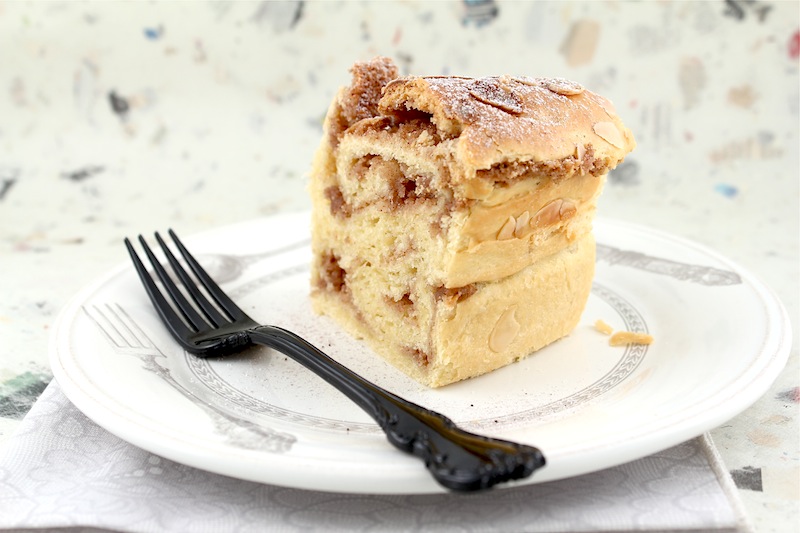
Following day, the dough is normal, risen and rolls out the dream. A sigh of relief escapes from my lips. I cut back on the egg whites and sugar to about 2/3 the original quantity, use ground nuts as I should and continue on my merry way. It fills and rolls up beautifully, I slip it in the pan, decide to treat it to a little milk wash and a pretty little dusting of slivered almonds. It rises again, just gorgeous. It bakes up giddily high and golden. I take photos of it, slice, taste and it is utterly, gorgeously perfect! I download the photos….yes, it is not an illusion, they are indeed there. And I smile. And I sigh with pleasure and relief.

And to top it all off, son and a friend of his stop by the house on their way to a party and carry the thing off.


Maybe the Baking Gods are on my side after all.

I am a Babe for a living. 
 – Gabrielle Reece 


I am hosting the Bread Baking Babe event this month with a wonderful (yes, I said it…wonderful!) Cinnamon Nut Roll Coffee Cake from the Taste of Home Bakeshop Favorites cookbook. I love Taste of Home Cookbooks; they are filled with the best of American home baking and for every level of baker. This coffee cake is light and fluffy, infused with just a delicate sweetness from the meringue filling with a hint of cinnamon and nuts. Light, moist, it is the perfect treat for breakfast, brunch or snack.


Check out if and how the other Babes managed their own Cinnamon Nut Roll Coffee Cake:

Bake My Day – Karen
Bread Baking Babe Bibliothécaire – Katie
blog from OUR kitchen – Elizabeth
Feeding my enthusiasms – Elle
girlichef – Heather
Lucullian Delights - Ilva
Living in the Kitchen with Puppies – Natashya
My Kitchen In Half Cups – Tanna
Notitie Van Lien – Lien
Paulchens Foodblog – Astrid
Provecho Peru – Gretchen

You too can bake along with us and be a Bread Baking Buddy. Simply bake this Cinnamon Nut Roll Coffee Cake, blog it – don’t forget to mention being a Bread Baking Buddy and link back to this blog post! Then send me the link (please include your name and your blog’s name) by August 26th to jamieannschler AT gmail DOT com with August Bread Baking Buddy in the subject line and I will add you to the roundup.

I want to share this wonderful yeast coffee cake with Susan of Wild Yeast for her weekly Yeastspotting!


CINNAMON NUT ROLL COFFEE CAKE
Adapted from Taste of Home Bakeshop Favorites.

* Note that the dough rests in the refrigerator over night, so start the process the day before! If you are using European regular flour, start the basic dough with 3 cups (390 g) flour; if using American all-purpose flour, begin with 2 ½ cups (325 g) then add more as needed the second day when kneading the dough before rolling. I have given the original filling recipe as well as my own adjustments and changes below it.

You will need a stand mixer or beaters to whip egg whites for the meringue filling and a 10-inch (standard) tube pan, preferably with a removable center.

For the dough:

2 packages (1/4 ounce/7 g each) active dry yeast
¼ cup (@ 65 ml) warm water (110°F to 115°F)
16 Tbs (225 g) unsalted butter, melted
½ cup (125 ml) warm 2% fat/lowfat milk (110°F to 115°F)
4 egg yolks
2 Tbs sugar
¾ tsp salt
2 ½ cups (325 g*) all-purpose flour (if using European regular flour, increase total flour to 3 cups/390 g), more if the dough is too sticky or runny.

* when I measure flour I spoon lightly into the measuring cup and then level off so 1 cup usually weigh approximately 130 g: * see note above.

For the filling: (*see note above)

3 (90 g) large egg whites
1 cup + 3 Tbs sugar, divided
2 cups ground walnuts (I usually use pecans but choose what you like)
2 Tbs 2% fat/lowfat milk
2 tsps ground cinnamon

MY OWN CHANGES AND ADAPTATIONS TO THE FILLING:

2 – 3 large egg whites for a total of 2.65 oz (75 g)
2/3 cup (135 g) sugar + 2 Tbs (30 g) sugar
4.4 oz (125 g) ground hazelnuts or almonds
1 – 2 tsps ground cinnamon
2 Tbs 2% fat/lowfat milk

A bit of milk for brushing the top and the seams of the cake and slivered blanched almonds for dusting, optional but pretty

The day before, prepare the dough:

In a large mixing bowl, dissolve the yeast in warm water; allow to activate for 10 – 15 minutes until foamy. Whisk in the tepid melted butter, warm milk, eggs yolks, sugar and salt and then stir in the flour. Beat or stir until smooth – the mixture will be sticky. Cover and refrigerate overnight.

The day of baking, prepare the filling:

In a small bowl, beat the egg whites on medium speed until soft peaks form. Gradually beat in 1 cup (or 2/3 cup following my changes) sugar, about 2 tablespoons at a time, on high speed until the sugar is incorporated and dissolved, leaving a thick, glossy meringue.

In a large bowl, combine the ground nuts, cinnamon and remaining sugar then stir in the milk until the dry ingredients are all moistened; fold in the meringue.

Prepare the Coffee Cake:

Grease/butter the bottom, sides and center tube of a 10-inch tube pan.

Divide the dough in half. On a well-floured work surface, roll each portion into an 18 x 12 –inch (45 x 30 cm) rectangle with the longer side perpendicular to your body (the longer edge lying on the cutting board left to right). Spread half of the filling evenly over each rectangle within 1/2 –inch (1 cm) of the edges. Lightly brush the farthest, top edge with milk. Roll each up jellyroll style, as tightly as possible, starting with the long side closest to you and rolling up; pinch seam to seal.

Place one filled roll, seam side up, in the greased tube pan. Pinch the two open ends together. Place the second roll, seam side down on top of the first roll, again pinching and sealing the two open ends. Gently brush the top all over with a bit of milk and dust with some slivered almonds.

Cover the pan with plastic and allow to rise for 1 hour.

Preheat the oven to 350°F (180°C).

Once the coffee cake has risen, discard the plastic wrap and once again gently brush or dab the top surface all over with a bit of milk and add more slivered almonds where there are spaces.

Bake in the preheated oven for about 45 minutes or until puffed and golden brown. Remove from the oven and allow to cool for 10 minutes. After 10 minutes, loosen the coffee cake from the sides of the pan and lift out the center tube, placing the tube with the cake onto the rack to cool completely. Once cool enough to handle, loosen the cake from the bottom of the pan and around the tube using a long, thin blade and carefully invert, lift off the tube and flip back, top side up, onto a serving platter. Or lift off of the tube onto the serving platter.


Eat as is or drizzle with glaze or dust with powdered sugar/cocoa powder.

Spicy Lamb & Feta Gözleme with a North African Twist

INTERLUDE IN THE KITCHEN


Have I even cooked yet since my return from Florida? I cannot remember. Time is flitting by on wings…. No, more like time is rushing by on wheels as it is pushed down a steep mountain. Where does it go? I have a bucketful of projects that seem to be standing around my desk, hands on hips, feet tapping earnestly as each waits…demands.. its turn and my attention.

The funny thing is, I brought back a stack of cooking magazines from the US and from Ireland, magazines stuffed from cover to cover with tempting recipes. I sit and flip through each and every one and ogle this photo and that, peruse the recipes and concoct plans to make so many of them. And then I sit back down at my laptop and start writing again. When I finally look up at the clock it is lunchtime or dinnertime, too late to cook. And when I mention baking, my men balk and begin ranting and begging for me to stay away from the sweet treats for just a bit. It is no wonder that I haven’t cooked in ages.


On the other hand, when it comes to my projects and work, I am…cooking! All of those magazines were purchased as resources rather than for the recipes, truth be told. They infuse me with creative energy and get the business juices flowing. I finished turning my Florida interview into a story and sent it off. My interviews of local chefs and food gurus are going swimmingly as I prepare three separate pieces from them. I am now in contact with another editor interested in our work. My head is flooded with story ideas just waiting for the chance to flow out onto the page. And my own personal editor/mentor/friend has now put me on a schedule for my book chapters. Can it get any better, any more productive than this?

Husband and I have the house to ourselves for the week; one son is away sailing as the other sleeps off the effects of a birthday weekend before slogging through two tough project presentations. The sun – finally the sun – splatters through the windows and onto tabletops and carpets, adding a hint of warmth to the June chill. Summer’s stone fruits are now heaped in bowls on the kitchen counter, the sheets crumpled and twisted on unmade beds, the television droning in the background competing with the city’s ordinary, everyday noises bursting joyfully, aggressively through the windows. The hum of the printer, the ringing of the telephone, the clatter of fingers on keyboard come from his office at the back of the apartment as we both work from home. There really is nothing to keep us from cooking.

Yet… one photograph from the BBC Good Food magazine – brought to me from London by my charming and thoughtful writing instructor buddy Jeanne – of Spiced Lamb & Feta Gözleme kept coming back to me, haunting me with the scents and flavors of something exotic, warming, delicious. I so wanted to taste the Gözleme that I finally gathered the courage to go out and pick up the ingredients needed and make them.


What is a Gözleme, you ask? Gözleme is a Turkish savory, filled pastry, the dough hand rolled then wrapped around a filling and sealed. The filled pocket is brushed with butter or oil and then cooked in a skillet or on a griddle. A woman at our market actually makes them, hers filled with feta or herbs or meat. I glanced over the list of ingredients in the magazine, which had a rather Greek spin to it, and decided to change it and give it a more North Africa twist, similar to my Lamb Triangles. I changed out the spices, added in caramelized onions and flavored the browned lamb with tomato purée and pomegranate molasses. Raisins heightened the touch of sweetness, pine nuts added a wonderfully toothsome crunch.


The resulting Gözleme were divine! The dough – just slightly adjusted from the magazine’s recipe – was a snap to make and, once cooked, was light and fluffy with just the right denseness to add a bit of chew. The filling was flavorful, the perfect balance between sweet and savory, meat and feta. One must only be extremely careful in rolling out, filling, folding, brushing and flipping the dough and the pastry to avoid any ripping – the dough is very delicate and any holes in the dough and the filling will escape!

I served this with a spicy and sweet chutney, but it would also be delicious served with an herbed yogurt dipping sauce. But personally, I loved them served as is; they needed nothing at all to be perfect.


I am sharing this with Susan of Wild Yeast for her weekly Yeastspotting!

Life's a Feast now has its very own Facebook page! Simply like the page to join in the discussion, meet new friends and join the community!

Don't miss one Plated Stories post! Join us on Facebook and don't forget to sign up for email alerts!

SPICY LAMB & FETA GÖZLEME PASTRIES
Makes and serves 4

For the dough:

1 packet (7 g) dry active yeast
1Tbs golden granulated sugar
2/3 cup (175 ml) warm water
9 oz (250 g) flour + more for kneading
½ tsp salt
2 Tbs olive oil + more for brushing the pastry

For the filling:

1 – 2 Tbs olive oil
1 lb (500 g) ground/minced lamb – or a combination of lamb and beef, if preferred
1 small – medium onion, chopped
2 cloves garlic, minced
1 slightly rounded tsp ground cumin
1 slightly rounded tsp ground coriander
¾ tsp ground cinnamon
¾ tsp ground chili or chipotle chili powder, or more or less to taste
Salt and pepper
2 Tbs tomato purée, more to taste if desired
2 Tbs pomegranate molasses, more or less to taste as desired
2 oz (50 g) raisins
2 oz (50 g) good quality pine nuts
4 oz (100 g) drained feta cheese, crumbled

Prepare the dough:

Place the golden granulated sugar and the dry yeast in a small mixing bowl. Add the warm/tepid (not hot) water to the yeast and sugar and allow to stand for about 15 minutes until the yeast is activated and the mixture foamy.

Put the flour in a medium to large mixing bowl and stir in the salt. Make a well in the center of the flour and add the yeast mixture and the olive oil. Using a wooden spoon, stir until blended and all of the dry ingredients have been moistened. Scrape the dough out onto a floured board or work surface and knead for 8 – 10 minutes, flouring the work surface and the dough only as needed. After 8 to 10 minutes, the kneaded dough should be smooth, soft and elastic, not dry but not sticky.

Lightly oil the inside of a medium to large bowl and place the round ball of dough into the bowl, turning the dough to oil evenly. Cover the bowl with plastic wrap and then a clean kitchen towel and set aside to rise, at least doubled in size, about an hour.

Meanwhile, prepare the lamb filling:

Have everything prepared – the onion and garlic chopped, the spices, raisins and pine nuts measured out, etc.

Heat a skillet over medium heat. Add the pine nuts and cook very quickly, stirring constantly so they do not burn, just until toasted (they will begin to turn a golden brown). Remove quickly from the heat, scraping the pine nuts into a waiting bowl.

Return the skillet to the heat and add a tablespoon of olive oil. Add the chopped onion and cook over medium heat, stirring often, until the onion is tender and golden brown around the edges. Add the chopped or minced garlic and cook, stirring, for another couple of minutes until the garlic is tender (but not colored). Add another tablespoon of olive oil and then the minced/ground lamb and cook, stirring and chopping the meat to break up any lumps, until cooked through and browning, no longer pink.

Stir in the spices as well as the salt and pepper until evenly coating the meat and cook, stirring, for a minute or two. Add the toasted pine nuts, the raisins as well as 2 tablespoons each of the tomato purée and the pomegranate molasses, stirring to blend. Cook, stirring, for a few minutes until the meat is done and the flavors are melded. Remove from the heat and allow to cool just for a few minutes until just cool enough to handle. If prepared ahead of time, gently heat the filling through until warm before preparing the Gözleme – adding just a bit of water while reheating will help to keep the mixture from burning as well as bring back moisture to the meat.

Prepare the Gözleme pastries:

Have both the warm (but not hot) filling and the crumbled feta ready. Also have ready a small bowl with several tablespoons of olive oil and a clean pastry brush as well as a good skillet or grill.

Scrape the risen dough onto a floured work surface and divide into four even pieces. Working one piece of dough at a time, pat the dough into a rectangle and place on the board in front of you lengthwise perpendicular to your body. Gently roll the dough into a 8 x 10 inch (20 x 25 cm) rectangle, being very careful to keep the dough an even thickness and not to tear, split or weaken the dough.

Place ¼ of the lamb filling on the bottom half of the dough rectangle, leaving a ¾-inch (2-cm) edge on the 3 sides of the dough of the bottom half of the rectangle (the space covered by filling). Pat the filling until it evenly covers the space.

Place ¼ of the crumbled feta cheese on top of the lamb filling, dispersing it evenly over the lamb. Do not forget the feta!


Very gently and lightly brush a very small amount of olive oil on the edge of the dough - the 3 sides around the filling - and then bring the top half of the rectangle of dough down over the filling to create a pocket or turnover. Match the edges, pressing the top dough to the bottom and sealing. Very gently brush the sealed edges with a bit more olive oil and gently roll the edge over onto itself to form a rim. Very gently brush/pat a bit of olive oil all over the top of the Gözleme pastry, including the rim.


(I keep repeating very gently because the dough is incredibly light and fragile and it must not rip!)

Heat the skillet or grill over medium heat. Very gently and carefully (the dough is soft and fragile and must not rip) lift the pastry off of the work surface (I used a pastry/cake lifter and my fingers) and, once the skillet is hot, flip the pastry into the pan olive oil side down and press all around with the back of a spatula for even cooking. As the pan-side of the pastry cooks, gently brush/dab the flip side (now facing up) with olive oil. Cook the pastry until the pan side of the dough is a deep golden brown – the dough will puff as it cooks – and then very carefully flip the Gözleme over to cook the other side until golden brown.


Serve immediately, eat joyfully.

Labels

أحدث المواضيع

 
Support : Creating Website | Johny Template | Mas Template
Copyright © 2013. Entries General - All Rights Reserved
Template Created by Creating Website Published by Mas Template
Proudly powered by Blogger