Recent Movies

Badly needed Energy Bars

I guess most of you, or at least anyone who follows me on Facebook and Twitter, know that I have taken up running.  It’s only been a couple of months but I am really loving it.  Now I am only running between 2-4 miles 3 or 4 days a week, but add that to the walking and weights I have been doing and I need some energy help during some workouts. 

You also know that we eat very few processed foods with granola bars and energy bars being the exception.  At least now you can buy them with no artificial sugars or dyes…anyway, I need something that I can grab at 5:00AM when I head out the door for my run and these are just about perfect.

DSC_0259

Energy Bars Adapted from The Food You Crave by Ellie Krieger

Ingredients

  • Cooking spray
  • 1 cup quick cooking rolled oats
  • 1/2 cup roasted sunflower seeds
  • 1/2 cup toasted wheat germ
  • 1/4 cup whole-wheat flour
  • 1/2 cup dried apples
  • 1/2 cup pecans
  • 1/2 cup pitted dried dates (I used ones with sugar but would like them without next time)
  • 1/2 cup powdered nonfat dry milk
  • 1/2 teaspoon ground cinnamon
  • 1/3 cup pure maple syrup
  • 2 large eggs

Directions

Preheat the oven to 350 degrees F. Coat a 9 by 13-inch baking pan with cooking spray.

Place all ingredients except the syrup and eggs in a food processor and pulse until the mixture is finely chopped. Add the syrup and eggs and pulse until the mixture is well combined. It will resemble a coarse paste.

Transfer to the baking pan and spread evenly pressing in with your fingers. Bake until lightly browned and just done, about 20 minutes. Allow to cool for about 15 minutes and then cut into 24 squares.

These can be stored in an airtight container at room temp for about 3 days or wrap individually and freeze for up to  3 months.

***I really loved these and so did the family.  I think that this is a really versatile recipe and am looking forward to playing with the dried fruits and nuts used in it.  The recipe calls for almonds and apricots so I may try that with some cranberries thrown in…endless possibilities!

***WW points has it as a 3 point recipe but I think with all of the good fats and whole grains in it it is worth the splurge!

signature

Sautéing 101: Chicken Sauté with Onions, Garlic & Basil

Class is back in session this week and before I do a recap, I'll be sharing the recipes I got to make in class. We're starting a new section in our books that's much more in depth and allows us to learn more techniques. To further our understanding, we're making three poultry dishes. The first dish we made is this one for Chicken Sauté with Onions, Garlic & Basil. This specific recipe introduces the technique of sautéing and preparing a sauce in the sauté pan...

Here are some class notes on sautéing:

Sautéed poultry should be tender and juicy, if it's flavor is developed by proper browning. Additional flavors come from a sauce made by deglazing the pan, usually with wine, and adding garnishes, seasonings, and lquids. Stir-frying is a popular method of sautéing poultry where boneless pieces are cut into strips and quickly cooked with assorted vegetables and seasonings.

Selecting Poultry to be Sautéed
Most poultry is tender and works well to sauté. Although small birds such as squab can be sautéed bone-in, large pieces and bone in cuts from larger birds should not be sauteéd. Boneless breasts, suprêmes, scallops and cutlets are the most common and practical cuts for sautéing. Because they are high in fat, boneless duck breasts can be sautéed without additional fat.

Determining Doneness
Sometimes it can be difficult to tell what the doneness of an item is if you have only the temperature of the sauté pan and the color of the item being cooked. A more practical method is to press the item with your finger and judge the resistance. Very undercookds poultry will offer little resistance and feel mushy. Slighly underdone poultry will feel spoungy and will not spring back when your finger is removed. Properly cooked poultry will feel firm to the touch and will spring back when your finger is removed. Overcooked poultry will feel very firm, almost hard, and will spring back quickly when your finger is removed.

Accompaniments to Sautéed Poultry
Sautéed poultry is usually served with a sauce made directly in the pan in which the item was cooked. The sauce uses the fond for added flavor. A wide variety of ingredients, including garlic, onions, shallotw, mushrooms and tomatoes are commonly added to the pan as well as wine and stock. Sautéed items are often served with a starch such as pasta, rice or potatoes.

Procedure for sautéing poultry
  1. Heat the sauté pan and add enough fat or oil to just cover the bottom.
  2. Add the poultry item, presentation side down, and cook until browned.
  3. Turn the item, using tongs or by tossing te item back on itself using the pan's sloped sides.
  4. Large r items can be finished in an oven. Either place the sauté pan in the oven or transfer the poultry to another pan. The latter procedure allows a sauce to be made in the original pan while the poultry cooks in the oven. Hold smaller pieces that are thoroughly cooked in a warm place so that the pan can be used for making the sauce.
Procedure for preparing a sauce in a sauté pan
  1. Pour off any excess fat or oil from the sauté pan, leaving enough to sauté the sauce ingredients.
  2. Add ingredients such as garlic, shallots and mushrooms that will be used as garnishes and sauce flavorings; sauté them.
  3. Deglaze the pan with wine, stock or other liquids. Scrape the pan, loosening the fond (cooked bits leftover) and allowing it to dissolve in the liquid. Reduce the liquid.
  4. Add any ingredients that do not require long cooking times such as herbs and spices. Adjust the sauce's consistency and seasonings.
  5. Before serving, the poultry can be returned to the pan for a moment to reheat it and to coat it with the sauce. The poultry should remain in the sauce just long enough to reheat. Do not attempt to cook the poultry in the sauce.
  6. Serve the poultry with the accompanying sauce.

Chicken Sauté with Onions, Garlic & Basil


3 whole chicken breasts, boneless, skinless, approximately 10 oz each
salt & pepper to taste
flour, as needed for dredging
2 tablespoons clarified butter (or olive oil)
1 small onion, diced
6 cloves of garlic, minced
1/2 cup dry white wine
1 tablespoon lemon juice
3/4 cup tomato concassée
1/2 cup chicken stock
6 fresh basil leaves, chiffonade

Mise en place

Trim any excess fat from the breasts. Split each breast into two pieces by removing the small piece of cartilage that joins the halves. Season the chicken with salt and pepper; dredge in flour.

Add the butter to the pan just until hot., then sauté the breasts in the butter, browning them slightly. Once lightly browned and almost fully cooked, place in a warm oven and hold.

Left in the pan is fond. Add the onion and garlic to the fond and butter in the pan.

Deglaze the pan with the white wine and lemon juice. Add the tomato concassée and stock. Sauté to combine the flavors; reduce the sauce to the desired consistency.

Return the chicken breasts for reheating. Adjust the seasonings and serve one half breast per portion with a portion of the sauce.Garnish with basil.

Ραγιάδες προσοχή οικογενειοκρατίες.


Τελικά τι πολίτευμα έχουμε;

Για αυτούς που είναι πραγματικά καλοί στα μαθηματικά και την
στατιστική. (ΜΟΝΟΝ)
Επειδή δεν θυμάμαι και πολλά από την στατιστική στο πανεπιστήμιο. Και επειδή
αυτό αποκλείεται να γίνει θέμα στις πανελλαδικές εξετάσεις.
Άσκηση 1
Να βρεθεί:
Η πιθανότητα να συμβεί τρεις φορές σε 189 χρόνια ζωής του Ελληνικού κράτους
στην ίδια χώρα, με πληθυσμό 8,000,000 (έστω) να γίνουν πρωθυπουργοί... Παππούς,
Γιος και Εγγονός της ίδιας οικογένειας.
Ξαναλέω ΤΡΕΙΣ ΦΟΡΕΣ ΟΧΙ ΜΙΑ.

Άσκηση 2
Να βρεθεί:
Η πιθανότητα να συμβεί επτά φορές σε 189 χρόνια ζωής του Ελληνικού κράτους
στην ίδια χώρα, με πληθυσμό 8,000,000 (κατοίκων έστω) να γίνουν πρωθυπουργοί
Πατέρας και Γιος.
Οι απαντήσεις

A) Aπό παππού σε γιο και εγγονό
O Δημήτριος Pάλλης (1844-1921) πέντε φορές πρωθυπουργός (1897, 1903, 1905,
1909 και 1920-21). O γιος του Iωάννης (1878-1946) μια φορά (κατοχικός 1943-44).
Γιος και εγγονός ήταν ο Γεώργιος (1918-2006) μια φορά πρωθυπουργός ( 1980-81).
Aξίζει να σημειωθεί ότι Γ. Pάλλης ήταν και εγγονός πρωθυπουργού από τη μητέρα του (κόρη του Γ. Θεοτόκη).
O Γεώργιος Παπανδρέου (1888-1968) τέσσερις φορές πρωθυπουργός (1944, 1944-
1945, 1963 και 1964-65 ). O Aνδρέας Παπανδρέου (1919-1996) τρεις (1981-85, 1985-
89 και 1993-96). O εγγονός και γιος Γιώργος μόλις άρχισε την πρώτη θητεία.
O Διομήδης Kυριακός (1811-69) κατέκτησε το αξίωμα μια φορά (1863). Tο ίδιο και
ογδόντα χρόνια αργότερα (1949) ο εγγονός του Aλέξανδρος Διομήδης - Kυριακός
(1875-1951)
Στην ίδια κατηγορία θα μπορούσε να προστεθεί άλλη μια περίπτωση. Πρόκειται για τον Γεώργιο Kουντουριώτη (1782-1858) , που κάθισε στην καρέκλα μια φορά (1848) και ο εγγονός του Παύλος (1855-1935) έγινε Πρόεδρος της Δημοκρατίας (1924-1929).

B) Aπό πατέρα σε γιο
O Σπυρίδων Tρικούπης (1788-1873) υπήρξε ο πρόεδρος (πρωθυπουργός) του πρώτου νεοελληνικού υπουργικού συμβουλίου (1833). O γιος του Xαρίλαος (1832-1896) διατέλεσε εφτά φορές πρωθυπουργός ((1875, 1878, 1880, 1882-85, 1886-90, 1892-3 και 1893-1895).
O Θρασύβουλος Zαΐμης (1825-1889) δυο φορές πρωθυπουργός (1869-70 και 1871). O γιος του Aλέξανδρος οχτώ φορές πρωθυπουργός (1897, 1901, 1915, 1916, 1917, 1926, 1927 και 1928) και Πρόεδρος της Δημοκρατίας (1929-1935). Aς προστεθεί ότι ο Aνδρέας πατέρας του πρώτου και παππούς του δεύτερου είχε διατελέσει πριν την έλευση του Kαποδίστρια και μετά τη δολοφονία του πρόεδρος της «Διοικητικής Eπιτροπής Eλλάδος» (αξίωμα ανάλογο του πρωθυπουργού).
O Eλευθέριος Bενιζέλος (1864-1936) εννιά φορές πρωθυπουργός (1910-15, 1915,
1917-20, 1924, 1928-29, 1929-32, 1932, 1932-33, 1933) . O γιος του Σοφοκλής
ορκίστηκε πέντε φορές (1944 και κατά διαστήματα το 1950-51).
O Γεώργιος Θεοτόκης (1844-1916) τέσσερις φορές (1899-1901, 1903 και 1903-05) . O
γιος του Iωάννης (1880-1961) μια (1950).

Το ξαναγράφω αυτό έγινε ΕΠΤΑ ΦΟΡΕΣ!
ΤΕΛΙΚΑ ΕΧΟΥΜΕ ''ΚΛΗΡΟΝΟΜΙΚΗ ΚΟΙΝΟΒΟΥΛΕΥΤΙΚΗ
ΔΗΜΟΚΡΑΤΙΑ"

Για το δημοκρατία δε βάζουμε και το χέρι μας στην φωτιά αλλά κατά βάση είμαστε
κρυφοβασιλικοί οι κερατούκλιδες. Άλλωστε είμαστε το μόνο έθνος στην ιστορία που
ζήτησε ξένο βασιλιά για να τον κυβερνήσει!!!!!

Αγνώστου συγγραφέα κυκλοφορεί στο διαδίκτυο.

Spicy Beef Nachos

It's football season and a popular snack in our house is nachos. I'm not going to lie. We usually open up a bag of tortilla chips, pop open a can of nacho cheese that we warm up, have a bowl of jalapeno slices nearby and dig in. But I had enough. I wanted to serve up nachos just like they do at the restaurants - obnoxiously piled high on top of layer upon layer of southwestern goodness. Well, that's exactly how these Spicy Beef Nachos were served up and yes, it was obnoxious... obnoxiously good!...

I don't know what I love most about nachos. It could be the hot, crispiness of the chips that have been lightly salted, seasoned ground beef with a slight kick of spice, the smooth, warm, buttery cheese drizzled all over the top or the pickled slices of jalapeno to give it a little heat what I do know is that all those things together make for a great nacho platter. The down side is that sometimes restaurants make nachos out of slightly stale chips, the ground beef is bland and greasy, the cheese is oily and I get more jalapeno juice than jalapenos.  But this recipe tackles all those concerns and this is one amazing nacho recipe you'll have to try at least once during football season.

Through this recipe, I learned that the order in which the ingredients are topped is important. The beans are layered on first since they are easy to spread. Next is the seasoned beef layer so it can adhere to the beans (thus soaking up an potential greasiness). Then finally, shredded cheese is sprinkled on top of everything. But it doesn't stop there. This recipe has everything layered again so there are actually 2 layers of chips, beans, beef and cheese. The whole thing is baked to heat up and melt the cheese. Once it's out of the oven, the entire nacho dish is topped with salsa and garnished with sour cream and diced fresh avocados. You just might even take your eyes off the game and really savor what you're eating!


Spicy Beef Nachos
recipe adapted from Cooks Illustrated's The Best Ever Recipes

Pico de gallo salsa:
1 medium tomato, diced
1 red onion, finely chopped
1/2 fresh jalapeno pepper, seeded and chopped
2 sprigs fresh cilantro, finely chopped
1/2 teaspoon garlic powder
salt & pepper to taste

In a medium bowl, combine tomato, onion, jalapeno pepper (to taste,) cilantro and green onion. Season with garlic powder, salt and pepper. Stir until evenly distributed. Refrigerate for 30 minutes.


Refried Beans:
1/2 cup canned refried beans
1/2 cup shredded sharp cheddar cheese

Combine the beans and cheese together in a small bowl and set aside.


Spicy Beef:

1 teaspoon vegetable oil
1 small onion, minced
 3 garlic cloves, minced
1/2 teaspoon cayenne powder
1 teaspoon ground cumin
1/2 teaspoon dried oregano
1 teaspoon salt
1 pound 85% lean ground beef
2 tablespoons tomato paste
1 teaspoon brown sugar
1 medium canned chipotle chile, chopped + 1 teaspoon adobo sauce
1/2 cup water
2 teaspoons juice from1 lime

Heat the oil in a skillet over medium heat until hot. Cook the onion until softened. Add the garlic, cayenne, cumin, oregano, and salt. Cook until fragrant. Add the beef and cook until no longer pink, breaking up the meat into smaller bits with a wooden spoon and scraping the skillet bottom to prevent scorching.

Add the tomato paste, sugar, chile, and adobo sauce and cook until the paste begins to darken. Add the water and bring to a simmer. Continue to cook over medium low heat until the mixture is nearly dry. Stir in the lime juice and place the mixture onto a towel lined plate.


Assembly:
1 (9.5 ounce) bag tortilla chips
2 cups shredded sharp cheddar cheese
2 cups shredded hot pepper jack cheese
2 jalapeno chiles, sliced into thin rings
Sour cream (optional)
Diced avocado (optional)
Cilantro leaves (optional)
Scallions, thinly sliced (optional)

Preheat the oven to 400 degrees. Spread half of the chips on a large, ovensafe 9x13 serving dish or platter. Dollop half of the bean mixture over the chips and spread evenly (it might be a little challenging but do the best you can.) Next, scatter half of the beef mixture over the beans, then top with 1 cup of the cheddar and 1 cup of the hot pepper jack cheese. Sprinkle half of the sliced jalapenos over the cheese layer.
Repeat with the remaining chips, beans, beef, cheese and jalapenos. Bake until the cheese is melted and just beginning to brown. Top with salsa and garnish with sour cream, diced avocado, cilantro leaves, scallions, or however you'd like to top your nachos.

Korean Style Chicken Wings

Great Sea's Chicken Wings. If you're a Chicago foodie, you know what I'm talking about. There's this Chinese restaurant in the Albany Park neighborhood of Chicago called Great Sea. They offer the standard Chinese American fare but the draw of this place is their Korean style chicken wings, interestingly enough. Their super crispy and crunchy chicken wings are perfectly glazed with this amazing sweet, garlicky, yet subtly spicy sauce. I've wanted to crack the secret to their wings for years, searching for a recipe that could even come close. Well, I'm done searching. I've found the recipe for Korean Style Chicken Wings I've been looking for and learned the secret to the unmistakable crunch these wings are known for...

Who doesn't love a good chicken wing? They're the perfect meaty, flavorful snack and best consumed when watching a game, right? I made this recipe as we watched the most recent Chicago Bears vs. Greenbay Packers football game and they were a hit. Crunchy, sweet and a subtle spice... total umami if you ask me! I soon found out that the secret to crispy chicken wings is cornstarch.

These wings start out by seasoning them liberally. I seasoned them with salt, pepper, onion and garlic powder since those are typically my favorite seasonings. Once seasoned, the wings get dredged in cornstarch and placed in a strainer so that any excess cornstarch can be removed. It's especially important that the wings have only a thin coating of cornstarch. Next, a simple wet mixture of cornstarch and water is made and the wings are dipped in this batter just before frying up. It seems that the cornstarch really gives the chicken a shattering crisp coating. When the chicken wings are fully cooked and done frying, they are transferred to a wire rack and set aside.

Meanwhile, a sweet garlicky sauce is made either in the microwave or stovetop. Sugar, soy sauce, water, minced garlic, rice vinegar and a touch of sriracha sauce is the magic combination for the most perfect sweet and spicy sauce, giving these chicken wings that Korean touch. Garnish with some sliced scallions, and you've got yourself the homemade version of Korean Chicken Wings! You can also adapt this recipe for fried chicken as well.

Korean Chicken Wings
recipe adapted from Cooks Illustrated The Best Ever Recipes

3 quarts vegetable oil for frying
1 1/2 cups cornstarch
3 1/2 pounds bone in chicken wings
1 teaspoon garlic powder
1 teaspoon onion powder
salt & pepper to taste
1 cup water
1 recipe for Sweet Soy & Garlic Sauce (recipe follows)
2 scallions sliced thin on a bias

Line 2 rimmed baking sheets with wire racks; set aside. Measure 2 inches of oil into a large Dutch oven or deep fryer and heat over medium high heat to 350 degrees.

Sift 1/2 cup of the cornstarch into a wide shallow dish. Set a large mesh strainer over a large bowl. Pat the chicken wings dry with paper towels and season with garlic powder, onion powder, salt and pepper. Working with several pieces of chicken at a time, coat all the chicken pieces thoroughly with the cornstarch, then transfer to the strainer and shake vigorously to remove all but a thin coating of cornstarch. Transfer the chicken to one of the wire racks.

Whisk the remaining cup of cornstarch, water, and 1 teaspoon salt together in a large bowl to form a smooth batter. When the oil is hot, finish coating the chicken by adding half of the chicken to the batter and turning to coat. Using tongs, remove the chicken from the batter, 1 piece at a time, allowing any excess batter to drip back back into the bowl. Add to the hot oil.

Fry the chicken, stirring to prevent the pieces from sticking together and adjusting the heat as necessary to maintain an oil temperature of 350 degrees, until the chicken begins to crisp, turns slightly golden. Continue cooking until the chicken turns a darker shade of golden brown to fully cook. Repeat with the remaining half of chicken by battering and frying.

Once fully cooked, transfer all the chicken to a large bowl, drizzle with the sauce and gently toss until evenly coated. Transfer the chicken to a serving platter, sprinkle with scallions and serve. You could also serve up the chicken once they're all fried and drizzle the sauce over as garnish instead of tossing completely to coat.

Sweet Soy-Garlic Sauce

1/2 cup sugar
1/4 cup soy sauce
1/4 cup water
3 garlic cloves, minced
1 tablespoon rice vinegar
1 teaspoon sriracha sauce

Combine all the above ingredients together in a small sauce pan over medium heat until syrupy. about 5 minutes. Let cool to room temperature before service. Alternately you can prepare this in a microwaveable bowl and microwave for about 5 minutes. Remove from the microwave and set aside to thicken.

Oven Baked Fish Nuggets

DSC_0252

I am always trying to feed my kids the healthiest things that I can.  Most week nights I have a ridiculously tigh schedule and sometimes we only have about 20 minutes for dinner.  On those nights they get leftover pizza or something but on the nights when I have a few more minutes I like to make these and they really love them.  Even if they do eat them with ranch dressing???

DSC_0257

Oven Baked Fish Nuggets (inspired by Kalyn’s Kitchen)

Preheat oven to 450F

Ingredients:

1 lb of fish (cod, tilapia, halibut) filet, thawed if frozen
1 cup flour
1 Tbsp garlic powder
1 Tbsp kosher salt
1 tsp paprika
2 eggs, beaten with a splash of water
1 cup panko bread crumbs
1 cup seasoned bread crumbs

Directions:

  • Cut your fish fillet so it is about ½ inch thick.  Then cut it into 1 inch wide pieces.  Pat them dry with a paper towel and set aside.
  • Get out three large bowls.  Add in your flour, garlic powder and paprika to the first, the eggs and water to the second, and the breadcrumbs to the third.  Mix to combine all the ingredients in each bowl. 
  • Spray a baking sheet with spray olive oil to cover. 
  • Dip each fish nugget into the flour mixture.  Shake off excess flour and dip into the egg bowl.  Then dip into the bread crumbs and lay onto your baking sheet in a single layer.  Continue with the rest of your nuggets.  Give the fish a light spray of the olive oil spray and put into the oven. 
  • Bake for 18 – 20 minutes or until nicely browned.  
  • Serve with tartar sauce or ketchup for dipping.

***The kids love fish stick night.  I have tried these using cod and tilapia.  Just about any firm white fish would do!

signature

Conor's Apple Picking Education

Conor receives instruction, including ABA based instruction, at Leo Hayes High School, a neighborhood school. He interacts with other students in the Resource Center and in common areas of the school. He also gets to go on school outings to places like the pool at his former middle school and recently went apple picking with other students and with a Teacher Assistant who was kind enough to take, and forward,  some excellent pictures. And, oh yeah, Conor loves apples. We go through a lot of them at home.


New Alward Carr Government Will Roll Back Autism Progress in New Brunswick


Congratulations to New Brunswick's new Premier David Alward and all members of his team who were elected.  Congratulations also to those Liberals who were elected despite the obvious backlash against the Liberal government of Shawn Graham. I offer all these congratulations sincerely even though I know that the election of this government and the likely cabinet role to be played by Jody Carr and possibly his brother Jack Carr will spell the end of the progress that has been made in helping autistic preschoolers and students in New Brunswick over the past 4 years.  We live in a democracy and the people have spoken. Those elected, including the Carr brothers in their ridings, have received the endorsement of the people.  For this they deserve the hearty applause of all NBers including me.

Having offered these sincere congratulations  though I must also state that the Carr Family will exercise a profoundly  negative influence on the future of autistic preschoolers and students in New Brunswick. Their prominence will threaten existing programs of early autism intervention, autism trained Teacher Assistants and accommodation in alternative learning environments within neighborhood schools for autistic children and other children whose severe disability challenges make the mainstream classroom a negative, and in some cases, a harmful environment.  I know these things because I was actively involved, along with other well informed, determined parents of autistic children,  in the struggle to establish the preschool and school programs and policies that have made New Brunswick an autism leader in early intervention and education in Canada.  I know these things because throughout the years of struggle we were steadfastly opposed by the New Brunswick Association for Community Living to which both Jody and Jack Carr are intimately tied.

The NBACL has done much good in raising public awareness about disabilities generally, promoting acceptance of disabilities generally, and acceptance. The problem is that the "community" and "inclusion" principles of the Community Living organizations in Canada and in New Brunswick have hardened into resistance to accommodation of those with severe autism challenges and other individuals whose disabilities require accommodation and learning in different environments ... a separate quieter environment outside the mainstream classroom ... than that which NBACL and CACL insist upon for ALL students regardless of their specific disability and their specific challenges and needs. The fine principles of the NBACL have deteriorated into dogma and ideology and Jody Carr, his wife Krista Carr and Jack Carr have all , in the past, resisted  efforts of parents seeking to help their autistic children.  The Carr's have resisted evidence based approaches to early intervention and education of all children with disabilities, including autistic children, in favor of cliches. There is no room for compromise or accommodation in the Community Living based ideology which the Carrs  promote. For them It is the community cliche way or the highway.

Adult autism residential care is one of the areas in which little progress has been made in New Brunswick.  5 years ago the Bernard Lord Conservative government sent an autistic youth to the Miramichi Youth corrections facility for several months while he waited a place at the Spurwink residential treatment facility in Maine.    When Jody Carr vetoes efforts to create a professional, evidence based and compassionate residential care and treatment facility in New Brunswick he says that "we will not send them away" do not be fooled, do not believe him.   In 2005 the Lord  Conservative government sent them, autistic youths and adults away to Maine and to outmoded psychiatric facilities, even to hospital wards and Jody Carr, a Conservative MLA at the time,   said nothing .... absolutely nothing.  

For New Brunswick children and adults with autism the Alward Carr years will not be pretty. There is a rough trail ahead, a very rough trail.

.

Shrimp Jambalaya

We are most definitely a rice loving family so any dish made with rice is always welcomed to the table. When my husband suggested a dish using shrimp for dinner, I happily decided to make this Shrimp Jambalaya. It's chock full of sausage, shrimp and vegetables and it's a wonderful one pot meal, especially for the fall. The trick to this dish is the rice though. It has to be cooked just right otherwise you'll end up with a gummy mess...


What I like about this recipe is that everything is cooked in one pot, making clean up a breeze. However, when rice is involved, it could get a little tricky. There are some rice dishes have a tendency to get gummy when overcooked or gritty when undercooked. And when it comes to jambalaya, when I've made it in the past on the stovetop, there's that potential for the bottom to get all burnt and crusty. For this recipe, the dish is baked and it ensures the rice won't scorch on the bottom. Another trick is that a piece of foil is placed directly on the surface of the rice before the jambalaya goes into the oven. The foil holds in the steam and heat far more effectively than the lid alone so that helps every grain of rice to cook perfectly.

Also, if you can't find andouille sausage, you can substitute it with a polish sausage and add some cajun seasoning to taste for that extra kick of flavor.

Shrimp Jambalaya
recipe from Cook's Illustrated The Best Ever Recipes

2 teaspoons vegetable oil
8 ounces andouille sausage, halved lengthwise & cut crosswise into 1/4 inch half moons
1 pound shell on shrimp (31 to 40 per pound)
1 onion, minced (about 1 cup)
1 green bell pepper, stemmed, seeded, and chopped fine
5 garlic cloves, minced
1 1/2 cups long grain white rice
1 tablespoon tomato paste
1 teaspoon salt
1/2 teaspoon minced fresh thyme leaves
1 (14.5 ounce) can diced tomatoes, drained with 1/4 cup juice reserved
2 (8 ounce) bottles clam juice
1 bay leaf
2 scallions, sliced thin

Preheat the oven to 325 degrees.


Heat the oil in a large Dutch oven over medium high heat until shimmering. Add the sausage and cook until browned. Using a slotted spoon or tongs, transfer the sausage to a paper towel lined plate. Add the shrimp to the same pot and cook until the shells are lightly browned on both sides, about a minute per side. Transfer the shrimp to a large bowl and refrigerate.

Reduce the heat to medium and add the onion, celery, bell pepper, and garlic to the opt. Cook, stirring occasionally, until the vegetables have softened, about 5-10 minutes. Add the rice, tomato paste, salt and thyme and cook until the rice is coated with fat. Stir in the tomatoes, reserved tomato juice, clam juice, bay leaf, and sausage . Place a square of foil directly on the surface of the rice. Bring mixture to a boil, cover the pot, transfer to the oven, and bake in the preheated oven until the rice is almost tender and most of the liquid is absorbed, about 20 minutes.

Meanwhile, peel and devein the shrimp and discard the shells. Remove the pot from the oven, lift off the foil, and gently stir in the peeled shrimp, and any accumulated juice. Replace the foil and lid, return the pot to the oven, and cook until the rice is fully tender and the shrimp are cooked through, about 5 minutes. Remove the pot from the oven, discard the foil and bay leaf, fold in the scallions, and serve immediately.

Νίψον ανομήματα μη μοναν όψιν


Crunchy Potato Wedges

What's a burger dinner without french fries?! I'm always in search of french fry recipes and there are so many ways to prepare them. This time around, I made these Crunchy Potato Wedges to serve alongside the All in One Burgers I made. I enjoyed this dish even though I prefer thin, skinny fries instead. I will say that these are hearty fries so a few is more than enough for a serving. What piqued my interest about this recipe is the use of a simple batter and spice blend to season the fries...

French fries typically require cooking twice. The first time is to cook the potato and soften it up a bit and the second time is to get a nice crisp texture and golden color. For these Crunchy Potato Wedges, potatoes are sliced, tossed with oil and spices, and then cooked in the microwave. (Yes - the microwave!) The potatoes were cooled a bit and then dredged in a mixture of flour and cornstarch. Then the potatoes get a quick dip in a mixture of buttermilk and baking soda. Another dredge in flour and cornstarch finished the potatoes before they were deep fried. After frying, the fries got another toss in seasonings to give them an extra boost of flavor. The result is a super crispy, coated french fry that has a nice spice flavor from the seasonings used. It was a nice change of pace from the usual french fry recipe and it gave me some ideas to use the flour/batter technique with other things!

Crunchy Potato Wedges

4 teaspoons kosher salt
1/2 teaspoon black pepper
2 teaspoons onion powder
1 teaspoon garlic powder
3/4 teaspoon cayenne pepper
1 teaspoon dried oregano
1 3/4 pounds russet potatoes (about 3 large), cut into 1/4 inch wedges
1/4 cup vegetable oil, plus more for frying (about 3 quarts)
1 1/2 cups unbleached all purpose flour
1/2 cup cornstarch
1 cup buttermilk
1/2 teaspoon baking soda


Combine the salt, pepper, onion and garlic powder, cayenne and oregano in a bowl. Take 4 teaspoons of this mixture and add to a large microwave safe bowl.

Add the potato wedges to the large microwave safe bowl with the 4 teaspoons of spices and toss with 1/4 cup of vegetable oil to coat. Cover the potatoes with plastic wrap and microwave on high for 7-9 minutes, until the potatoes are tender but not falling apart. Shake the bowl without removing the plastic to redistribute the potatoes halfway through cooking. Slowly remove the plastic wrap from the bowl and drain the potatoes. Arrange the potatoes on a rimmed baking sheet and cool until they firm up, about 10 minutes.

Heat the remaining 3 quarts of oil in a Dutch oven over high heat to 340 degrees. Meanwhile, combine the flour and cornstarch in a medium bowl. In another bowl, combine the buttermilk and baking soda. Working in 2 batches, dredge the potato wedges in the flour mixture, dip in the buttermilk mixture and dredge again in the flour mixture. Shake off the excess flour and place on a wire rack.

When the oil is ready, add half the coated wedges and fry until deep golden brown (about 4-6 minutes.) Transfer the wedges to a large bowl and toss with 1 teaspoon of the spice mixture. Drain the wedges on a baking sheet lined with paper towels. Return the oil to 340 degrees and repeat with the second batch of wedges. Serve with extra spice mixture on the side.

All in One Burgers

There's nothing like a great burger. In fact, all throughout my pregnancy, burgers were what I craved, at all hours of the day and night. For me, I like my burgers simply made with simple seasonings and topped with fresh lettuce, tomato and slices of sweet onion. I could do without the condiments since the main draw is the patty itself. When I came across this recipe for 'All in One Burgers' I knew I had to give it a try. With these burgers, flavor is busting out the seams since the patty is packed with all sorts of goodness. It was a nice change of pace from my usual burger recipe and definitely worth a try...


The key players in this burger recipe include sharp cheddar cheese, yellow mustard, Worcestershire sauce and bacon. (Everything's better with bacon, right?!) These ingredients are mixed in with the ground beef and formed into patties. You have the option to cook on a grill or even your stovetop with a grill pan. I found that these burgers were especially juicy, yet not greasy - and that's due to the use of 85% lean ground beef. There's really no need to top these burgers with anything else aside from lettuce and tomato because the bacon and cheddar cheese definitely shines through. A bonus is that it's not that messy to eat (as opposed to having the toppings on the burger.) You could also build from this recipe by incorporating firm cheeses, adding garlic, chiles and various herbs. However you decide to make your burgers, this is definitely one worth trying!

All in One Burgers
recipe adapted from Cooks Illustrated 'Best Recipes'

8 slices of cooked bacon, crumbled and chopped fine
1 1/2 pounds 85% lean ground beef
1 cup shredded extra sharp cheddar cheese
4 teaspoons yellow mustard
3 teaspoons Worcestershire sauce
1/2 teaspoon salt
1/2 teaspoon fresh ground pepper

In a large bowl, crumble the beef and add the cooked bacon, cheese, mustard, Worcestershire sauce, salt and pepper. Using your hands, lightly knead the mixture until combined. Divide the meat into 4 equal portions, then form each into a loose ball and gently flatten into a 1 inch thick patty. Cover and refrigerate the patties until the grill is ready.

Place the burgers on the grill and cook, without pressing on them, until well seared on both sides and cooked through, roughly 8-12 minutes. Flip the burgers halfway through. Transfer the burgers to a platter, tent loosely with foil and let rest for 5 minutes before serving.

FROSTED SUGAR COOKIES

BLACK & WHITE


So many see the world in black and white, true and false, right and wrong. Maybe it is time to start thinking in shades of gray.

A very long time ago, out of college and working an utterly lousy job in New York City, I decided that it was time to pack my bags and head out. Tired of working for barely enough wages to pay a New York rent and the bills with nothing at all left over with which to enjoy the city, frustrated by the Reagan “Me Years” and the constant talk of money, money, money swirling around me, fed up by all of my wealthy classmates who could afford the interesting jobs that paid exactly zero dollars for the privilege of working at this gallery or that museum while those of us without the support of our parents had to settle for the less than interesting or simply low-paying jobs, angry by all of the social injustice I saw, and maybe even upset with myself for the string of bad career choices I had made, I knew that I had to find a new life. So I gave my month warning, quit my job, ripped up my rental contract, gave away as much of my furniture as I could, wrapped up bags of old clothing and dumped them on the sidewalk for whoever wanted to take them away, packed two suitcases, emptied my meager bank account and left. Ah, Paris awaited on the other side of the ocean, only the first leg of what has turned out to be a very long journey.


To many of my friends this appeared to be the ultimate in cool bohemian adventure, able to pick up and move on a whim, choose a new city, a new country, slip into a new life with ease and pleasure at will. Others, not so much. One conversation struck me so forcibly that it still lingers in my mind today: I remember a friend, upon learning that I was quitting my job in a New York art gallery, packing up my bags and leaving for Paris, declaring with a sigh “Ah, I wish I could leave everything behind and move to Paris….” and felt his thoughts “if only I didn’t have a serious job, a real job, responsibility and obligations” hanging in the air between us like some unspoken rebuke. The world as he saw it, in black and white.

A few years later, my young husband decided to change professions, leave behind one that was unsatisfying, unrewarding and often mind bogglingly crazy for another that he found more exciting and better suited to his character and to his dreams. One day, he came home from a dentist appointment and related how he had casually explained to the dentist that he was leaving his profession to start another and how the dentist actually turned on him, furiously screaming that it was impossible and irresponsible to change professions like that! My husband was stunned by the dentist’s absolute outrage! It was as if our ability to turn our back on society’s expectations of us and to grab at our dreams was a personal affront to him! That wistful voice from my past, my friend’s statement on the eve of my first trip to Paris, came back to join this other, angrier voice in a chorus of disapproval, of judgment! And we were found guilty! But guilty of what?


Both my husband and I have changed professions, jobs, homes, cities many times. Cool Bohemian adventure or irresponsible whim? Black or white or something in between? We often discuss the ways of life and what role we have to play in the scheme of things, our responsibility as adults, parents, citizens. Do we follow one path, choose a career, create a cozy, secure home, have children, never say die until the end of our days? We are surrounded by so many who think so, we live in a society, a culture that sets strict rules of behavior and expectations, yet there has always been something stronger at play from my first voyage to France and JP’s long ago choice to spend two years in Morocco in lieu of performing the traditional military service to our moves from country to country, city to city. People often ask me to tell them how I ended up in Paris, how I met my husband, and this is the rather simple story.

Maybe we have simply both been bitten by the same strain of wanderlust? But when the urge to move and change kicks in, maybe it is less out of a sense of adventure as it is a need. We seem, both of us, to be on a continuous search for ourselves, for a life that suits, a society that fulfills our wants and soothes our hunger for a better life. Maybe there is nothing wrong with defying expectations and bending the rules, refusing to buy the whole Black is Black ideology. Our sons have often vilified us, accusing us of “not being like the other parents!” Acquaintances often try and amuse us with understanding smiles, interested curiosity in this wanton life we have chosen, all the while treating us as children who know no better. But life is too short for misery or discontent. And life is too short to not go after one’s dreams. Why the heck not? Maybe rules are meant to be broken, or at least bent. Are we the Black Sheep of this otherwise White Society of people who surround us? Strangely enough, once I got involved with the fascinating world of food, first as a culinary tour guide and interpreter, now as a food blogger and writer, I see that we are not alone. The world is filled with people who choose to live their passions even if it is risky, people who change and evolve not with what is happening outside but responding to what is happening inside. I sound like a preacher, like I’m declaring only what is so obvious to so many, but life is full of so many interesting possibilities and, as they say, life is too short to stick to just one thing, to live by somebody else’s rules.


For now, we are content. I am undertaking what I hope will be an entirely new career, absolutely committed to having fun while pursuing a passion. We pat ourselves on the back and suppress a grin as we watch our sons embark on their voyage into adulthood in the most unlikely, unexpected ways, following their passions rather than following the crowd. All four of us have learned that life is not merely black and white, rather it is full of a rainbow of bright, intriguing colors.


The September 2010 Daring Bakers’ challenge was hosted by Mandy of What the Fruitcake?! Mandy challenged everyone to make Decorated Sugar Cookies based on recipes from Peggy Porschen and The Joy of Baking. In real life I am as colorful as the rainbow yet I dress the world around me in black and white. And what goes better with vanilla than chocolate? Perfect, buttery sugar cookies frosted in pure white decorated with a luscious Rorschach of chocolate squiggles. Kind of like what it looks like inside of my head.


FROSTED SUGAR COOKIES IN BLACK & WHITE

½ cup + 6 Tbs (200 g) unsalted butter, softened to room temperature
1 cup (200 g) sugar
1 tsp vanilla
1 large egg, lightly beaten
3 cups + 3 Tbs (400 g) flour


In a large mixing bowl, cream together the butter, sugar and vanilla until smooth and creamy. Do not overbeat; incorporating too much air into the batter may lead to the dough spreading in the oven thus losing their shape.
Beat in the egg until combined, scraping down the sides of the bowl as needed. Gradually sift the flour onto the butter/sugar mixture, beating it in on low speed. If you add it all at once it may fly out all over the counter. Scrape the dough out onto a lightly floured work surface and knead lightly just until you have a smooth ball of dough.

Divide the dough into two or three even pieces. Gently sandwich each ball of dough between baking sheets of parchment paper until it is about 1/5- to 1/8-inch thick. Slide the parchment onto baking trays and refrigerate the sheets of dough for about 30 minutes.

Once chilled, peel off the top layer of parchment and use your favorite cookie cutters to cut out shapes of dough, carefully transferring the shapes to a baking or cookie sheet. Reroll dough scraps, roll out again and cut, using up all of the dough. Chill the trays of shapes for an additional 30 minutes.

Preheat the oven to 350°F (180°C).

Bake the cookies for 8 – 15 minutes, depending on the size and thickness of the cookies, until golden around the edges. If your oven bakes unevenly (as does mine) rotate the baking sheets halfway through the baking time. Remove from the oven, gently slide or lift off the baked cookies onto cooling racks and allow to cool completely before frosting.

The quantities given for both the white and the chocolate icings are good to frost all of the cookies. Feel free to cut either or both recipes in half.

WHITE ROYAL ICING

3 cups (375 g) Powdered/Icing/Confectioner’s Sugar, or more as needed
2 large fresh egg whites
2 tsps lemon juice
1 tsp either vanilla or almond extract, optional

Whisk the egg whites with the lemon juice just until foamy. Sift the powdered sugar over the egg whites and beat on low speed until smooth and creamy. Beat in the flavoring if using. Add more sugar if the frosting is too thin and runs. It should be spreadable.

CHOCOLATE ROYAL ICING

2 cups (125 g) Powdered/Icing/Confectioner’s Sugar, or more as needed
1/6 to ¼ cup (40 - 60 ml) boiling water
1 oz (30 g) unsweetened or very bittersweet chocolate (I used Lindt’s Dessert 99%)

Gradually add enough of the boiling water to the powdered sugar, stirring, until the mixture is thick but smooth and speradable. Chop up the chocolate and add it to the icing and stir (over very low heat if needed) until the chocolate is melted and the icing is smooth.


The Future of NBers with Autism Will Be Decided Here; Please Vote FOR Autism

Today New Brunswickers will vote.  

We will come together and decide who will represent us in the  legislature.  This is the most important decision we, citizens in this province, will make for the next 4 years.  

If news reports are true many will vote in anger or cynicism or out of a desire to punish the governing party. That is their democratic right. That is your democratic right. I ask you though, as the father of an autistic son, to not let anger determine the future of your family member with autism. Please vote FOR our autistic loved ones, family members and family friends with autism.  Please do not vote in anger or cynicism. Vote for the party that, over the past 4 years,  made New Brunswick a leader in preschool and school autism services in Canada.  

Please do not vote for a party attempting to capitalize on anger. Do not vote for a party which will give New Brunswickers cliches like "community", "inclusion", and "connecting the dots" but will dismantle the evidence based programs that have been built and helped our children.  Do not vote for a party which will dismantle New Brunswick's Canada leading evidence based early intervention and education system.  Please do not vote for anger and the Conservative Party.  Please vote Liberal ... for the continuation of solid autism programs that have benefited our children.

Pumpkin Praline Dessert Tamales

Who says tamales have to be savory all the time? When I hosted a culinary tour of the Little Village neighborhood of Chicago a while back, I had the opportunity to try a sweet dessert tamale made with pineapple and pecans. Much to my surprise it was really good and worked so well with the masa. I started thinking that masa is really a great neutral base to build flavors upon so it made sense that sweet tamales work just as well as savory ones. Although we made quite a few tamales at our tamale party, I didn't have a chance to share a sweet recipe. So when I got home, I made these Pumpkin Praline Dessert Tamales to highlight some flavors of fall...

Pumpkin is quite a popular ingredient this time of year so I decided to try my hand at incorporating it in a tamale. I sweetened my masa with a touch of sugar and cinnamon and created a simple filling made with canned pumpkin pie mix, chopped toasted pecan pieces and some brown sugar. After preparing a good handful of these tamales, I hoped for the best and steamed them until done. Sure enough, after taking a bite, they were perfect! The masa held it's own with a subtle sweetness and that hint of cinnamon really carried through. The filling itself was just the taste of fall I was looking for. The pumpkin and brown sugar worked worked well with the crunchy bits of toasted pecan pieces. To finish them off, I garnished these tamales with some homemade whipped cream and a sinful drizzle of buttery caramel sauce. That put these dessert tamales over the top!

Pumpkin Praline Dessert Tamales
original Joelen recipe

2 cups pumpkin pie filling
2 tablespoons dark brown sugar
1 1/2 cup toasted pecan pieces
2 cups masa (prepared as directed on package)
1 teaspoon ground cinnamon
1 tablespoon sugar
corn husks, soaked
caramel sauce for serving (optional)
whipped cream for serving (optional)

To prepare the pumpkin praline filling, combine the pie filling, brown sugar, and pecan pieces in a bowl.

Prepare the masa as directed on the package for 2 cups of masa and add the cinnamon and sugar. and soak the corn husks in hot water for at least 10 minutes. Drain the water from the corn husks and start to assemble.

To assemble, spread a heaping tablespoon of masa across the widest part of the corn husk. Spread it to a nice thin layer. Down the middle of the masa, place your filling in a line, being careful not to overfill! Take the sides of the tamale and fold it over towards the middle. Fold up the narrow bottom and tie it with a sliver of corn husk.

To cook, steam them in a large pot with a steamer basket or even a colander. If you don't have a large pot with a steamer basket, crumple a large piece of foil into a ball and place in a wok, dutch oven or the largest/deepest pot you have. Place your tamales inside the pot and have it lean against the foil ball, all the way around. Carefully fill the pot with water until you have an inch of water or more - just as long as the water level doesn't touch the bottom of the steamer basket/colander. Cook over high heat for 45 minutes to 1 hour, covered. Check the level of the water every so often to make sure it hasn't completely evaporated. The tamales are done when it peels away from the corn husk easily and the masa turns a slight shade of yellow.

To serve, open up the tamale and tuck in the corn husks, laying the tamale on top. Top with whipped cream and drizzle with caramel sauce.

* Since a batch of tamales makes quite a bit, you can definitely freeze them to enjoy later. The tamales should be cooked completely before freezing. I recommended cooling the tamales completely before packing them into a freezer bag. To enjoy, remove from the freezer and run the tamales over some water to get the husks wet. Wrap the wet tamale in a paper towel and microwave for 1-2 minutes or until hot and softened.

Tamale Party

Is there a food that your family treats as a big ordeal that generally takes a day to make? In my family, one food would be lumpia, or Filipino eggrolls. It takes some time to make the filling and allowing it to cool, prepping the wrappers, rolling each by hand, carefully packing them for the freezer and of course, frying some up to enjoy. Despite being an all day affair, it's worth all the time and effort to make lumpia, even if it's just an excuse to get together with family. Well Latin Americans can certainly relate to how my family makes lumpia. They go through a similar lengthy process when making tamales. Since I love hanging out in the kitchen with friends, I hosted a Tamale Party today where we sat around and wrapped up tamales around the table...

Everything was picture perfect at the tamale party I hosted. From the big batches of masa we all made, the fillings that I brought in, the large bowls of corn husks soaking in water, to the tables where we sat and made our tamales... but there's no point in being 'picture perfect' if you don't have an SD card on hand to be able to use your nice camera. Blah! So to make up for it, my pictures were taken here at home where I made some tamales for my family.

For the tamale party, friends brought corn husks to wrap our tamales in along with condiments. I brought the masa and 3 kinds of fillings including: Chicken Salsa Verde, Roasted Tomato & Pork, and Corn, Black Bean & Cheese (recipes to follow below).

Preparing the Masa
For the event, I used Maseca brand instant masa. This brand is gluten free and uses no lard. Simply follow the package instructions by combining the instant masa with water and salt. For added flavor, substitute the water for chicken, pork or beef broth (to match your filling) and/or add a little ground cumin in the mix for savory tamales! Once you have everything combined, you want to make sure the masa is a nice soft, dough consistency. If it's a little crumbly, add a bit more water or broth. If it's a little wet, add more masa. Another trick to check whether your dough is ready us to take about 1/2 a teaspoon of the dough and place it in a cup of cold water. If the dough floats, the dough its ready.

Preparing the Corn Husks
You can find dried corn husks at various stores including some supermarkets or ethnic markets. Friends picked them up from an ethnic market and asked the staff for them since its something they don't always put out. (It helps to know your neighborhood grocery staff too!)

To prepare the corn husks for tamales, you will need to soak them for at least 10-15 minutes in hot water to get them pliable and to absorb enough moisture so they don't dry out while cooking.
 Assembling the Tamales
There are so many ways to assemble tamales, but for my event, we kept it simple. To assemble, spread a heaping tablespoon across the widest part of the corn husk. Spread it to a nice thin layer. Down the middle of the masa, place your filling in a line, being careful not to overfill! Take the sides of the tamale and fold it over towards the middle. Fold up the narrow bottom and tie it with a sliver of corn husk. I'm sure if you did a search online, you'll find so many fun and different ways to package these tasty tamales.

If you need some visuals, here is a link with some step by step pictures and thorough explanations on how to make tamales.

Cooking the Tamales
Now that you have your tamales made, you'll want to steam them in a large pot with a steamer basket or even a colander. If you don't have a large pot with a steamer basket, crumple a large piece of foil into a ball and place in a wok, dutch oven or the largest/deepest pot you have. Place your tamales inside the pot and have it lean against the foil ball, all the way around. Carefully fill the pot with water until you have an inch of water or more - just as long as the water level doesn't touch the bottom of the steamer basket/colander. Cook over high heat for 45 minutes to 1 hour, covered. Check the level of the water every so often to make sure it hasn't completely evaporated. The tamales are done when it peels away from the corn husk easily and the masa turns a slight shade of yellow.

Since a batch of tamales makes quite a bit, you can definitely freeze them to enjoy later. The tamales should be cooked completely before freezing. I recommended cooling the tamales completely before packing them into a freezer bag. To enjoy, remove from the freezer and run the tamales over some water to get the husks wet. Wrap the wet tamale in a paper towel and microwave for 1-2 minutes or until hot and softened.


Chicken Salsa Verde Filling:
1 large roasting chicken (about 4-5 pounds)
2 tablespoon olive oil
1 tablespoon garlic powder
1 tablespoon onion powder
1 tablespoon adobo seasoning
2 teaspoons ground cumin
1/4 cup sliced pickled jalapeno slices
1 1/2 cups salsa verde (any store bought brand or homemade)


Preheat the oven to 350 degrees. In a roasting pan lined with a roasting rack, place the chicken in the center. (Alternately you could use a shallow baking dish large enough for your chicken.)


Season the top of the chicken with all the seasonings (garlic powder, onion powder,, adobo seasoning, ground cumin, salt & pepper.) Drizzle with the oil and rub over the chicken. Bake in the preheated oven for 1-2 hours until juices run clear. Allow the chicken to cool.


When the chicken has cooled enough to handle, remove all the meat from the bones and place the meat in a large bowl. (Save the bones for stock by placing them in a freezer bag & freeze until you're ready to make stock.)


Add the jalapeno slices and salsa to the bowl and mix thoroughly to combine. Cover and allow filling to chill overnight for flavors to meld.


After the chicken has chilled, process the chicken in batches in a food processor by pulsing to a mealy consistency. Or if you prefer, keep chicken as is for filling.


Roasted Tomato & Pork Filling:
1 large pork shoulder or pork butt roast (about 4-5 pounds)
2 tablespoon olive oil
1 tablespoon garlic powder
1 tablespoon onion powder
1 tablespoon adobo seasoning
2 teaspoons ground cumin

1 1/2 cups roasted tomato salsa (any store bought brand or homemade)


Preheat the oven to 350 degrees. In a roasting pan lined with a roasting rack, place the pork roast in the center. (Alternately you could use a shallow baking dish large enough for your pork roast.)


Season the top of the pork roast with all the seasonings (garlic powder, onion powder,, adobo seasoning, ground cumin, salt & pepper.) Drizzle with the oil and rub over the pork roast. Bake in the preheated oven for 1-2 hours until juices run clear. Allow the  pork roast to cool.


When the pork roast has cooled enough to handle, slice the roast and then dice up the meat. Place the meat in a large bowl.

Add the salsa to the bowl and mix thoroughly to combine. Cover and allow filling to chill overnight for flavors to meld.


After the  pork roast has chilled, process the pork roast in batches in a food processor by pulsing to a mealy consistency. Or if you prefer, keep pork roast as is for filling.


Corn, Black Bean & Cheese Filling:
3 (15 oz) cans of black beans, rinsed & drained
1 cup frozen corn kernels
1/2 cup diced bell pepper (red, green, yellow or mix)
1 tablespoon garlic powder
1 tablespoon onion powder
1 tablespoon adobo seasoning
2 teaspoons ground cumin

2 cups shredded hot pepper jack cheese

Place half of the black beans in a large bowl. Place the remaining black beans in the bowl of a food processor and pulse until mashed. Add the mashed black beans to the bowl. Add the remaining ingredients and stir to combine.

Autism Promise 2006: Liberals Kept Their Word and New Brunswick Became a Leader in Educating Children with Autism

If you are the parent, family member, or family friend of a child with autism who is being educated  or assisted at a neighborhood school by an autism trained Teacher Assistant and autism trained Resource Teacher, as I am, please remember that these services resulted from an extraordinary promise made ... and kept .... by  Liberal leader Shawn Graham who kept that commitment as Premier once his Liberal party formed the government. My son Conor, and many other autistic school children in New Brunswick,  received the benefits of that promise and the UNB-CEL autism trained Teacher Assistant instruction and individual instruction program put together with the help of autism trained Resource Teachers. 

Tomorrow as you cast your ballots please remember the following autism commitment  made to then Autism Society NB President Lila Barry on behalf of autistic children and their families. The commitment was made,  and honored, by  Shawn Graham and his Liberal government. The fulfillment of that commitment has helped many autistic children in New Brunswick, including my son Conor.  The fulfillment of that autism commitment has made New Brunswick a leader in educating children with autism :

From: Graham, Shawn (LEG)
Sent: Wednesday, September 06, 2006 2:37 PM
To: lila barry
Subject: Liberal Platform

Dear Ms. Barry:

Thank you for your letter and for sharing your concerns with me. In our Liberal election platform that will be released this week, we are committing to the implementation of the recommendations of the Interdepartmental Committee on Autism released in November 2001. Although we realize this document is now nearly five years old, it does provide a basis on which to develop, in partnership with the stakeholders, a strategy that will assist children with autism from early childhood and into adulthood.

As well, we will take two concrete steps to address the immediate needs of children with autism in two areas: a case management process and UNB-CEL autism training.

A new Liberal government will:

1. Integrate services for young children and their families by enhancing and expanding the Early Childhood Initiatives Program to ensure a smooth transition into public school for children identified as at risk or those with special needs, such as autism.


2. Provide UNB-CEL autism training for 100 additional teaching assistants and Methods and Resource teachers each year for four years.

I commend you and the members of the Autism Society of New Brunswick on your tireless advocacy on behalf of children with autism. You are truly making a difference in many lives. Please feel free to contact me at any time.

Yours truly,

Shawn Graham

Red Velvet Cupcakes

After hosting a Cupcake Bootcamp, I came home with cupcakes on the brain (naturally). Even after being surrounded by cupcakes all day, I figured I could play in the kitchen for a little while and make a nice batch with my nephew. He and I had fun making these Red Velvet Cupcakes from scratch... and I got a kick making him be Mr. Popular for a day...


Even though making cupcakes from a box mix is easy and convenient, I definitely like making them from scratch too. One of my favorite cupcake flavors is red velvet. It's essentially a chocolate cake that tastes like chocolate and vanilla and has red food coloring added for it's unmistakable color. The recipe comes from that Southern belle, Paula Deen. Her recipe is a classic Southern version and from my understanding, Southerners love red velvet cake. The usual suspects are combined - flour, sugar, baking soda and salt, along with cocoa powder. As for the wet ingredients, it's a little more interesting where oil, buttermilk, eggs, vinegar, vanilla extract and red food color are combined. There aren't too many cake recipes I've made involving vinegar, which makes red velvet pretty unique. As for frosting these cupcakes, I went with the ever favorite cream cheese frosting. These cupcakes will make everyone like you more than they already do! In fact, when my nephew took these cupcakes to church the next day, everyone flocked to him the minute he was holding the cupcake tray. I don't think he was expecting to be 'Mr. Popular'!


Red Velvet Cupcakes
recipe from Paula Deen

2 1/2 cups all-purpose flour
1 1/2 cups sugar
1 teaspoon baking soda
1 teaspoon salt
1 teaspoon cocoa powder
1 1/2 cups vegetable oil
1 cup buttermilk, room temperature
2 large eggs, room temperature
2 tablespoons red food coloring
1 teaspoon white distilled vinegar
1 teaspoon vanilla extract

Frosting:
1 pound cream cheese, softened
2 sticks butter, softened
1 teaspoon vanilla extract
4 cups sifted confectioners' sugar


Preheat the oven to 350 degrees F. Line 2 (12-cup) muffin pans with cupcake papers.


In a medium mixing bowl, sift together the flour, sugar, baking soda, salt, and cocoa powder. In a large bowl gently beat together the oil, buttermilk, eggs, food coloring, vinegar, and vanilla with a handheld electric mixer.

Add the sifted dry ingredients to the wet and mix until smooth and thoroughly combined.


Divide the batter evenly among the cupcake tins about 2/3 filled. Bake in oven for about 20 to 22 minutes, turning the pans once, half way through. Test the cupcakes with a toothpick for doneness. Remove from oven and cool completely before frosting.


For the Cream Cheese Frosting:
In a large mixing bowl, beat the cream cheese, butter and vanilla together until smooth. Add the sugar and on low speed, beat until incorporated. Increase the speed to high and mix until very light and fluffy. 

Cupcake Bootcamp!

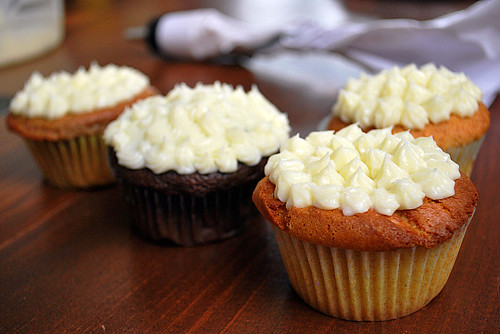
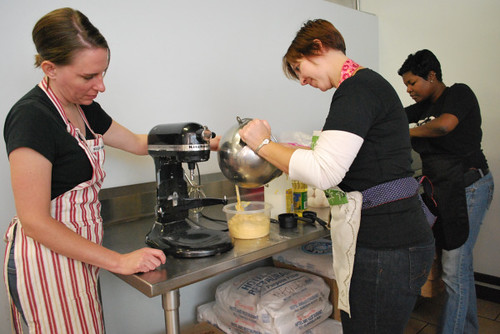
Maybe I'm in the minority, but I don't get the fascination about cupcakes. Here in Chicago, there are several cupcake bakeries, all with their special niche. It's also interesting to know that most gastro-trucks (food trucks) in Chicago are cupcake based. What is it about these things?! Is this food fad here to stay or will it eventually die down? Regardless, even I can't resist a cupcake. I may not understand why they're so popular but they certainly hit the spot. Since cupcakes are increasingly popular, it struck me to host a Cupcake Bootcamp to share a few tips and tricks, as well as indulge in this perfect, portable treat...

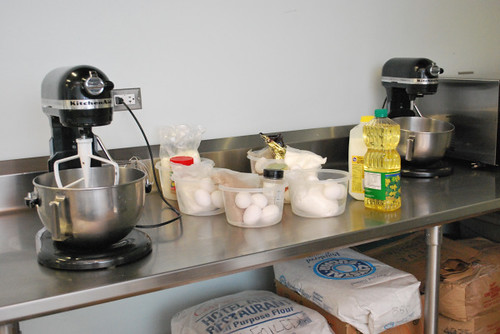
For the Cupcake Bootcamp, friends and I got together to make several kinds of cupcakes using a box mix. The general formula for a cupcake recipe is:

1 box cake mix (dry package contents only)
+ 4 room temperature eggs
+ 3/4 cup buttermilk
+ 1/3 cup canola oil
+ 1/2 cup add ins*

* Add ins include: nuts, baking chips, fresh or dried fruit, peanut butter, Nutella, pumpkin pie filling, etc.

Preheat oven to 350 dregees. Combine all the above ingredients in a bowl, mix with a mixer (hand held or stand mixer) for 2 minutes. Pour into lined cupcake liners and bake in preheated oven for 12-18 minutes until golden brown and done.

The fun in making cupcakes this way is that they bake up consistently without having to make a batch from scratch only to find out it isn't very good. Another reason is that it's super convenient and allows for some creativity. I love playing with various cake flavors and add ins to create something different. For the Cupcake Bootcamp, we made the following cupcake flavors (recipes to follow below):
 
French Vanilla Cupcakes
Chocolate Mocha Cupcakes
Peanut Butter Cupcakes
Carrot Cake Cupcakes
Pumpkin Butter Cupcakes
Chocolate Banana Cupcakes

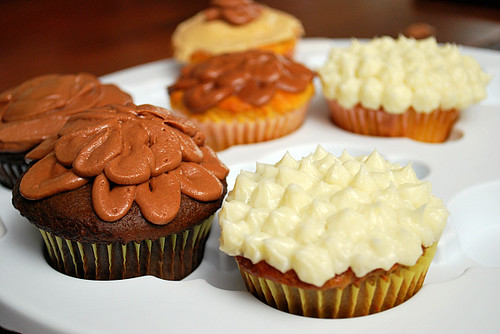
So let's talk frosting. For the Cupcake Bootcamp, we prepared the following frostings which paired nicely with the cupcakes we baked (recipes to follow below):

Cream Cheese Frosting
Vanilla Bean Buttercream Frosting
Chocolate Buttercream Frosting
Peanut Butter Buttercream Frosting

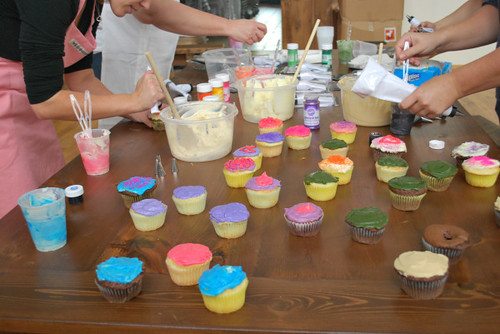
After we finished making the frostings, it was time to decorate! Various colored sprinkles, color gels and decorator tips were available for everyone to get creative. I plan on hosting a second Cupcake Bootcamp dedicated to decorating, learning more about frostings and the different consistencies next month so stay tuned!

French Vanilla Cupcakes
1 box French Vanilla cake mix (dry package contents only)
4 room temperature eggs
3/4 cup buttermilk
1/3 cup canola oil

Preheat oven to 350 dregees. Combine all the above ingredients in a bowl, mix with a mixer (hand held or stand mixer) for 2 minutes. Pour into lined cupcake liners and bake in preheated oven for 12-18 minutes until golden brown and done.


Chocolate Mocha Cupcakes
1 box Dark Chocolate cake mix (dry package contents only)
4 room temperature eggs
3/4 cup buttermilk
1/3 cup canola oil
1 teaspoon instant coffee

Preheat oven to 350 dregees. Combine all the above ingredients in a bowl, mix with a mixer (hand held or stand mixer) for 2 minutes. Pour into lined cupcake liners and bake in preheated oven for 12-18 minutes until golden brown and done.


Peanut Butter Cupcakes
1 box butter cake mix (dry package contents only)
+ 4 room temperature eggs
+ 3/4 cup buttermilk
+ 1/3 cup canola oil
+ 1/2 cup creamy or crunchy peanut butter

Preheat oven to 350 dregees. Combine all the above ingredients in a bowl, mix with a mixer (hand held or stand mixer) for 2 minutes. Pour into lined cupcake liners and bake in preheated oven for 12-18 minutes until golden brown and done.


Carrot Cake Cupcakes
1 box carrot cake mix (dry package contents only)
4 room temperature eggs
3/4 cup buttermilk
1/3 cup canola oil
1/2 cup crushed pineapple, drained

Preheat oven to 350 dregees. Combine all the above ingredients in a bowl, mix with a mixer (hand held or stand mixer) for 2 minutes. Pour into lined cupcake liners and bake in preheated oven for 12-18 minutes until golden brown and done.


Pumpkin Butter Cupcakes
1 box cake mix (dry package contents only)
4 room temperature eggs
3/4 cup buttermilk
1/3 cup canola oil
1/2 cup pumpkin pie filling (or pumpkin butter)

Preheat oven to 350 dregees. Combine all the above ingredients in a bowl, mix with a mixer (hand held or stand mixer) for 2 minutes. Pour into lined cupcake liners and bake in preheated oven for 12-18 minutes until golden brown and done.


Chocolate Banana Cupcakes
1 box cake mix (dry package contents only)
4 room temperature eggs
3/4 cup buttermilk
1/3 cup canola oil
1/2 cup mashed ripe banana

Preheat oven to 350 dregees. Combine all the above ingredients in a bowl, mix with a mixer (hand held or stand mixer) for 2 minutes. Pour into lined cupcake liners and bake in preheated oven for 12-18 minutes until golden brown and done.


Cream Cheese Frosting
2 (8 ounce) packages cream cheese,softened
1/2 cup butter, softened
2 cups sifted confectioners' sugar
1 teaspoon vanilla extract
In a medium bowl, cream together the cream cheese and butter until creamy. Mix in the vanilla, then gradually stir in the confectioners' sugar. Store in the refrigerator after use.  
Vanilla Bean Buttercream Frosting
10 tablespoons unsalted butter, softened
1/2 vanilla bean, halved lengthwise
1 1/4 cups confectioners’ sugar (10 ounces)
Pinch salt
1/2 teaspoon vanilla extract
1 tablespoon heavy cream

In a standing mixer fitted with the whisk attachment, beat the butter at medium-high speed until smooth, about 20 seconds. Using a paring knife, scrape seeds from vanilla bean into butter and beat mixture at medium-high speed to combine, about 15 seconds.

Add confectioners’ sugar and salt; beat at medium-low speed until most of the sugar is moistened, about 1 minute. Scrape down the bowl and beat at medium speed until mixture is fully incorporated, about 30 seconds; scrape bowl, add vanilla and heavy cream, and beat at medium speed until incorporated, about 20 seconds, then increase speed to medium-high and beat until light and fluffy, about 4 minutes, scraping down bowl once or twice.


Chocolate Buttercream Frosting
10 tablespoons unsalted butter, softened
1 cup confectioners’ sugar 
Pinch salt
1/2 teaspoon vanilla extract
4 ounces bittersweet chocolate chips, melted and cooled

In standing mixer fitted with whisk attachment, beat butter at medium-high speed until smooth, about 20 seconds. Add confectioners' sugar and salt; beat at medium-low speed until most of the sugar is moistened, about 45 seconds. Scrape down bowl and beat at medium speed until mixture is fully combined, about 15 seconds; scrape bowl, add vanilla and beat at medium speed until incorporated, about 10 seconds, then reduce speed to low and gradually beat in chocolate. Increase speed to medium-high and beat until light and fluffy, about 4 minutes, scraping down bowl once or twice.


Peanut Butter Buttercream Frosting
8 tablespoons unsalted butter, softened
1/2 cup creamy peanut butter
3/4 cups confectioners’ sugar (10 ounces)
Pinch salt
1/2 teaspoon vanilla extract
1 tablespoon heavy cream

In standing mixer fitted with whisk attachment, beat butter and peanut butter at medium-high speed until smooth, about 20 seconds. Add confectioners' sugar and salt; beat at medium-low speed until most of the sugar is moistened, about 45 seconds. Scrape down bowl and beat at medium speed until mixture is fully combined, about 15 seconds; scrape bowl, add vanilla and heavy cream, and beat at medium speed until incorporated, about 10 seconds, then increase speed to medium-high and beat until light and fluffy, about 4 minutes, scraping down bowl once or twice.

Labels

أحدث المواضيع

 
Support : Creating Website | Johny Template | Mas Template
Copyright © 2013. Entries General - All Rights Reserved
Template Created by Creating Website Published by Mas Template
Proudly powered by Blogger