Recent Movies

Black Bean & Corn Salad

It's time for a remake! Since I've started blogging back in January 2007, I've tried to feature a different recipe every time I post. With so many recipes out there I'd love to try, it wasn't hard to make a new dish everyday. However, I do have some standby recipes I enjoy making often. One such recipe is this Black Bean & Corn Salad. I recently made this for a Latin inspired dinner for family that's currently visiting from out of town. As always, it never fails and is a great side dish especially with Mexican and Latin inspired recipes...

I originally featured this recipe on May 27, 2007, where this salad was enjoyed during a picnic party. Since then, this recipe has found its place on many menus I've prepared. It's a great combination of fresh vegetables, canned black beans and a tasty vinaigrette with a slight kick of heat. Aside from being a salad, you could even pass this off as a salsa if everything is diced up finely and slightly mashed. I also prefer making this in advance so the salad has a chance to absorb the vinaigrette flavors. However you prefer to enjoy it, it's a refreshing side dish that's a favorite at our house. Feel free to adjust the amounts of each to your tastes.

Black Bean & Corn Salad

recipe adapted from AllRecipes

1/3 cup fresh lime juice
1/2 cup olive oil
2 cloves garlic, minced
1 teaspoon salt
1/8 teaspoon ground cayenne pepper
1 (15 ounce) cans black beans, rinsed and drained
1 (15 ounce) can sweet corn kernels
2 avocados; peeled, pitted and diced
1 red bell pepper, diced
2 tomatoes, seeded and diced
6 green onions, thinly sliced
1/2 cup chopped fresh cilantro

Place lime juice, olive oil, garlic, salt, and cayenne pepper in a small jar. Cover with lid, and shake until ingredients are well mixed.

In a salad bowl, combine beans, corn, avocado, bell pepper, tomatoes, green onions, and cilantro. Shake lime dressing, and pour it over the salad. Stir salad to coat vegetables and beans with dressing, and serve.

Picture from May 27, 2007
(interesting difference in my photo skills over the years!)

French Vanilla Cake with Raspberry Filling

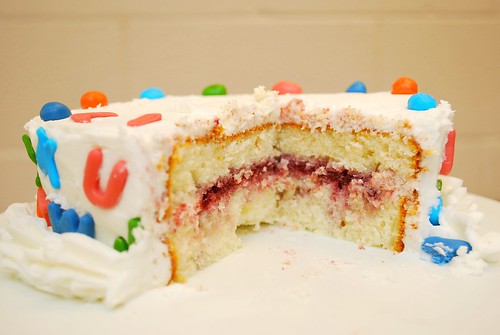
It's been a really hectic past couple of days in my kitchen, hence the lack of recipe posts lately. However I will be posting an explosion of recipes within the next couple of days, if not weeks to make up for it! For one, my sister and her family are driving in from Virginia and staying the week, so I've got some great meals planned during their visit. But before that, I've been working on a special baby shower cake for my friends Suzanne and Josh. They're expecting their first child, a baby girl, which they'll name Lily Grace. Suzanne and Josh had a baby shower today and I made their shower cake for the celebration. I was left to decide what flavor to make and chose a French Vanilla Cake with Raspberry Filling. It was a three tiered cake that was a hit with her friends and family that attended the shower, with enough leftover to share with their grandmother who couldn't attend...

In deciding on a cake flavor to make, I wanted to do something that everyone would enjoy. That being said, vanilla is a popular choice. To kick it up a notch, I made a French Vanilla cake which I thought had more flavor that the usual vanilla, white or yellow cake. The cake had a tender crumb that was perfect - not too dry, not too moist... just right. For the filling, I took a hint from Suzanne when she mentioned Josh was a fan of raspberries. I made a raspberry filling that was delicious and allowed me to take advantage of the fresh raspberries in season too. The cake was covered with a traditional buttercream frosting. For the decor, I used their shower invitation as inspiration and mimicked the alphabet theme onto the cake. The alphabet letters were made by making a homemade marshmallow fondant and using small alphabet cookie cutters especially made to use with fondant. I colored the fondant with color gels to get the right color to go with the invitation and cake toppers. The cake toppers were the only inedible part of the cake and were chosen by Josh. This cake definitely was a hit at the party and compliments were given all around. If you're looking for a show stopper cake, this is one I'd definitely recommend.


French Vanilla Cake with Raspberry Filling
cake recipe from Vanilla Garlic

Cake:
1 cup (2 sticks) unsalted butter, room temperature
2 cups of sugar or vanilla sugar
1 large egg, room temperature
2 egg yolks, room temperature
3 cups all-purpose flour
1 teaspoon baking powder
1 teaspoon of baking soda
pinch of salt
1/2 cup milk
1/2 cup of cream
2 teaspoons of vanilla extract
1 vanilla bean


Preheat oven to 350 degrees. Prepare your cake pans by greasing & flouring them; set aside.

In the bowl of a stand mixer, beat the butter on high until soft for 30 seconds then add sugar. Beat on medium-high until light and fluffy. Continue to add eggs and egg yolks one at a time, beating for 30 seconds between each.

In a separate bowl, whisk together flour, baking powder, salt and baking soda.

Measure out milk, cream and vanilla extract in 2 cup measuring cup. Cut open the vanilla bean and scrape out the seeds and add them to the milk mixture.

Add the flour mixture to the stand mixer bowl, then the milk mixture; alternating between the two and ending with the flour. Mix throughly.

Pour the batter into your prepared pans and divide evenly between the 2. Bake in the preheated oven for 20-25 minutes or until a toothpick comes out clean.

Raspberry Filling
recipe from Good Things Catered

2 pint containers of fresh raspberries (or frozen fresh)
1 3/4 cup water, divided
1 1/2 cup granulated sugar
2 tablespoons fresh lemon juice
1 teaspoon vanilla extract
6 tablespoons cornstarch


In a small bowl, place 1/2 cup of fresh raspberries and set aside (if using frozen berries, skip this step).

In a large saucepan, place the remaining raspberries along with 1 1/4 cup of water, sugar and lemon juice. Bring it to a boil and allow to cook, stirring the berries occasionally. They'll eventually break down in about 10-15 minutes. Remove from heat and strain the berry mixture through a fine mesh strainer to remove the seeds. Place the mixture back into the saucepan over medium low heat.

In a small bowl, prepare a slurry by combining the remaining 1/2 cup of water and the vanilla with the cornstarch. Pour this slurry into the saucepan with the strained raspberry mixture. Mix well over medium low heat until it starts to thicken. Remove from heat and set aside to cool completely.


Vanilla Buttercream Frosting
recipe from Gale Gand

3 cups confectioners' sugar
1 cup butter
1 teaspoon vanilla extract
1 to 2 tablespoons whipping cream
In a standing mixer fitted with a whisk, mix together sugar and butter. Mix on low speed until well blended and then increase speed to medium and beat for another 3 minutes.

Add vanilla and cream and continue to beat on medium speed for 1 minute more, adding more cream if needed for spreading consistency.

To assemble:
Split each cake in half crosswise. Place a dollop of buttercream frosting on the center of your serving platter and top with one cake half. (This keeps the cake in place and prevents it from sliding.) Pipe buttercream frosting on the edge of the cake. Fill the center of the cake with the raspberry filling and then top with the other cake half. Frost the entire cake lightly for the 'crumb coat' which seals everything in. It doesn't have to be perfect and crumbs are completely fine, as the cake will be frosting a second time for a final finish. After the crumb coat, frost again liberally as desired. Repeat with the other cake. Decorate the cake as you wish.


Rhonda's Ultimate Marshmallow Fondant
recipe from Cake Central

15 oz. mini marshmallows
2 tablespoons water
1/2 teaspoon salt
2 teaspoons lemon juice (fresh or bottled)
2 teaspoons light corn syrup (helps w/ pliability)
1 teaspoon vanilla extract
1/2 teaspoons lemon extract
2 lbs (approx 7 cups) confectioner’s sugar, sifted
1/2 cup Crisco or vegetable shortening

Grease microwave proof bowl w/ Crisco. Also grease wooden or heat proof spoon. Pour marshmallows and water into bowl. Microwave for approximately 2 minutes stopping and stirring at 40 second intervals. Mixture should be soupy.

Take out of microwave and immediately add corn syrup, lemon juice, salt and extracts. Stir well. Sift confectioner’s sugar into mixture, one cup at a time. After approximately 5 cups, grease your hands well with Crisco and knead the mixture in the bowl. Add the sixth cup and continue to knead. Now grease your work surface well and turn mixture out of bowl onto counter. Sift remaining sugar, regrease hands, and knead well. If mixture seems soft, add one additional cup of powdered sugar.

Shape into a mound and put a coating of crisco on outside. Double wrap in cling wrap and insert into ziplock bag. Press air out of bag and seal. Allow to rest overnight, but, can be used after sitting for a few hours.


And the Taste of the Nation Chicago winners are...

Thank you to all the local Chicagoland folks that participated in the Share our Strength: Taste of the Nation Chicago giveaway! Two lucky winners have been randomly selected based on the number of their comment, in response to what one of their favorite restaurants is in Chicago. Find out who won and what culinary adventures are planned for What's Cookin, Chicago in August...

It's been several months since I've been really active hosting events for our culinary group, What's Cookin, Chicago. I took a slight hiatus to focus on my rather challenging pregnancy but now that my little one is just about 3 months old (seriously, where did the time go?!), I'm ready to jump back into the kitchen and take on more culinary adventures in the city with friends! If you're in the Chicago area, take a look at our cooking/baking event calendar and our wine event calendar for August to see 'What's Cookin' and come join us in the kitchen. Some events we'll be hosting include...
Now for our winners! The winners will be indulging in this culinary experience featuring 50 of Chicago’s best chefs and restaurants in a celebration of street food. We'll savor delicious craft beers from Stella Artois and Chicago’s own Goose Island, along with many other brews and wines, and specialty cocktails created by 25 of Chicago’s best mixologists. There's even a decadent Dessert Lounge planned for us to indulge in! We'll be enjoying all the sweets, savories and drinks provided as well as enjoy street-themed entertainment from a variety of Chicago’s most cutting edge artists and performers.

The winners from our blog and our Facebook page were chosen based on the number of their comment. Winners will be contacted via email/Facebook with details regarding their ticket to the Share our Strength: Taste of the Nation Chicago event coming up on August 12, 2010. Congratulations again!

Winner from our blog/website: Jen M


Winner from our Facebook page: Danielle Davis

Southwestern Chicken Stuffed Shells

Leftovers... you either love them or hate them! In our house, we like them and afford throwing away food as much as possible. So when we have a mish mosh of ingredients leftover, one way I like using them up is to come up with a filling of some sort. In this case, I had a few ingredients left over from a Tex Mex dinner I prepared. Looking what I had to work with, I made these Southwestern Chicken Stuffed Shells which turned out delicious!...

These jumbo pasta shells are filled with a mixture of chicken, Monterey Jack cheese, cilantro, diced jalapeno, taco seasoning, corn, black beans, and cream cheese. Once the shells were filled, I topped them with salsa with more shredded cheese and baked them in a preheated oven. Just before serving, I sprinkled some fresh cilantro and served them with sour cream and guacamole. Feel free to tweak this to your tastes and what ingredients you have on hand. Hopefully before you throw out that food, you can use it to create a filling and fill away!

Southwestern Chicken Stuffed Shells
original Joelen recipe


1 box jumbo pasta shells, cooked
2 cups shredded cooked chicken or 1 rotisserie chicken (fully cooked)
1 cup shredded Monterey Jack cheese
1/2 cup chopped cilantro + more for garnish
1 small jalapeno, seeded and diced
1 tablespoon taco seasoning (store bought or homemade)
1/2 cup sweet corn kernels (canned)
1/2 cup black beans (rinsed and drained)
8oz cream cheese
1 cup salsa (jarred/storebought or homemade)
Guacamole or slices of avocado for serving
Sour cream for serving


Cook pasta shells as directed, drain and set aside.

In the meantime, debone the rotisserie chicken and place the meat in a large bowl. After you've deboned the chicken of all meat, discard the bones and shred the chicken meat with 2 forks or your fingers. Add to the chicken  the 1/2 shredded cheese, chopped cilantro, diced jalapeno, taco seasoning, corn, black beans, and cream cheese. Toss to cmbine; set aside.

In a 13 x 9 baking pan, lightly grease with cooking spray. Fill cooked pasta shells with filling & place in greased pan. Continue to fill all pasta shells using the filling. Once baking pan is full, pour the salsa over the top of the filled shells. Sprinkle with shredded monterey jack cheese and bake at 350 for 45 - 60 minutes.

Garnish with more chopped cilantro and serve with sour cream and slices of ripe avocado (or guacamole).

Ginger Pork Spring Rolls

Vietnamese cuisine is full of refreshing flavor and perfect for hot summer days. It's been awhile since I've had some really good Vietnamese fare (oh, how I miss living in the city!) but the cuisine really isn't too difficult to make at home. One of my favorite Vietnamese appetizers is the fresh spring rolls, also known as Goi Cuon. Traditionally, they're made with a combination of shrimp, pork and vermicelli noodles. For an easier twist on the traditional recipe, I made these Ginger Pork Spring Rolls. Although not quite authentic, it's a great substitute...

A common complaint I hear from friends who want to cook Asian cuisine at home is that some key ingredients are sometimes difficult to find. For this recipe, the 'specialty ingredients' needed include hoisin sauce, Asian chili garlic sauce and rice paper wrappers. Hoisin sauce is becoming more of a common ingredient in most national grocery store chains. The Asian chili garlic sauce is an optional ingredient. If you do prefer to use it, you can use as much or as little as you'd like, depending on how much heat you want in the dish. Lastly, the rice papper wrappers is what makes this dish a tasty little package. If you can't find this item in your local grocery store, you can substitute it with wonton wrappers and fry the spring roll. Or, omit the wrapper altogether and enjoy it as a salad as is; as a lettuce wrap/cup filling; toss with cooked white or brown rice as a side dish; or use the filling inside tacos or burritos.

Regardless of how you decide to enjoy the filling, take note of how flavorful the pork is with the bits of ginger, cilantro and scallions mixed in. I especially like the use of a coleslaw mix - it saves time and really adds a great, fresh texture!


Ginger Pork Spring Rolls
recipe adapted from America's Test Kitchen

1/4 cup hoisin sauce
1/4 cup soy sauce
2 tablespoons Asian chili-garlic sauce (or to taste; optional)
1/4 cup water
1 (16oz) bag coleslaw mix
1/2 cup chopped fresh cilantro
6 scallions/green onions, white parts minced; green parts sliced thin
1 tablespoon vegetable oil
1 pound ground pork
3 tablespoons freshly grated ginger
12 (9 inch) rice paper wrappers

Combine the hoisin, soy, and chili garlic sauces and water in a small bowl. In another bowl, combine the coleslaw, cilantro and scallion greens; set aside.

Heat oil in a large skillet over medium high heat until just smoking. Add pork and 1/3 cup of the hoisin sauce mixture. (The remaining hoisin sauce will be used as a condiment for dipping.) Cook the pork until no longer pink, about 5 minutes. Stir in the ginger and scallion whites and cook until fragrant. Place this pork mixture into the bowl with the coleslaw, cilantro and scallion greens. Toss to combine.

Spread a clean, damp kitchen towel on the counter. Soak a rice paper wrapper in a shallow bowl of warm water, about 10 seconds, and spread out on towel. Arrange 1/2 cup of filling on each wrapper, leaving a 2 inch border on the bottom. Fold in sides and roll up tightly like a burrito. Repeat with remaining wrappers and filling. Serve with the remaining hoisin sauce mixture for dipping.

I Don't Understand HOW This Could Happen: Autistic Man Dies Horrible, Needless Death in Hot Van

 I don't understand how this could happen.

The Trentonian reports that a 20 year old autistic Middleton, Pennsylvania, man, living in a residential facility was found dead in the back of a hot van. He had attended an outing with three other residents and two counsellors, each counsellor responsible for only 2 residents. How could a person forget and leave one of only two persons in their care in a hot van? The matter is under investigation but what could possibly explain this result?
I just don't understand.

"Police detectives are investigating the tragic death of an autistic 20-year-old client who had returned to the Woods Services residential facility from Sesame Place and was found dead hours later in the back of the Woods’ van.


The New York man had apparently been left inside the van from about noon until 4 p.m. Saturday when a nurse seeking to dispense his medication couldn’t find him, police said.


“The nurse and other personnel initiated a search of all the local buildings with room to room searches until a supervisor started checking the vehicles and found the client deceased in the back of the van that he had been transported to Sesame Place in,” police said in a press release.


“No names are being released at this time due to the sensitive nature of the ongoing investigation and in deference to the family of the deceased.”


Woods Services is a residential facility for people with exceptional needs. Middletown Township Police responded as well as Penndel Middletown Emergency Squad, which confirmed that the client was deceased.


An investigation is under way to determine if there is any criminal liability involved, police said.


The deceased had made the trip to Sesame Place in the morning along with three other clients, accompanied by two residential counselors each being responsible for two clients."

Triple Citrus Cheesecake Bars

Citrus flavors are all the rage during the summer months for it's refreshing flavor. With the raves I received on the recent Key Lime Cheesecake Bars I made recently, I decided to make them again with a slight twist. I used a combination of lemon, lime and orange to make these Triple Citrus Cheesecake Bars. It's one of the best ways to highlight summer's citrus fruits!

These were fantastic and so flavorful! I prepared the same recipe for Key Lime Cheesecake Bars where I made the substitution of changing out the lime juice and zest for a combination of lemon, lime and orange juices and zest. It certainly had more zest than the key lime version but it worked well, if not better. The flavors were much more pronounced, which is exactly what I was looking for. Another change I made to the original recipe was using crushed animal crackers in place of the graham cracker crumbs. I took the tip of using animal crackers from Cooks Illustrated's recipe for Key Lime Bars. It makes for a great crust that's sturdy and handles the bright notes of the three types of citrus zest.

* Note: For the citrus juice called for in this recipe, squeeze the juices of 1 lime, 1 lemon and 1 small orange all into one small bowl. Whisk the juices together to combine. Measure out 3 tablespoons of this juice for this recipe.

Triple Citrus Cheesecake Bars
recipe adapted Taste & See

Crust:
2 cups graham cracker crumbs
1 stick butter, melted
2 Tablespoons sugar
zest of 1 lime
zest of 1 lemon
zest of 1 small orange

1 teaspoon vanilla extract

Cheesecake:
3 sticks of cream cheese, 8 oz each, room temperature
zest of 1 lime
zest of 1 lemon
zest of 1 small orange 1 cup sugar
3 large eggs
1 cup heavy cream
3 Tablespoons citrus juice *see note above


Preheat oven to 350. Begin to boil a large pot of water for the water bath.

Mix together the crust ingredients and press into your preferred pan. You can press the crust just into the bottom, or up the sides of the pan too - baker's choice. Set crust aside.

Combine sugar and lime zest and mix with the cream cheese in the bowl of a stand-mixer (or in a large bowl if using a hand-mixer) and cream together until smooth. Add eggs, one at a time, fully incorporating each before adding the next. Make sure to scrape down the bowl in between each egg. Add heavy cream and citrus juices and blend until smooth and creamy.

Pour batter into prepared crust and tap the pan on the counter a few times to bring all air bubbles to the surface. Place pan into a larger pan and pour boiling water into the larger pan until halfway up the side of the cheesecake pan.

Bake 45 to 55 minutes, until it is almost done - this can be hard to judge, but you're looking for the cake to hold together, but still have a lot of jiggle to it in the center. You don't want it to be completely firm at this stage. Close the oven door, turn the heat off, and let rest in the cooling oven for one hour. This lets the cake finish cooking and cool down gently enough so that it won't crack on the top. After one hour, remove cheesecake from oven and lift carefully out of water bath. Let it finish cooling on the counter, and then cover and put in the fridge to chill. Once fully chilled, it is ready to serve.

To garnish, top with slices of fresh lime,lemon and/or orange. Whipped cream would be wonderful too!

Texas Autism Filicide: A Mother of an Autistic Child Provides Perspective and Sound Advice

It is very difficult to read each and every news account of filicide, the killing of a child by his or her parents.  Sometimes the killings flow from bitter, nasty domestic relationships.  In some, perhaps most, the parents involved had mental health issues.  Each instance has to be examined on its own set of facts and, given the nature of the act,  by the appropriate legal and mental health authorities.  We should all be extremely careful not to make sweeping generalizations based on the personal characteristics of the individuals involved in a particular case. 

This week there are news reports of a Pakistani-American woman in Texas who strangled her two autistic children and , as reported by the Dallas Morning News, informed 911 operators that she did so because they had autism and she wanted normal children.  In the internet world of autism discussions such a  tragic event  feeds into many issues, and much hostility,  on all sides of the various autism perspectives.  There is also a danger that the tragedy could feed into feelings of hostility held by some people towards people of Muslim faith since September 11 2001 although most news reports I have read of it, including the DMN article just  referenced, do not mention the mother's religion.

I found it very  helpful  to read the wise comments on this tragedy by  the Muslim mother of an autistic child on the blog site My Autistic Muslim Child in a post called Support and Responsibilities in which the author references the accused mother's Muslim religion and asks people not to characterize Islam  based on one person's actions, urges us to consider the mental health challenges of the mother who killed her children, without making excuses for her actions,  and points out the need for autism support systems,

I recommend this article by the author of My Autistic Muslim Child for its balance, sensitivity and wisdom and because it is written by some one who is also both a Muslim and the mother of an autistic child.   It is difficult to quote from this article without quoting the entire article so I ask you to read it  for yourself.  I will quote the two concluding paragraphs where the author talks about the need to get at the root of the problem:

"We have a serious problem in our society, and people of all religions and ideologies must work together to stop the violence against children with autism or other disabilities. We need to educate our communities about this issue, and make them understand that such crimes cannot be justified by any religious teachings.

Also, we must create a support system for our communities, so if they do not receive any support from their families (which is the case a lot of times too for different reasons), then they have an outlet to which to go and acquire the much needed help from others. Our religious facilities must have an adequate and functional social service program to help the needy. The finger-pointing must stop, and we need to admit this problem is OUR problem, not just isolated, random incidents. Once we reach this understanding, we have a good chance to work together as a society and get to the root of the problem so as to prevent a tragedy like this to happen again."

Toronto…the finale

So I told you I had fun when I was away right?  But unless you follow me on Twitter or on Facebook (Judy Chiappini) you may not know what exactly I was up to…

It was a friend of mine’s birthday and he invited me to a party at his house…

We had some dips (roasted red pepper and egg plant)…
DSC_0440

Some marinated and grilled shrimp…
DSC_0489
Grilled Octopus…
DSC_0496
Salads…
DSC_0498
Bulgar salad (Paula) (Photo courtesy of Paula @ Dragon’s Kitchen)

Potato Salad (Paula) (Photo courtesy of Paula @ Dragon’s Kitchen)

Grilled Pork Belly…
DSC_0504
DSC_0525
Homemade Chicken Gyro’s…
DSC_0435

with homemade tzatziki, tomatoes, and onions…DSC_0508

And then came the cake…
DSC_0533

DSC_0545

You see how lucky I am???  Have you guessed who’s birthday it was yet?

Peter @ Kalofagas had a birthday!!!
DSC_0518

and I got to meet Paula @ The Dragon’s Kitchen
DSC_0514
And Jasmine @ Confessions of a Cardamom Addict
Jasmine 
photo courtesy of Paula @ Dragon’s Kitchen

Can you believe how lucky I was to be invited to this Greek feast?  Peter single handedly prepared and served us all night long.  Paula did make the birthday cake and it is by far one of my all time faves…Lemon Meringue Cake!

We were able to meet up with Paula and Peter once again but just for a quick bite to eat after we went to the Science Center to see Harry Potter The Exhibition!  Still a little bit of time with 2 of my favorite bloggers and friends is better than no time at all…

DSC_0297 photo courtesy of Paula @ Dragon’s Kitchen

Loved meeting Paula (xoxoxo) and Jasmine and seeing Peter again!!!  Thank you for making this a memorable trip for me and can’t wait to do it all again next year…lamb on a spit right????

signature

Καινούργια οπτική γωνία


Καινούργια οπτική γωνία
ΕΥΓΕΝΙΑ ΗΛΙΟΠΟΥΛΟΥ
Ένα ηλίθιο ατύχημα με καθήλωσε για αρκετές ημέρες σε θέση προσωρινής αναπηρίας. Διάστρεμμα δεξιάς ποδο-κνημικής .Το πόδι ακινητοποιήθηκε με γύψινους επιδέσμους και απαιτούνται 10 ημέρες ανάρρωσης και ξεκούρασης για να τελειώσουν όλα καλά. Εκτός από το ότι μουντζώνω τον εαυτό μου για τον τρόπο που τραυματίστηκα δεν μπορώ να μην παρατηρήσω πόσο πολύ άλλαξε η ζωή μου μετά από το συμβάν. Πόσο άλλαξε κυρίως η οπτική γωνία για πάρα πολλές δραστηριότητες εντός και εκτός του σπιτιού μου. Πόσο διογκώθηκαν και πήρανε τρομακτικές διαστάσεις κάποιες απλές κινήσεις όπως η περιποίηση του σώματός μου η το πότισμα των φυτών μου. Που να το φανταστώ ότι θα λαχταρούσα ένα μπάνιο αλλά δεν μπορώ να το κάνω παρά αν θα κόψω το πόδι και θα του κάνω συγκόλληση μετά. Η μετάβαση μου από ένα δωμάτιο στο άλλο θα συνοδεύονταν από αφόρητους πόνους και ότι η ανεύρεση μία θέσης ξεκούρασης ,στο κρεβάτι, θα ήταν τόσο δύσκολη.
Η ιεράρχηση των πράξεων μου άλλαξε επίσης. Τι μπορώ να κάνω εντός της οικίας μου ;Πόσο δύσκολη έως και απορριπτέα θα ήταν μία βόλτα στους δρόμου; Οι πατερίτσες κατάντησαν μοναδική στήριξη και το καρεκλάκι με ρόδες ,που χρησιμοποιούσα στο υπολογιστή, αποτελεί, μόνιμα, το καλύτερο μέσο μεταφοράς εντός του σπιτιού. Τεράστια τα πράγματα και οι καταστάσεις, που θεωρείς αυτονόητες, θέλουν εξυπνάδα για την επίλυση τους. Οι νύχτες μου κατάντησαν εφιαλτικές λόγω δυσκολίας ανεύρεσης μίας υποφερτής θέσης του ποδιού. Άλλο να σηκώνεις ψηλά τα πόδια σου για μερικά λεπτά και άλλο να τα έχεις για ώρες! Η λήψη αντιφλεγμονωδών και παυσίπονων χαπιών επίσης δεν μου αρέσει επειδή ως χειρουργός και άνθρωπος δεν συνιστώ και ούτε παίρνω φάρμακα. Αυτό που με ενόχλησε περισσότερα από όλα ήταν ότι καθηλώθηκα ,προσωρινά, σε μία καρέκλα και βιώνω αυτά που βιώνουν οι ασθενείς μου. Φυσικά ακυρώθηκαν τα χειρουργεία που είχα προγραμματίσει, και ειδοποιήθηκαν οι ασθενείς .Τις εφημερίες θα τις αναλάβουν οι συνάδελφοι και μελλοντικά θα κάνω διπλάσιες για να ρεφάρω απέναντι τους.
Διάφορα πράγματα μέσα στο σπίτι άλλαξαν συμπεριφορά και στάση. Οι πόρτες στένεψαν και δύσκολα περνάω με το καινούργιο μου μεταφορικό μέσο. Μερικές οικιακές συσκευές επαναστάτησαν. Η τεχνολογία επίσης. Το conexx-router τα έφτυσε. Σαν να μην ήθελε να κάθομαι στο κρεβάτι μου και από εκεί να στέλνω τα αρθράκια μου. Μου θύμωσαν ή είχαν απωθημένα; Τα μικροαντικείμενα που πιάνω στα χέρια μου πέφτουν πολύ πιο εύκολα και η ανεύρεση τους καταντάει ηρωική πράξη αφού στηρίζομαι μόνο σε νε πόδι για να τα ψάξω. Οι δύο ζυγαριές συνεννοήθηκαν και κάνουν απεργία. Χωρίς να έχουν ΄΄τραυματιστεί΄΄ καθηλώθηκαν στο μηδέν και είναι άχρηστες. Έτσι μου στερούνε την ελπίδα ότι αδυνάτησα. Δεν μπορώ να καταλάβω αν έχασα κιλά μετά από την γυμναστική με τις πατερίτσες και το βάσανο με τα πηδηματάκια από την κρεβατοκάμαρα στην τουαλέτα. Η μεγαλύτερη αποκάλυψη ήταν φυσικά ότι αν ήμουνα πιο αδύνατη δεν θα ήταν τόσο δύσκολες οι μετακινήσεις μου. Για τι να έχω 87 κιλά και να μην είμαι κινέζα κοντή και αδύνατη;
Αυτό όμως που δεν άλλαξε καθόλου ήταν η συμπεριφορά των φίλων. Τα τηλεφωνήματα για συμπαράστασης και μήπως χρειάζομαι κάτι με συγκίνησαν πάρα πολύ. Η αγάπη και η στοργή τους είναι αναλλοίωτη .ʼΉρθαν και με πήρανε σηκωτή για να βρεθούμε το Σαββατόβραδο. Με πήραν και με πήγανε με το αυτοκίνητο. Τα αστεία τους και η παρηγοριά που μου πρόσφεραν ήταν το καλύτερο φάρμακο στους πόνους μου. Τώρα μετράω ημέρες για να γυρίσω κοντά στους ασθενείς μου. Να τους μεταφέρω την εμπειρία μου. Να τους δείξω μεγαλύτερη ευαισθησία επειδή η καινούργια οπτική γωνία με έβαλε για λίγο στον ρόλο του ασθενούς. Τώρα τους καταλαβαίνω καλύτερα και τους πονάω περισσότερα!

Best Ever Beef Dip Sandwiches

Number of hours cooking - 12 hours. Number of ingredients needed - 6 common ingredients. Number of pots/pans to cook in and clean - 1 slow cooker. Having an amazingly delicious dish on a sweltering summer day with little effort ... priceless. With the crazy heat these days I figured I'd use my slow cooker to make a meal and made these Best Ever Beef Dip Sandwiches. They certainly lived up to the name and who knew such a super easy recipe would result in something this good?!

I've been trying to find ways to keep cool while preparing meals during this summer. What's really helped is using my slow cooker/crockpot since it doesn't heat up the kitchen and cooking in it is pretty effortless. When I came across this recipe for 'Best Ever Beef Dip' and noticed how many raves it received, I figured I'd give it a try. I'm so glad I did because it really was tasty dish and made for great sandwiches!

Simply take a beef chuck roast, some garlic, dried rosemary, bay leaves, soy sauce and water and place it in a crockpot. Let it cook on low for 6-8 hours or even longer. In fact, the longer, the better! The result is a super flavorful, extremely moist and juicy beef roast that falls apart. I shredded the beef (which took no effort at all) and placed it in between a toasted hamburger bun, then topped it with slices of provolone cheese. The au jus that develops is just as amazing and makes for a great thing to dip your sandwich into. It was one of the best sandwiches I've had in awhile and I'll definitely plan on making this again soon. This can also be made as a freezer meal!


Best Ever Beef Dip Sandwiches
recipe from AllRecipes

4 pounds beef chuck roast
1 tablespoon minced garlic
1 tablespoon dried rosemary
3 bay leaves
1 cup soy sauce
6 cups water
Place roast in slow cooker. Season with garlic, rosemary, and bay leaves. Pour in soy sauce and water. Cook on low setting for 6 to 10 hours. Unlike most roasts, the longer the better. 

To serve, place in hamburger buns or split french bread and top with your preferred cheese if desired. Feel free to dip your sandwich in the au jus left in the slow cooker too!

* To make ahead/freezer meal
- Place all the ingredients except the water into a gallon sized freezer storage bag; seal and freeze. When ready to prepare, defrost completely. Place contents into your slow cooker and add 6 cups of water.
Cook on low setting for 6 to 10 hours. Unlike most roasts, the longer the better.

Rowing to Italy - A New Autism Blog You Should Follow

Blogs, including autism blogs, come and go. There are many out there.  I am very pleased to give a shout out for Rowing to Italy a new autism blog by a personal friend, Charlotte Robinson-Rocca. 

Charlotte is a dedicated mother and an autism therapist who  has been a major player in New Brunswick autism advocacy over the past decade. In addition to providing autism interventions to her own autistic children,  she has also worked with  other autistic children in New Brunswick.

I am not going to get too specific in my description of Charlotte.  When Charlotte sees a problem to be fixed or a challenge to be addressed she does so and she does it well.  I will guarantee you that  she is a force to be reckoned with. Many fellow  parent autism advocates and some current and former New Brunswick politicians will smile knowingly at my comment.  

I will also guarantee you that the autism "blogosphere" has just been changed ... for the better.

Cherry Cream Cheese Tart

 I look forward to birthdays... especially those that aren't even mine. My mother in law recently had a birthday and the family got together to celebrate the other night. As a special treat, I made this Cherry Cream Cheese Tart to share. It makes for a beautiful presentation and is a great summer dessert, which is even better if you make your own cherry topping from scratch.

Out of convenience, I didn't have a chance to make a homemade cherry topping so I resorted to the canned stuff. But nonetheless the tart was really good! The crust is made with a mixture of flour, confectioners sugar, butter and an egg yolk. As for the filling, it's a straightforward combination of cream cheese, sugar, eggs, cream and some citrus zest for extra brightness. Overall, its a great cream cheese tart recipe that can be topped with your preferred topping. In this case, I used cherry pie filling but any berry topping or even chocolate, caramel and nuts would be fantastic!


Cherry Cream Cheese Tart
recipe adapted from King Arthur Flour

Crust:

1 1/4 cups all purpose flour
1/3 cup confectioners sugar
1/4 teaspoon salt
6 tablespoons soft butter
1 large egg yolk

Filling:

8-ounce package cream cheese, at room temperature
1/2 cup granulated sugar
2 large eggs
1/2 cup cream or half & half
rind of 1 medium orange or lemon, optional

Topping:
1 can cherry pie filling (or you can make it from scratch)


To make the crust: Whisk together the flour, sugar and salt. Mix in the butter until evenly crumbly. Add the egg yolk, mixing until the mixture holds together when squeezed. Press the dough into a 9 inch tart pan, pushing firmly up the sides. Prick the crust all over with a fork and chill in the freezer, uncovered, for 15 minutes. Preheat the oven to 375 degrees. After the crust has chilled in the freezer, bake the tart crust for 15 to 20 minutes, until the edges are lightly browned. Remove from the oven and set aside.


To make the filling: Mix the softened cream cheese with the sugar until well blended, scraping  the side and bottom of the bowl. Mix in the eggs, one at a time, then add the cream and zest (if using.) Pour the filling into the baked crust. Reduce the oven heat to 350 degrees and bake for 20-25 minutes, until the tart is nearly set. The middle will be slightly jiggly, which is fine. Remove from the oven and cool at room temperature for 1 hour, then chill in the refrigerator for at least 1 hour before serving. Top with canned (or homemade) cherry pie filling. Other fruit toppings can be used as well.

Toronto…

Probably all of you know by now that I am Canadian and come from a city just outside (about 10 minutes) of Toronto.  I wasn’t able to make it up there last year and it hit me really hard so I was determined to make it up there for my Brother-in-Law’s and sister’s birthday this year…

We hung out with dogs and family…
DSC_0237

DSC_0274

DSC_0323

DSC_0330

DSC_0352

Went to the beach on a very hot and hazy day…DSC_0300

Swam in Marlene’s pool on a very hot and sunny day…
DSC_0264

Played at the Ontario Science Center (see how tall and thin we are?)…
DSC_0278

DSC_0280

DSC_0283

And we ate, oh did we eat…
DSC_0354

DSC_0372

DSC_0376

DSC_0377

DSC_0385

Recipe to come…DSC_0399

Next up is the grand finale!  And what a finale it is…

signature

Labels

أحدث المواضيع

 
Support : Creating Website | Johny Template | Mas Template
Copyright © 2013. Entries General - All Rights Reserved
Template Created by Creating Website Published by Mas Template
Proudly powered by Blogger