
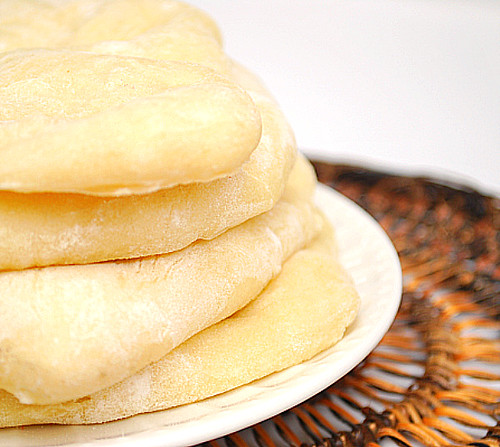
I like to make homemade bread from scratch but tend to do it more during the fall and winter months. However I couldn't hold off on making Homemade Pita Bread any longer. They're the perfect accompaniment to grilled meats like the Chicken Souvlaki I recently made. I'm so glad I made these and they're now going to be a bread I'll have on hand more often!
These were absolutely lovely pillows of softness! The soft, chewy texture of this bread was wonderful. Traditional pita bread will puff up when baked and then slowly deflate as it cools, leaving behind a giant air pocket that pita bread is known for. I will admit I still need to practice a bit with this recipe because the pita didn't puff up as they should. I'm not sure if I over kneaded the dough or what (if you can diagnose why it didn't puff up, I'd appreciate it!)... but I still loved the way they turned out as a flat pita bread.
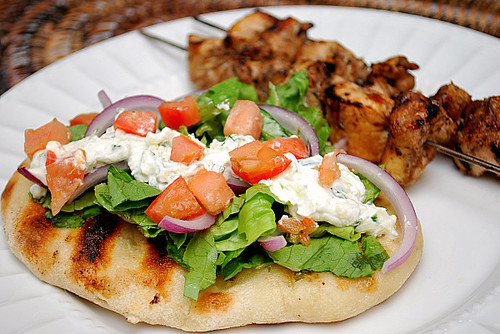
 I took the recipe a bit further by grilling them along with the chicken souvlaki we had for dinner. Grilling the pita bread gave it a nice toasty flavor... and once off the grill, I brushed the pita with garlic butter. Amazing! I could eat grilled pita brushed with garlic butter just as is and be happy! In fact, it reminded me very much of garlic naan I've had at Indian and Pakistani restaurants. I guess you could use the same recipe for both pita and naan... either way, it's delicious!
These were absolutely lovely pillows of softness! The soft, chewy texture of this bread was wonderful. Traditional pita bread will puff up when baked and then slowly deflate as it cools, leaving behind a giant air pocket that pita bread is known for. I will admit I still need to practice a bit with this recipe because the pita didn't puff up as they should. I'm not sure if I over kneaded the dough or what (if you can diagnose why it didn't puff up, I'd appreciate it!)... but I still loved the way they turned out as a flat pita bread.
Homemade Pita Bread
recipe from The Fresh Loaf
3 cups flour
1 1/2 teaspoons salt
1 Tablespoon sugar or honey
1 packet yeast (or, if from bulk, 2 teaspoons yeast)
1 1/4 to 1 1/2 cups water, roughly at room temperature
2 tablespoons olive oil, vegetable oil, butter, or shortening
In the bowl of a stand mixer fitted with the paddle attachment, combine the yeast with the flour, salt, and sugar. (If you are using active dry yeast, follow the instructions on the packet to activate it before combining with the rest of the ingredients.) Add the olive oil and 1 1/4 cup water and stir together with a wooden spoon until you form a ball. Add water if needed to get all the flour mixed into the ball of dough.
Once all of the ingredients form a ball, remove the paddle attachment and replace with the dough hook attachment. Knead the dough at low speed for approximately 10 minutes. After kneading, place the ball of dough in a lightly oiled bowl and roll the dough inside the bowl around to coat. Cover with plastic wrap and set aside to rise until it doubles in size (roughly 1 1/2 hours - 2 hours).
When the doubled in size, punch the dough down to release some of the trapped gases and divide it into 8 pieces. Roll each piece into a ball, cover the balls with a damp kitchen towel, and let them rest for 20 minutes. This step allows the dough to relax so that it'll be easier to shape.
While the dough is resting, preheat the oven to 400 degrees. If you have a baking stone, put it in the oven to preheat as well. If you do not have a baking stone, turn a cookie sheet upside down and place it on the middle rack of the oven while you are preheating the oven. This will be the surface on which you bake your pitas.
After the dough has relaxed for 20 minutes, spread a light coating of flour on a work surface. Set a ball of dough on the floured surface. Flour the top of the dough, as well as your rolling pin or hands. Stretch and flatten the dough with your rolling pin/hands and roll out the dough to a 1/8 - 1/4 inch thickness. If the dough is too touch to stretch, cover it with the damp towel and let it rest 5 to 10 minutes before trying again.
Open the oven and place as many pitas as you can fit on the hot baking surface. Bake in the preheated oven for 3 minutes or up to 5 minutes if you want them slightly crispy.


0 التعليقات:
إرسال تعليق